Phone:
(701)814-6992
Physical address:
6296 Donnelly Plaza
Ratkeville, Bahamas.
Phone:
(701)814-6992
Physical address:
6296 Donnelly Plaza
Ratkeville, Bahamas.
To stretch a welded wire fence, start by installing sturdy, deeply anchored end posts and stout H-brace assemblies to resist pull forces.
Attach stretcher bars securely to the fabric, then use a come-along or ratchet straps to apply steady, even tension, aiming to remove about half the wire’s crimp without over-stressing.
Fasten the tight fabric with galvanized staples, maintaining proper clearance and alignment.
After confirming secure fastening, carefully release tensioning tools. For detailed techniques and tool recommendations, keep exploring further steps.
A strong set of end posts and braces is essential for stretching welded wire fence effectively, as they bear the full tension load during the pull.
You need to select posts made from durable materials like treated wood or heavy-gauge steel, ensuring they’re deeply set—typically at least 2 feet into the ground—to resist leaning or shifting.
Brace assemblies, such as H-braces, must be robust and properly anchored, using cross braces and tension wire to distribute the load evenly.
Weak or insufficient bracing will cause posts to bend, compromising fence integrity and tension.
Before starting, check that your end posts and braces are square and firmly positioned.
This solid framework allows you to apply consistent tension without damaging the fence or posts during stretching.
Using pressure-treated lumber for posts and braces is recommended to resist decay and prolong fence life, enhancing overall durability and stability of the frame design.
Once your end posts and braces are firmly in place to withstand the tension, you’ll need to gather specific tools designed to handle the stretching process efficiently.
Start with stretcher bars to securely grip the welded wire fabric during pulling. Use a come-along or puller chain to apply controlled tension, ensuring you can incrementally tighten without overloading the fence.
Ratchet straps serve as an alternative tensioning method when appropriate. Equip yourself with wire grippers, pliers, and tying tools to fasten the fabric once stretched.
If commercial stretcher bars aren’t available, fabricate bars from sturdy lumber and bolts for a reliable grip. Don’t forget personal protective equipment to guard against wire snaps or sharp edges.
Having these tools at hand will streamline the stretching process and improve the fence’s final stability. Using continuous consumable wire feeding techniques can help maintain consistent tension during the stretching process, reducing interruptions and enhancing control.
Start by placing the fence fabric near the end post. This helps create a solid anchor point.
Next, make sure the line wires are centered and held tightly. This step is crucial before you start stretching the fabric.
Proper placement and alignment are key! They help prevent any uneven tension or sagging when you pull the fabric tight.
Using the correct welding rod and technique ensures strong, durable connections when securing fence components.
Near the end post, you’ll want to carefully lay out and align the welded wire fabric so the line wires center properly and the fence sits straight.
Position the fabric close to the post, ensuring it’s plumb and parallel to the fence line. Unroll the wire smoothly, avoiding twists or kinks that can complicate tensioning.
Use temporary supports or stakes to hold the fabric upright and prevent sagging during setup. If your method includes a pipe or stretcher bar, thread it through the fabric near the post to distribute pulling forces evenly.
Confirm the fabric’s bottom edge maintains consistent clearance from the ground, typically 3.5 to 4 inches, to prevent rust and facilitate maintenance. Proper positioning here sets the foundation for an effective, uniform stretch.
Always wear appropriate personal protective equipment when handling and stretching wire fabric to ensure safety.
Make sure the line wires run precisely centered along the fence fabric before applying tension. This alignment guarantees even force distribution and prevents fabric distortion during stretching.
Lay the fence flat and visually inspect the line wires, adjusting the fabric so the central wires align with the intended fence line. Use temporary supports to hold the fabric upright and stable.
| Step | Action |
|---|---|
| 1. Layout Fabric | Fully unroll and flatten fabric |
| 2. Align Wires | Center line wires on fence line |
| 3. Support Fabric | Use stakes or braces temporarily |
| 4. Inspect Again | Confirm wires remain centered |
Accurate alignment reduces tension issues and improves fence longevity. Adjust before tensioning for best results. Proper force distribution during stretching helps maintain fence integrity and prevents damage.
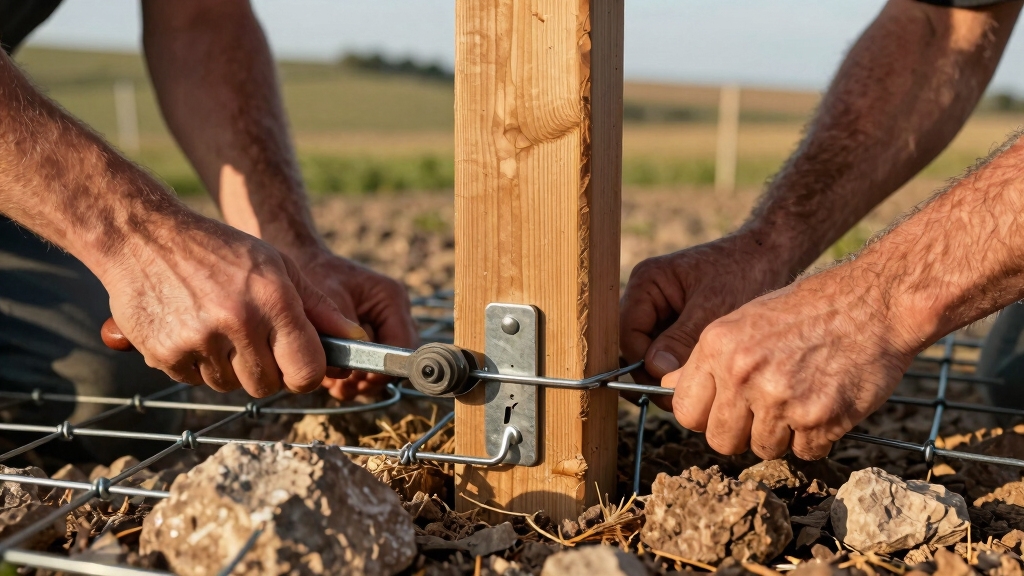
Clamp the stretcher bars firmly onto the fence fabric to guarantee a secure grip during tensioning.
Position the bars at the fence section’s ends or at intervals of 10 to 19 feet, depending on the pull length.
Use heavy-duty clamps or bolts to attach the bars through the wire mesh, ensuring even pressure along the fabric’s width.
This prevents slippage or damage when tension is applied.
Make sure the bars align straight with the fence line to avoid distortion.
If you’re using fabricated stretcher bars, verify that all bolts are tightened securely and that the bars are rigid enough to transfer pulling force uniformly.
Proper attachment here is critical.
It stabilizes the fabric, allowing you to apply tension efficiently without compromising fence integrity.
Before attachment, measure and mark the fabric accurately to ensure proper alignment and minimize uneven edges during stretching, which is a key part of workspace preparation.
Begin by attaching your come-along or ratchet straps securely to the stretcher bars and a solid anchor point, such as a brace post.
Make certain all connections are tight to prevent slippage under tension.
Using the come-along, crank the handle steadily to remove slack from the fence fabric, observing the wire’s alignment as you go.
If you’re using ratchet straps, engage the ratchet mechanism incrementally, applying consistent force to evenly tighten the fence section.
Avoid sudden or excessive pulls that could damage the wire or posts.
Maintain control and monitor the tension progress, ensuring that the fence fabric starts to stand more vertically without deforming.
Always wear protective gloves and eyewear during this step, as tensioned wire can snap or rebound unexpectedly.
For best results, inspect all tension points regularly to prevent misalignment and damage to the fence over time.
Although it’s tempting to pull the fence as tight as possible, you should apply tension gradually and evenly across the entire fabric to prevent distortion or damage.
Use stretcher bars and a come-along or ratchet straps to distribute force uniformly along the wire.
Monitor the fence as you tighten, stopping when the pull becomes noticeably hard, indicating sufficient tension without overstressing.
Aim to remove about half of the original crimp in the line wires, which typically guarantees a taut but flexible fence.
Avoid concentrating force on any single point, as that leads to warping or wire breakage.
Incremental tightening with repeated alignment checks helps maintain the fence’s shape and structural integrity, guaranteeing a professional, durable installation.
To ensure long-term strength, it is important to manage heat input carefully during any welding repairs or attachments on wire fencing materials.
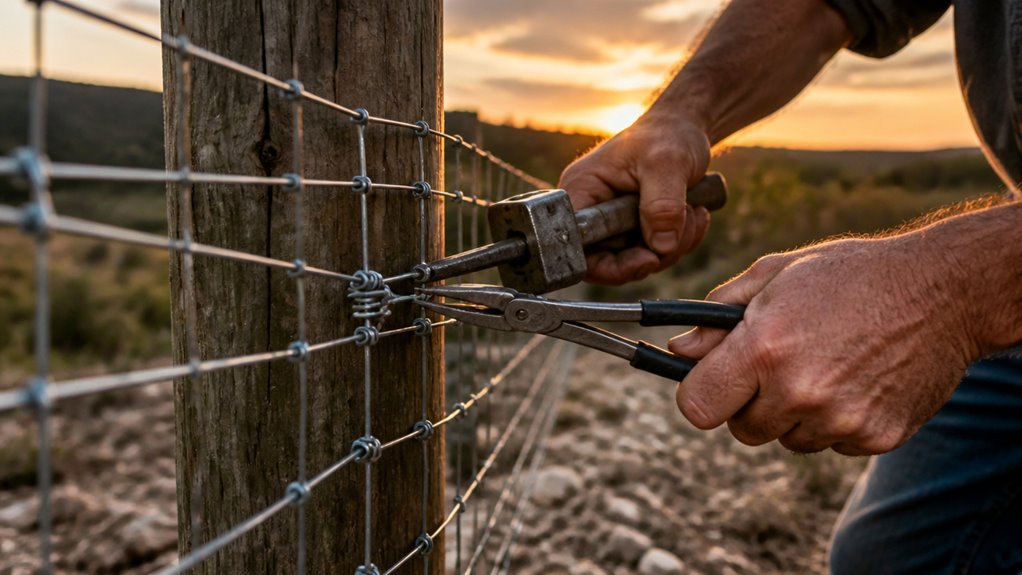
Once the fence is properly tensioned, it’s time to fasten it securely to the line posts. You can use staples, ties, or clips—whatever works best for you—to keep that tension consistent.
Now, don’t forget about the brace assemblies! It’s super important to make sure they’re firmly anchored. This way, they can handle the sustained load without any issues.
By fastening everything properly at these points, you’ll prevent sagging and keep your fence in great shape over time.
It’s all about maintaining that integrity, right? Proper preparation and precise positioning are key to ensuring strong seam formation and long-lasting structural stability.
With the fence fabric properly tensioned, you’ll secure it firmly to the posts and braces to maintain that tension over time.
Begin fastening at the end post, using galvanized staples or heavy-duty fence clips spaced every 12 to 18 inches along line posts.
Make certain each staple is driven flush without crushing the wire to avoid weakening.
Keep the fence tight as you work down the line, checking for slack or bulges.
At brace posts, attach the fabric securely with multiple fasteners to resist the higher forces.
Use pliers or tying tools to cinch any loose ends and trim excess wire neatly.
Once the fence is fastened, remove any temporary tensioning devices.
Then inspect all connections to confirm they hold firm under tension and environmental stresses.
Proper surface preparation and inspection help ensure joint integrity and long-lasting fence performance.
Secure the brace assemblies firmly to withstand the high tension from the stretched welded wire fence.
Begin by ensuring your H-brace assemblies are stout, properly set, and anchored deeply to resist pull forces.
Use heavy-duty bolts or nails to fasten cross braces tightly to posts, eliminating any movement that could reduce fence tension.
Attach the stretched welded wire securely to the brace posts with galvanized staples or wire ties spaced at regular intervals, preventing slippage under load.
Check that the bottom clearance is consistent, around 3.5 to 4 inches, to avoid corrosion and allow ground clearance.
Finally, verify all connections are tight and stable before removing any temporary tensioning tools, ensuring the fence maintains uniform tension and alignment along the entire line.
Before finalizing the fence installation, you should carefully check the clearance between the bottom of the welded wire fabric and the ground, guaranteeing it maintains the recommended 3.5 to 4 inches. This gap helps prevent rust and allows for maintenance access.
Also, inspect the fence alignment to verify it runs straight without bowing or sagging. Adjust tension or reposition posts as needed to achieve uniformity.
To properly check and adjust:
Use a tape measure to confirm consistent clearance along the fence line.
Visually inspect for any sections pulling away from posts or uneven heights.
Apply incremental tension adjustments to correct minor misalignments before final fastening.
Accurate clearance and alignment guarantee long-term fence stability and function.
After you’ve confirmed the fence is properly tensioned and aligned, you can begin removing temporary tensioning devices such as stretcher bars, puller chains, or ratchet straps.
Carefully loosen and detach these tools to avoid sudden releases that could damage the fence or cause injury.
Next, secure the stretched fabric by fastening it firmly to the line posts using wire ties, staples, or clips.
Start at one end and move systematically along the fence.
Double-check that all fasteners hold tight, especially at brace points and end posts, to maintain tension over time.
Finally, inspect the entire fence line for any slack or misalignment and make minor adjustments if needed.
Removing temporary tensioners only after permanent fastening guarantees the fabric maintains its stretched state and structural integrity.
You should wear heavy-duty gloves to protect your hands from sharp wire edges and tensioned materials.
Safety glasses are essential to shield your eyes from snapping wires or debris.
Sturdy boots protect your feet from dropped tools or wire ends.
Consider wearing long sleeves and pants to minimize skin scratches.
Always use personal protective equipment because the fence is under high tension, creating a risk of sudden releases or wire recoil during stretching.
Think of stretching a fence like tuning a guitar. Humidity and temperature change the strings’ tension.
When it’s cold, metal contracts, so you should stretch the wire fence a bit more to compensate for later expansion.
In hot weather, the wire expands, so avoid overstretching to prevent sagging later.
Wet conditions can make posts soft and unstable, so guarantee solid footing before tensioning.
Always adjust your pull based on current weather for lasting stability.
Yes, you can stretch welded wire fence without professional tools by using homemade stretcher bars made from lumber and bolts.
Use ratchet straps or come-alongs as alternatives to puller chains for tensioning.
Secure the fence fabric tightly before pulling, and apply even tension incrementally to avoid distortion.
Remember to wear protective gear and make sure end posts and braces are sturdy enough to handle the load during stretching for a safe, effective installation.
Regularly review your stretched welded wire fence for rust, sagging, or snagging.
Routinely reinforce loose ties and retighten slack sections to sustain sturdy structure.
Clear creeping vegetation and debris to prevent damage and deterioration.
Check brace assemblies for stability, ensuring posts remain plumb and secure.
Lubricate any metal hinges or gates to maintain smooth movement.
With consistent care and careful checks, your fence will continue to function flawlessly and fend off wear effectively.
When stretching welded wire fence on uneven or sloped terrain, you’ll need to adjust tension incrementally and work in shorter sections to avoid distortion.
Secure brace assemblies firmly on slopes to resist pull forces. Use temporary supports to keep the fabric aligned, and clear debris or obstructions along the pull line.
Maintain consistent bottom clearance for maintenance, and check alignment frequently to ensure even tension and proper seating against the ground.
By properly stretching your welded wire fence, you guarantee durability and security. These factors are key since fences under proper tension last up to 50% longer.
Remember to use strong end posts and apply even tension with a come-along. Securing the fabric correctly prevents sagging and damage.
Keep adjustments precise to maintain alignment and clearance. Following these steps will help your fence perform at its best, saving you time and costly repairs down the line.