Phone:
(701)814-6992
Physical address:
6296 Donnelly Plaza
Ratkeville, Bahamas.
Phone:
(701)814-6992
Physical address:
6296 Donnelly Plaza
Ratkeville, Bahamas.

Dross in welding is the solidified oxidized metal residue that forms when molten metal doesn’t fully separate from your workpiece.
It typically appears as a bubbly or hard bead along cut edges, caused by insufficient gas flow, incorrect torch angle, or improper travel speed.
Dross negatively impacts surface finish, weld strength, and dimensional accuracy, increasing cleanup time.
If you want to improve your welding results, understanding its causes and prevention methods will help you optimize your process effectively.
Dross is the solidified oxidized metal residue that forms when molten metal fails to fully separate from the workpiece during welding or cutting processes.
Dross forms when molten metal doesn’t fully separate from the workpiece during welding or cutting.
When you perform welding or plasma cutting, the molten metal at the cut edge must be efficiently ejected to produce a clean finish.
If the gas or air pressure doesn’t adequately remove this molten material, it cools and solidifies as dross, adhering to the cut surface.
This residue results from oxidation combined with incomplete separation of molten metal.
You’ll notice dross forming along the cut edges or the underside of the workpiece, appearing either as a bubbly accumulation or a hard bead.
Understanding this formation process helps you identify and control dross to optimize cut quality and reduce cleanup effort.
Proper control of parameters like current and weld time is essential to minimize defects such as dross in welding and cutting operations.
When molten metal doesn’t separate cleanly during cutting, several factors usually contribute to the excessive buildup you see as dross.
Worn consumables impair the cutting arc, reducing molten metal ejection efficiency and increasing residue.
Incorrect cutting speed disrupts the balance between metal melting and removal rates, leading to either excessive or insufficient dross.
Improper amperage alters the heat input, causing incomplete separation or oxidation of molten metal.
Poor standoff distance affects gas flow dynamics, preventing effective slag expulsion.
Additionally, dirty equipment or inadequate maintenance can introduce inconsistencies in gas delivery and arc stability, further promoting dross formation.
Proper surface preparation and maintenance, such as cleaning and dressing consumables, are essential to reduce electrode wear and improve cutting quality.
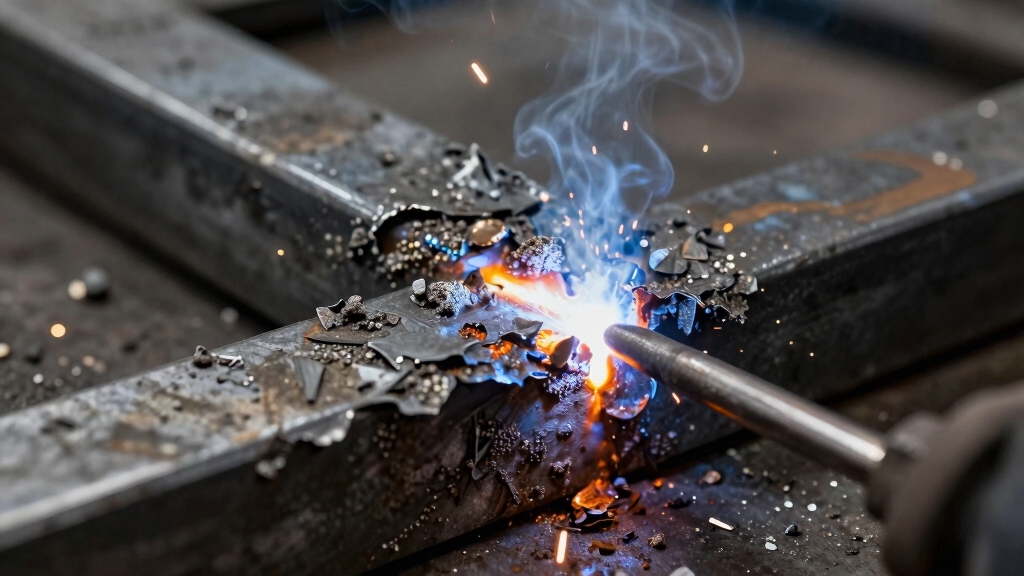
You’ll often find unwanted solidified residue forming along both the top and bottom edges of a cut in welding and plasma cutting operations.
Unwanted solidified residue commonly forms along the top and bottom edges of cuts in welding and plasma operations.
This dross typically accumulates on the underside of the plate as thick, bubbly deposits or as small, hard beads along the top edge.
The top surface may also exhibit light spatter coatings from molten metal that didn’t fully eject.
These formations primarily occur where molten metal remains attached due to insufficient gas flow, incorrect torch angle, or improper travel speed.
You’ll notice that dross concentrates near the kerf’s edge, where oxidation and incomplete metal separation happen.
Understanding these precise locations helps you target cleanup efficiently and adjust parameters to minimize dross buildup, optimizing cut quality and reducing post-process labor.
Proper edge preparation, including removing dross and oxide layers by grinding or wire brushing, is essential for reliable welding on plasma-cut edges and to prevent weld defects related to oxidation and nitriding.
Dross can really mess with the quality of your welds, leaving you with a rough and uneven surface finish.
Not only does this affect how your finished parts look, but it can also compromise their structural integrity.
Plus, dealing with dross means you’ll have to spend extra time on cleanup after cutting.
You’re likely to find yourself grinding or deburring to get rid of that stubborn residue.
It’s a real time sink, and if you don’t tackle it properly, you might end up with inconsistencies in your work.
Contaminants like oil, rust, or protective coatings contribute to dross formation by disturbing the molten pool and causing irregular metal transfer, leading to increased spatter and dross.
Although often overlooked, the buildup of oxidized metal residue markedly compromises the surface finish of your welds and cut parts.
Dross creates an uneven, rough texture that interferes with the intended smoothness and dimensional accuracy of the metal surface.
This irregularity not only detracts from the visual quality but also introduces stress risers that can weaken the structural integrity of the weld joint.
You’ll notice that dross deposits disrupt uniform bead formation, leading to inconsistent weld profiles prone to cracking or corrosion.
Moreover, the presence of dross complicates subsequent finishing operations, as surface imperfections require additional attention to restore acceptable quality.
Additionally, dross can contribute to surface porosity, which further undermines weld quality and durability.
Frequently, excessive dross formation markedly increases the time and effort required for post-cut cleanup. This directly impacts workflow efficiency. When dross accumulates, you must spend additional time grinding, sanding, or mechanically removing residue to achieve clean edges.
This extra step delays production and raises labor costs. It also reduces overall weld quality and finished part accuracy. Proper preparation and workspace organization can help minimize additional cleanup caused by dross.
| Cleanup Method | Time Required | Effect on Part Quality |
|---|---|---|
| Grinding | High | Smooths rough edges |
| Sanding | Moderate | Removes minor residue |
| Hammering | Low | Dislodges heavy dross |
| Deburring Tool | Moderate | Improves edge finish |
After welding or cutting, you’ll need to clean up any solidified metal residue to guarantee a smooth finish and maintain part quality.
Begin by mechanically removing dross using a hammer or deburring tool to dislodge heavier deposits attached to cut edges.
Follow with grinding or sanding to smooth rough surfaces and eliminate residual buildup.
Choose appropriate abrasive tools matched to the metal type and thickness to avoid excessive material removal.
Regularly inspect the cut edges for stubborn dross, addressing it promptly to prevent dimensional inaccuracies.
Consistent maintenance of your equipment guarantees dross remains manageable post-cut.
This methodical cleanup preserves dimensional tolerances and surface integrity, reducing the risk of defects in assembly or finishing processes.
Efficient dross removal directly supports production quality and operational efficiency.
Using a welding process with precise heat input control can minimize dross formation during welding and cutting operations.
To reduce dross, it’s really important to optimize your cutting speed. This ensures that the molten metal gets ejected cleanly from the kerf. If you adjust the amperage settings precisely, you’ll help maintain the right heat input, which is key to preventing excessive residue buildup.
Also, don’t overlook the importance of maintaining the correct standoff distance. It plays a vital role in ensuring effective gas flow and achieving consistent cut quality. So, make sure all these factors are in check for the best results!
Regular equipment maintenance is essential to ensure stable performance and reduce issues related to inconsistent heat and gas flow.
Optimize your cutting speed carefully to minimize dross formation and enhance cut quality. The right speed guarantees molten metal is efficiently expelled from the kerf, preventing solidified residue buildup. Moving too slowly allows excess molten metal to cool on the edge, increasing dross, while excessive speed may fail to fully sever the material, leaving uncut beads.
To optimize cutting speed effectively, consider these guidelines:
Start with manufacturer-recommended speeds for your material thickness.
Adjust incrementally, observing dross reduction and cut quality improvements.
Monitor for signs of low-speed dross (thick, bubbly buildup) or high-speed dross (small hard beads).
Maintain consistent torch travel speed to avoid irregular dross patterns.
Combine speed adjustments with proper standoff distance to guarantee efficient molten metal ejection.
Fine-tuning speed helps balance thermal input and cutting efficiency, vital for reducing dross.
Additionally, understanding the role of semiautomatic wire feeding can help maintain steady parameters that influence dross formation.
Adjusting amperage settings plays a critical role in controlling dross formation during welding and cutting processes.
If your amperage is too high, excessive heat causes molten metal to splash and oxidize, increasing dross buildup along cut edges.
Conversely, too low amperage results in insufficient melting, leaving uncut or partially melted metal that solidifies as dross.
You need to calibrate amperage precisely based on material thickness and type to maintain a steady, ideal heat input.
Fine-tuning amperage prevents incomplete melting and promotes effective expulsion of molten metal from the kerf, minimizing residue.
Regularly check amperage against manufacturer’s specifications and adjust incrementally until dross formation reduces.
This controlled approach enhances cut quality and reduces post-process cleaning time, making amperage adjustment a fundamental step in mitigating dross.
Maintaining a steady wire feed speed in MIG welding also ensures consistent amperage and penetration, further reducing dross formation.
Maintaining proper standoff distance directly influences the efficiency of molten metal ejection and the reduction of dross during welding and cutting. If your torch is too close or too far from the workpiece, molten metal won’t be expelled effectively, causing increased dross buildup.
Adjusting standoff distance optimizes gas flow and heat distribution, vital for clean cuts. To reduce dross by maintaining proper standoff, focus on:
Yes, dross formation can signal the need for equipment replacement. When you notice persistent dross despite optimizing cutting speed, amperage, and standoff distance, worn consumables like nozzles or electrodes are often the cause.
These degrade cutting efficiency, leading to increased dross. Regularly inspecting and replacing consumables guarantees consistent cut quality and minimizes residue buildup. This prevents downtime and costly rework.
Don’t ignore dross; it’s a key indicator of equipment wear.
Yes, dross formation varies across welding methods.
In TIG welding, you’ll see minimal dross due to precise heat control.
In SMAW or stick welding, slag-like dross forms from flux decomposition.
MIG welding produces less dross, but improper parameters can still cause buildup.
You need to adjust your technique and equipment for each method to manage dross effectively.
Its characteristics depend on heat input, shielding, and material interaction.
Dross compromises the structural integrity of welded joints by creating weak points and potential stress concentrators.
When you leave dross trapped in or on the weld, it can cause incomplete fusion, porosity, and inclusions.
This reduces joint strength and fatigue resistance.
You’ll notice increased susceptibility to cracking and corrosion.
To guarantee reliable welds, you must control dross formation through proper parameters.
Remove any residual dross before final inspection or service.
Yes, you’ll find that materials like aluminum and stainless steel are more prone to dross buildup due to their oxide layers and thermal properties.
Aluminum’s high thermal conductivity and oxide film encourage dross during cutting.
Stainless steel’s chromium content promotes oxidation, increasing residue formation.
You’ll need to adjust cutting speed, amperage, and gas flow specifically for these metals to minimize dross and maintain quality in your welds or cuts.
Over 30% of metal waste in workshops comes from dross and slag.
You can recycle dross, but it requires careful processing to separate usable metal from impurities.
Typically, foundries remelt dross to recover metal, though its quality is lower than virgin material.
Reusing dross directly in welding isn’t practical due to contamination and inconsistent composition.
Dross can account for up to 30% of your total welding waste, markedly impacting efficiency and quality.
By understanding its formation and common causes, you can pinpoint where dross develops on your welds and cutting edges.
Removing it promptly and adjusting your welding parameters not only improves your finished parts but also reduces rework.
Taking these precise steps guarantees cleaner welds, saving you time and material costs in every project you tackle.