Phone:
(701)814-6992
Physical address:
6296 Donnelly Plaza
Ratkeville, Bahamas.
Phone:
(701)814-6992
Physical address:
6296 Donnelly Plaza
Ratkeville, Bahamas.
Protect yourself with the right safety gear, including helmets, gloves, and respiratory protection.
Prepare materials thoroughly by cleaning and securing tight joint fit-ups.
Select welding equipment and settings based on material type and thickness for peak amperage, voltage, and polarity.
Master torch angles and travel speed between 30–45 degrees to maintain arc stability and bead consistency.
Adjust technique for position and inspect equipment and welds for defects.
Keeping these fundamentals sharp will markedly enhance your welding results.
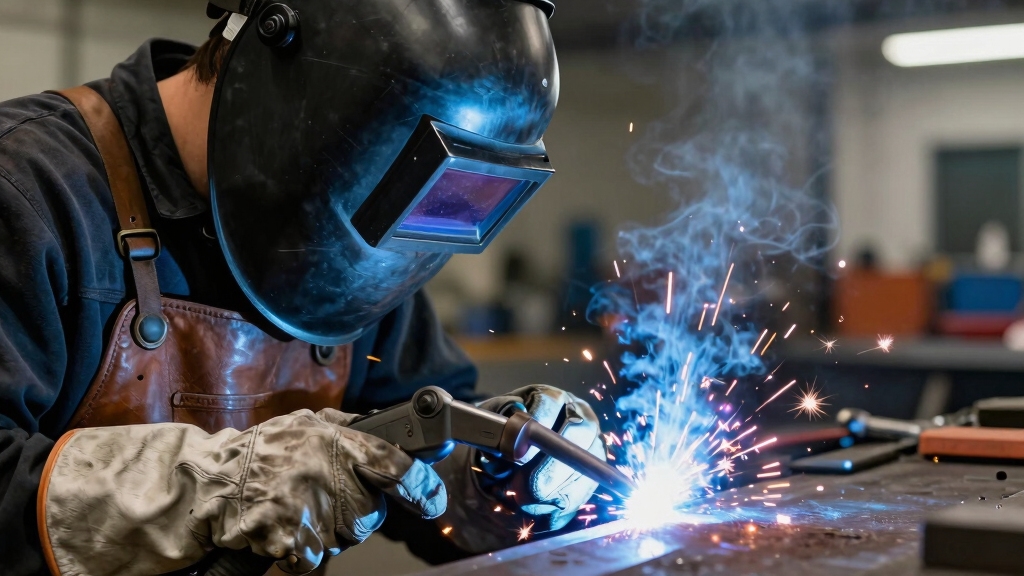
Although welding demands skill and precision, protecting yourself with essential safety gear is equally critical to prevent injury and long-term health risks.
Welding requires skill, but wearing proper safety gear is vital to avoid injury and health risks.
You must wear PPE tailored to welding hazards: a welding helmet with the correct shade lens shields your eyes and face from intense light and radiation. Flame-resistant gloves protect hands from heat and sparks. Insulated boots guard against electrical shock and molten metal.
Don’t neglect hearing protection since noise levels can exceed safe limits. Respiratory protection or proper ventilation is crucial to minimize inhalation of hazardous fumes and gases.
Follow OSHA-style safety procedures rigorously and maintain situational awareness to reduce accident risk. Keeping your workspace clean and organized further decreases hazards.
When possible, employ a spotter to monitor for dangers you might miss, reinforcing your overall safety strategy.
Regular inspection and maintenance of your protective equipment ensure its effectiveness and your safety during welding operations.
To achieve stronger welds, it’s crucial to start with clean metal surfaces. Make sure to remove any rust, scale, or contaminants that could mess with the integrity of your weld. A little effort goes a long way here!
Next up is joint preparation. Take some time to grind and inspect the edges to ensure everything fits together perfectly. This step can really help reduce defects in your welds—trust me, it makes a difference!
And before you dive into welding, don’t forget to check the type and thickness of your materials. This is key for setting your welding parameters correctly and optimizing the performance of the whole process. A bit of prep work can lead to much better results!
Ensuring a clean welding area helps prevent contaminants from compromising weld strength and causing defects.
When preparing metal surfaces for welding, thorough cleaning is essential to guarantee a strong, defect-free joint.
You need to remove rust, scale, paint, oil, and other contaminants that compromise weld integrity.
Use a wire brush, grinder, or chemical cleaner depending on the material and contamination type.
Inspect the surface carefully; even minor debris can cause porosity, inclusions, or weak fusion.
Avoid abrasive methods that alter the metal thickness unnecessarily.
After cleaning, wipe the surface with a lint-free cloth to eliminate residual particles.
Proper surface preparation reduces the risk of weld defects and rework, improving penetration and bead quality.
Consistently applying these cleaning steps secures your welds, maintains structural soundness, and meets performance expectations in demanding applications.
For aluminum welding, mechanical oxide removal after degreasing is crucial to eliminate the aluminum oxide barrier that inhibits weld penetration.
Since joint preparation directly influences weld strength and consistency, you must carefully align, clean, and fit the components before welding.
Proper fit-up reduces gaps that cause defects and assures uniform penetration. Inspect edges and remove debris to avoid inclusions. Use clamps or magnets to maintain stable positioning during welding.
Match your joint prep method to the weld type. Bevel edges for thicker materials, square edges for thin sheets. Grinding improves contact and aesthetics. Confirm gap dimensions precisely to prevent undercut or porosity.
| Joint Type | Preparation Method |
|---|---|
| Butt joint | Bevel edges, tight fit |
| Lap joint | Clean overlap, remove rust |
| Corner/fillet | Proper angle, clamp firmly |
Always secure the workpiece with a high-quality copper ground clamp on clean, bare metal near the weld area to ensure a stable electrical connection and reduce resistance.
This disciplined approach minimizes rework and optimizes final weld integrity.
Accurate joint preparation sets the stage, but confirming the material type guarantees that weld parameters and consumables suit the base metal’s properties.
Before welding, identify whether your material is carbon steel, stainless steel, aluminum, or another alloy. Use methods like spark testing, mill test reports, or handheld analyzers to verify composition accurately.
This step prevents mismatched filler metals and improper machine settings, which can cause weak welds or cracking. Adjust amperage, voltage, wire feed speed, and shielding gas based on the specific material’s thermal conductivity and melting point.
Confirming thickness alongside type ensures correct penetration and bead profile. Skipping this verification risks contamination, porosity, or failure under stress.
Prioritize material type validation to optimize weld strength and longevity, reducing costly rework and enhancing overall quality.
Selecting the proper welding rod chemistry matched to the base metal is essential to assure metallurgical compatibility and reduce defects.
Although selecting welding equipment can seem straightforward, choosing the right tools and settings demands careful consideration of the material type, thickness, and joint design.
First, identify the appropriate welding process: MIG, TIG, or stick, based on your base metal and application.
Then, select compatible consumables like wire, rod, or tungsten electrodes that match the material and process.
Shielding gas selection must align with your wire and method to guarantee proper protection and weld integrity.
Adjust amperage and wire-feed speed precisely according to material thickness and joint configuration, following manufacturer guidelines.
Proper equipment calibration prevents defects such as porosity, insufficient penetration, or excessive spatter.
Using an inert shielding gas such as argon or helium in MIG welding helps protect the weld from contamination and ensures a high-quality result.
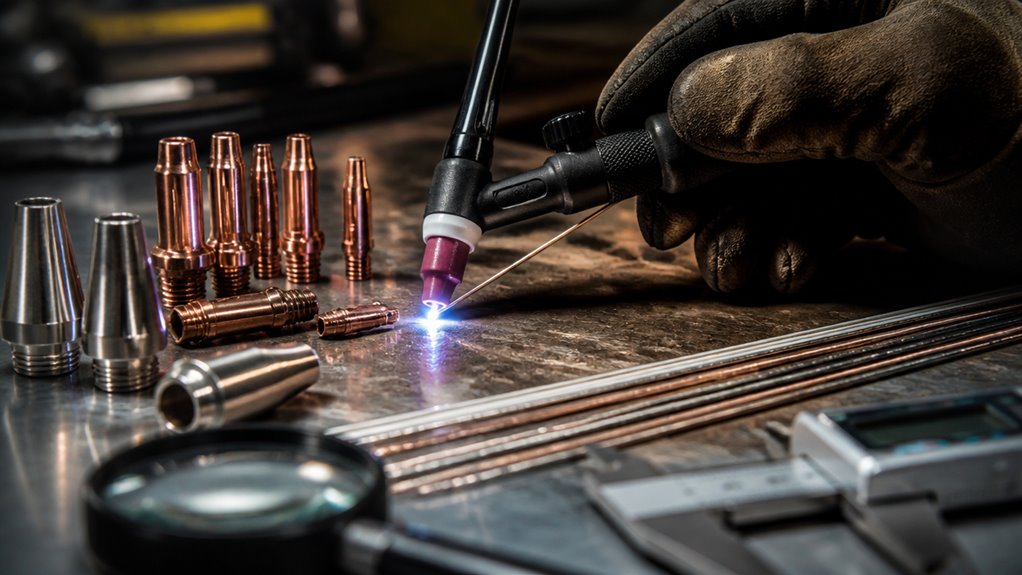
With your equipment correctly selected and settings dialed in, focus shifts to how you handle the torch and electrode. This directly impacts bead quality. Precise torch and electrode manipulation guarantees consistent arc stability and uniform bead formation.
Maintain a steady hand to prevent erratic movement that causes spatter or uneven welds. Here are key techniques to master for cleaner beads:
Keep the torch as straight as possible to guarantee consistent wire feeding.
Direct the electrode tip at the leading edge of the weld puddle for optimal control.
Maintain proper tungsten length to keep the arc visible and stable.
Use a travel angle between 30–45 degrees for smooth rod movement.
Practice consistent stroke speed and rhythm to enhance bead uniformity.
Mastering these techniques reduces defects and improves weld appearance.
Proper assembly of the torch components, including the ceramic cup and collet body, ensures effective gas shielding and arc precision.
To get that perfect weld joint fit-up, it’s super important to secure your workpieces tightly. You can use clamps or magnets to keep everything in place and avoid any movement while you’re welding.
Now, let’s talk about positioning your torch or electrode. Aim for an angle between 30 and 45 degrees. This helps ensure you get consistent penetration and a nice bead appearance.
Using clamps with heat-treated jaws improves durability and maintains clamping force under the intense heat of welding.
Consistently securing your workpieces with proper clamping techniques guarantees a stable joint fit-up. This is critical for achieving accurate weld positioning and uniform penetration. Without firm clamping, parts can shift under heat, causing misalignment and weak welds. You want clamps that hold securely without distorting the metal.
To make certain of optimal joint stability, consider these key points:
Use adjustable C-clamps or locking pliers for a strong, customizable grip. Position clamps to counteract welding heat distortion and movement. Employ magnets for quick setups on flat or simple joints. Check that clamps don’t obstruct welding paths or torch angles. Re-verify tightness after tack welding to maintain fit-up integrity.
Master these techniques to reduce rework and produce consistent, structurally sound welds. Additionally, maintaining proper gun angle during welding helps ensure consistent weld quality and reduces the risk of defects caused by joint movement.
After securing your workpieces firmly, focus shifts to the angles at which you hold the torch or electrode to achieve ideal weld penetration and bead quality.
Maintaining a consistent travel angle between 30–45 degrees maximizes arc stability and weld pool control. Adjust the work angle based on joint type to guarantee full penetration and minimize defects.
For fillet welds, a 45-degree work angle typically balances heat distribution.
| Joint Type | Optimal Work Angle (Degrees) |
|---|---|
| Butt | 0 – 15 |
| Fillet | 45 |
| Corner | 45 – 60 |
| Lap | 15 – 30 |
Precision in these angles improves bead uniformity, reduces spatter, and enhances joint integrity. Always adapt angles dynamically for positional changes during welding. Ensuring the correct polarity setting also plays a crucial role in maintaining arc stability and penetration quality.
When welding in different positions such as flat, vertical, or overhead, adjusting your technique is essential to guarantee proper penetration and bead quality. Each position challenges gravity and molten metal control, so you must adapt accordingly to prevent weld defects like sagging or inadequate fusion.
To optimize your welding technique across these positions, consider:
Alter travel angle: flatter for overhead, steeper for vertical welds to control puddle. Adjust travel speed: slower in vertical and overhead to ensure full penetration without excessive buildup.
Modify amperage settings: reduce slightly overhead to minimize spatter and burn-through. Use stringer beads in vertical and overhead to improve control over weave beads.
Maintain consistent electrode or torch distance to stabilize arc and puddle shape. Applying these precise adjustments guarantees strong, defect-free welds in all positions.
Mastering position-specific welding techniques helps control the weld puddle and penetration. However, even the best technique can be compromised by equipment issues or unnoticed weld defects.
Expert welding skills are vital, but equipment checks and defect detection ensure flawless, reliable results every time.
Before welding, inspect your equipment meticulously. Check wire feed tension, gas flow rates, and electrode condition to prevent inconsistent arcs and porosity. Monitor shielding gas delivery to avoid contamination and oxidation.
After welding, examine welds visually and with non-destructive testing methods to detect cracks, undercut, or lack of fusion. Use magnification or dye penetrant for detailed inspection. Address minor defects immediately to prevent structural failures.
Consistent equipment checks and weld inspections guarantee weld integrity, reduce rework, and maintain quality standards. By integrating systematic inspections into your workflow, you’ll catch potential problems early, safeguarding both your welds and your reputation.
Consistently practicing welding strokes sharpens your bead control and arc stability, which are critical for producing uniform, defect-free welds.
To build consistent skills, focus on deliberate, measured practice sessions that simulate real welding conditions. Analyze your technique critically and adjust based on observed bead shape and penetration.
Incorporate these practices:
Regularly inspect wire feed tension and gas flow before welding. Use training videos and step-by-step demonstrations to refine motions.
Practice consistent travel speed and torch angle within the 30–45 degree range. Perform test welds to detect shielding or contamination issues.
Review process parameters and material specs before each session to minimize guesswork.
Smart practice reduces variability, helping you deliver reliable, professional welds every time.
Weather conditions directly impact outdoor welding quality by influencing weld integrity and safety.
Wind can disrupt shielding gas coverage, causing porosity and weak welds.
Moisture from rain or humidity increases the risk of hydrogen-induced cracking.
Cold temperatures slow cooling rates, affecting weld strength, while excessive heat may cause distortion.
You need to adjust settings, use windbreaks, and guarantee dry materials to maintain consistent weld quality in varying weather.
You should store welding rods and wire in a dry, temperature-controlled environment to prevent moisture absorption. This absorption can cause weld defects like porosity.
Keep them sealed in original packaging or airtight containers with desiccants. For flux-coated rods, maintain humidity below 50%.
Use rod ovens or wire feeders with built-in heaters when possible. Regularly inspect storage conditions and rotate stock to avoid prolonged exposure that degrades welding consumables.
To reduce warping in thin metal welds, control heat input by using lower amperage and faster travel speeds.
Employ tack welds to stabilize the metal before completing the full weld. Use backstep or stitch welding techniques to distribute heat evenly.
Clamp parts securely to minimize movement and allow gradual cooling. Preheating or using heat sinks can also help manage thermal distortion effectively.
Imagine tiny gas bubbles trapped beneath your weld’s surface, weakening its integrity.
To fix porosity, first check your shielding gas flow and make certain it’s consistent. Too low or turbulent flow invites contamination.
Clean your base metal thoroughly to remove rust or oil.
Inspect your electrode or wire for moisture, and verify your machine’s settings match material specs.
Finally, improve ventilation to prevent fumes from interfering.
Consider using a spotter to catch hidden flaws early.
Different metals impact welding cooling times based on thermal conductivity and heat capacity.
For instance, aluminum cools faster than steel because it conducts heat more efficiently. This requires quicker adjustments to prevent warping.
Stainless steel cools slower due to lower conductivity, increasing the risk of distortion.
You’ll need to tailor your interpass temperature and cooling rate accordingly. This ensures proper weld quality and minimizes residual stress or cracking in diverse materials.
By consistently applying these welding tips, you’ll reduce defects and improve joint strength notably.
Did you know that proper fit-up and positioning can increase weld integrity by up to 30%? This statistic highlights how critical preparation and technique are to your results.
Stay vigilant with safety gear, equipment settings, and inspection routines. Practicing smart not only builds your skills but also guarantees every weld you make meets the highest standards of quality and reliability.