Phone:
(701)814-6992
Physical address:
6296 Donnelly Plaza
Ratkeville, Bahamas.
Phone:
(701)814-6992
Physical address:
6296 Donnelly Plaza
Ratkeville, Bahamas.
To use a fillet weld gauge, firmly place its base flat against the parent metal at a strict 90-degree angle.
Align the correct slot or cutout with the weld toe to measure leg length, sliding until the gauge contacts the weld without gaps.
Use the protruding arm to check throat thickness similarly.
Apply steady pressure and guarantee no tilting for precise results.
Calibrate the adjustable gauge before use and maintain consistent positioning.
Exploring these steps further clarifies accurate measurement techniques and proper maintenance.
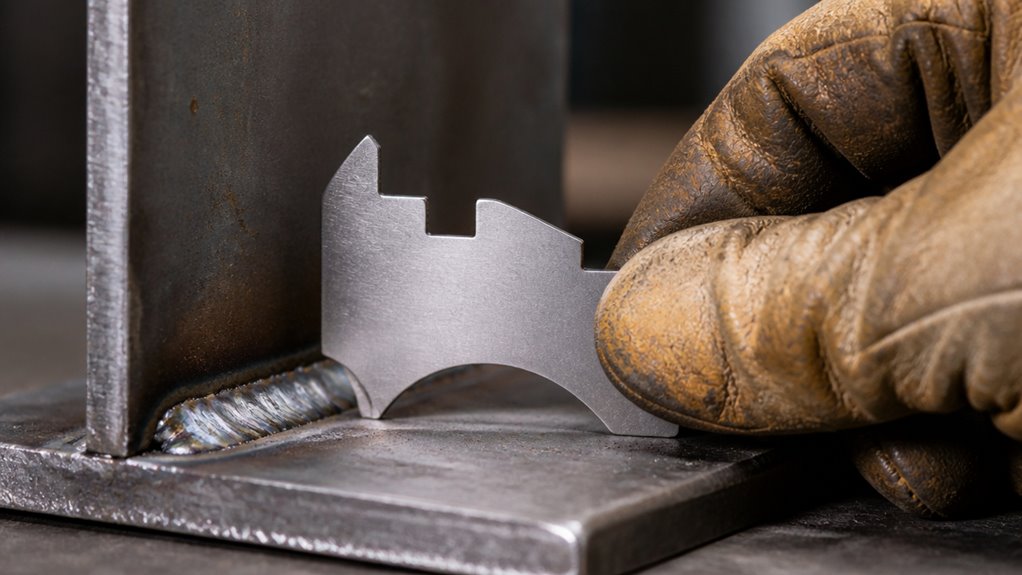
When selecting a fillet weld gauge for your project, consider the specific weld sizes and measurement accuracy required to guarantee compliance with specifications.
Choose between fixed gauges with cutouts for defined sizes, typically ranging from 1/8 inch to 3 inches, or adjustable models like the WG-3 that measure from 1/8 to 1 inch with 1/32-inch precision.
Make certain the gauge material is stainless steel for durability and corrosion resistance. Confirm if you need inch or metric measurements based on your project standards.
Remember, fillet weld gauges are specialized tools designed for lap joints, T-joints, and corner welds and shouldn’t be used for seam or butt weld measurements.
Selecting the correct gauge type and size assures accurate leg length and throat thickness assessments, critical for weld quality verification.
It is important to measure both horizontal and vertical legs individually for consistency in weld size verification.
To get accurate measurements, it’s important to position your fillet weld gauge so it lies flat against the parent material. You want to make sure it’s in direct contact for the best results.
Also, keep that gauge at a strict 90-degree angle. This way, you can avoid any skewed readings that might throw off your measurements. Remember, even a tiny deviation can lead to false assessments of weld leg length and throat thickness. So, take a moment to double-check your setup!
Proper surface preparation and thorough cleaning are essential to avoid masking defects during visual weld inspection, which complements measurements taken with the gauge for a reliable evaluation of the weld quality and profile visual weld inspection.
Accurately positioning your fillet weld gauge flat against the parent material is essential for obtaining reliable measurements.
When you place the gauge, guarantee its base fully contacts the material surface without any gaps or tilting.
Any deviation from flat placement can cause incorrect leg length or throat thickness readings, leading to misinterpretation of weld quality.
Use steady pressure to stabilize the gauge, preventing movement during measurement.
Confirm visually that the gauge’s reference edges align flush with the parent metal, avoiding angled or raised positioning.
This careful placement eliminates errors caused by uneven contact or surface irregularities.
Always inspect your protective gear before measurement to ensure safety and avoid distractions caused by damaged equipment, as proper gear inspection is crucial in welding environments.
Although placing the fillet weld gauge flat on the parent material is critical, maintaining a precise 90-degree angle during measurement is equally important. This guarantees reliable results. If the gauge tilts, leg length and throat thickness readings become inaccurate, risking non-compliance with specifications.
Always align the gauge base perpendicular to the joint surface. Use visual cues or a square for verification. Consistent 90-degree positioning ensures that the gauge’s short side or protruding arm contacts the weld toe or throat correctly.
Accurate measurement is essential because the fillet weld gauge verifies bead size to meet design and code requirements.
| Step | Action | Purpose |
|---|---|---|
| 1 | Place gauge flat | Prevent false readings |
| 2 | Align gauge at 90 degrees | Assure perpendicular contact |
| 3 | Use reference tools | Confirm angle accuracy |
| 4 | Check contact points | Verify weld conformity |
| 5 | Adjust if necessary | Maintain measurement precision |
To measure fillet weld leg length accurately, the first step is to choose the right gauge slot that matches the size of the weld you’re working with.
It’s important to get this right so you can have precise measurements.
Once you’ve got your gauge, you’ll want to position the gauge base flat against the parent material.
Make sure it’s sitting at a perfect 90-degree angle.
This little detail can really make a difference in avoiding measurement errors.
After that, take a moment to check both the horizontal and vertical weld legs.
This ensures that they meet the required dimensions.
It’s all about being thorough, so don’t skip this step!
Always refer to the fillet weld symbol on your drawing to confirm the specified weld size and location before measuring.
When measuring fillet weld leg length, you’ll need to select the gauge slot that exactly matches the required weld size specified in your project.
Begin by identifying the specified leg length from your weld procedure or blueprint. Then, choose the gauge slot or cutout that corresponds precisely to this dimension.
Using a slot larger or smaller than the required size can lead to inaccurate readings and misinterpretation of weld quality. If your gauge is adjustable, set it to the exact leg length using the calibrated scale.
Make certain the gauge material and type are suitable for your weld size range and measurement units (inch or metric).
Correct slot selection is essential for consistent evaluation, allowing you to detect undersized or oversized welds and maintain compliance with welding standards. Ensuring measurements align with the WPS essential variables helps guarantee the weld meets qualified procedure requirements.
Accurate fillet weld leg length measurement depends on placing the gauge at a true 90-degree angle to the parent material.
You must make certain the gauge base sits flat against the surface without tilting or rocking. Any deviation from perpendicular placement causes false readings by altering the effective leg length measurement.
To verify correct placement, position the gauge so the short side touches the weld toe while the base contacts the parent metal firmly.
Use visual alignment or a square tool if needed. Avoid gaps between the gauge and material to prevent inaccurate results.
Consistently maintain this 90-degree orientation when sliding the gauge along the weld. This technique ensures the measurement reflects the actual weld size, enabling proper evaluation against specifications and reliably identifying undersized or oversized welds.
Always ensure you wear proper Personal Protective Equipment to protect yourself from potential hazards while inspecting welds.
Measuring both legs of a fillet weld guarantees complete verification of weld size against specifications. To measure leg length accurately, position the gauge base flat and perpendicular on the parent material.
Slide the gauge until the short side contacts the weld toe. Check both horizontal and vertical legs to confirm compliance. A gap indicates an undersized leg requiring repair. Record measurements systematically for quality control.
Proper weld bead profiles around the circumference are essential to ensure strong, leak-proof connections.
| Leg Measured | Gauge Position | Interpretation |
|---|---|---|
| Horizontal | Base flat, short side on toe | Pass if no gap |
| Vertical | Base flat, short side on toe | Pass if no gap |
| Both Legs | Repeat for accuracy | Undersized if gap found |
This method guarantees precise leg length verification per welding standards.
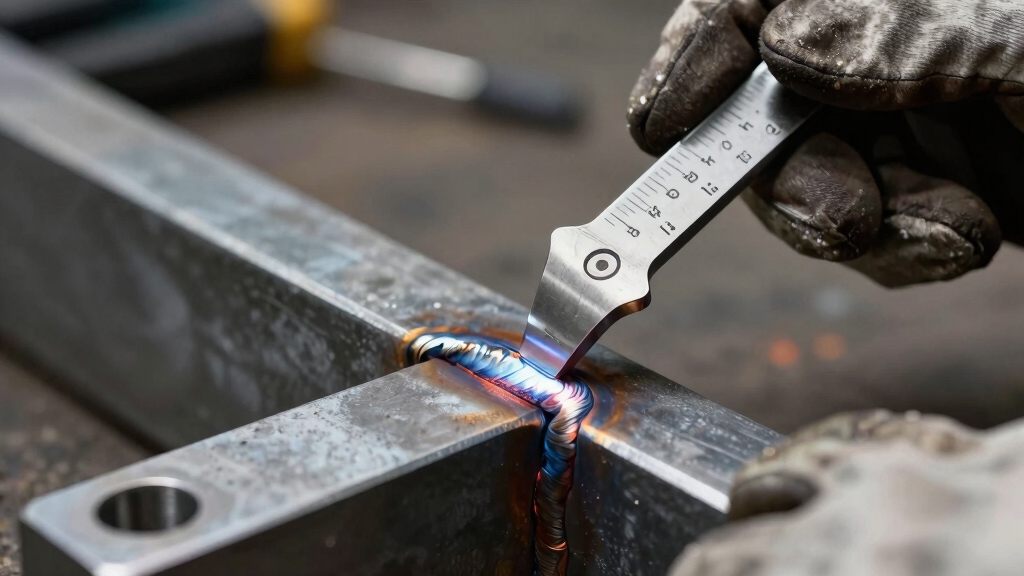
Using the protruding center arm or tube on the fillet weld gauge, you check throat thickness by firmly placing the gauge on the parent material at a 90-degree angle.
Make certain the gauge sits flat to avoid inaccurate readings. The center arm should touch the weld metal without any gap.
If a gap exists, it indicates insufficient throat thickness, commonly seen in concave welds.
Some adjustable gauges feature pointers calibrated to 1/16-inch increments for precise measurement.
Always confirm proper contact; reposition the gauge if the arm doesn’t engage the weld.
Consistent back pressure helps maintain accuracy.
This method verifies that the weld’s critical throat dimension meets specifications, ensuring structural integrity without relying solely on leg length measurements.
For vertical welds, maintaining puddle control is essential to prevent defects that could affect throat thickness accuracy.
Checking throat thickness confirms weld integrity, but you also need to identify if fillet weld legs are undersized or oversized to guarantee full compliance with specifications.
Use your fillet weld gauge to gauge leg length precisely. Here’s how you can identify size discrepancies:
Undersized legs compromise strength, while oversized welds waste material and may cause distortion. Consistent, accurate placement of the gauge secures reliable assessment for repairs or approval. Proper weld sizing is critical to ensure joint integrity and prevent defects that compromise sealing.
Although fillet weld gauges provide reliable measurements, you may encounter issues such as concave welds passing leg length checks but failing throat thickness assessments.
Concave welds can pass leg length checks yet fail throat thickness measurements, highlighting potential inspection challenges.
This occurs because the leg length can appear compliant while the actual throat thickness is insufficient.
To troubleshoot, make certain the gauge rests flat on the parent material at 90 degrees; any tilt causes inaccurate readings.
If the short side or protruding arm doesn’t contact the weld properly, reposition the gauge until contact is firm.
Concave weld profiles often require additional filler material to meet throat thickness standards.
Also, differentiate fillet weld gauges from seam gauges to avoid misapplication.
Consistently verifying proper gauge placement and weld geometry will help you detect discrepancies and maintain measurement accuracy during inspection.
When you need precise fillet weld measurements, adjusting your gauge correctly is essential to avoid errors.
Start by ensuring the gauge’s adjustable arms or pointers are released for smooth movement.
Then, calibrate the gauge to the required fillet size by aligning the adjustable parts to the specified leg length or throat thickness.
Always confirm that the gauge sits flat on the parent material at a 90-degree angle to prevent skewed readings.
Finally, secure the adjustable components to maintain consistent measurements during inspection.
Maintaining your fillet weld gauge guarantees accurate and reliable measurements throughout its service life. Regularly clean the gauge to remove dirt, grease, and welding spatter that can cause measurement errors.
Store it in a dry environment to prevent corrosion, especially if it’s stainless steel. Inspect the gauge for wear or damage, ensuring all edges and pointers remain sharp and intact. Avoid dropping or bending the gauge, which can distort its shape and compromise accuracy.
| Maintenance Task | Frequency | Purpose |
|---|---|---|
| Cleaning | After each use | Remove debris, guarantee clarity |
| Inspection | Weekly | Identify wear or damage |
| Calibration Check | Monthly | Confirm measurement accuracy |
| Proper Storage | Always | Prevent corrosion and damage |
No, you can’t effectively use fillet weld gauges on non-metal materials.
These gauges rely on precise contact with the parent metal surface at a 90-degree angle to measure leg length and throat thickness accurately.
Non-metal substrates lack the rigid, consistent surface needed for reliable readings.
Using them on plastics or composites would produce inaccurate results, defeating the purpose of ensuring weld conformance to standards in metal joints.
Think of fillet weld gauges as tailor’s rulers measuring seam allowances, while seam weld gauges act like fabric alignment tools.
You focus on fillet weld gauges to check leg length and throat thickness in lap or T-joints, ensuring weld size meets specs.
Seam weld gauges, however, measure alignment and root gaps in seam or butt welds.
You wouldn’t use one interchangeably because each targets different weld characteristics with distinct precision.
Yes, digital fillet weld gauges are available to provide easier, more precise readings.
They use electronic sensors to measure leg length and throat thickness, displaying values on a digital screen. This reduces human error in reading small increments and speeds up inspections.
You’ll find models with adjustable ranges and calibration features, enhancing accuracy and repeatability.
Digital gauges are especially useful in quality control and detailed weld assessments where precision is critical.
Over 60% of welding inspection errors stem from improper tool handling.
When using fillet weld gauges, always wear protective gloves to prevent cuts from sharp edges and safety glasses to guard against metal debris.
Make sure the gauge sits flat at 90 degrees to avoid inaccurate readings that could compromise safety.
Work in a well-lit area and keep your hands steady to prevent slips.
Follow these precautions to maintain precise, safe inspections.
Fillet weld gauges primarily detect size-related issues like undersized or oversized leg lengths and throat thickness.
While they don’t directly identify internal defects such as cracks or porosity, they can reveal concave welds with insufficient throat thickness. This may indicate potential structural weakness.
To make certain superior strength and safety, select the suitable fillet weld gauge, position it precisely, and perform prompt, precise measurements.
Pay particular attention to leg length and throat thickness to prevent problematic welds.
Properly adjusting and maintaining your gauge promotes consistent, correct readings, curbing costly corrections.
By consistently calibrating and caring for your equipment, you’ll confidently capture critical characteristics, creating clean, compliant, and consistent welds every time.