Phone:
(701)814-6992
Physical address:
6296 Donnelly Plaza
Ratkeville, Bahamas.
Phone:
(701)814-6992
Physical address:
6296 Donnelly Plaza
Ratkeville, Bahamas.

To TIG weld aluminum, first thoroughly clean and align your plates. Remove oxide layers with a stainless steel wire brush and acetone.
Set your AC TIG welder to about 1 amp per 0.001 inch thickness using 100% argon gas. Use 2% lanthanated tungsten with a precise torch angle and maintain a tight arc.
Tack weld in two steps, cooling between tacks to prevent warping. Control your heat and filler addition carefully for a strong, uniform bead.
Proper technique guarantees high-quality results and avoids common defects.
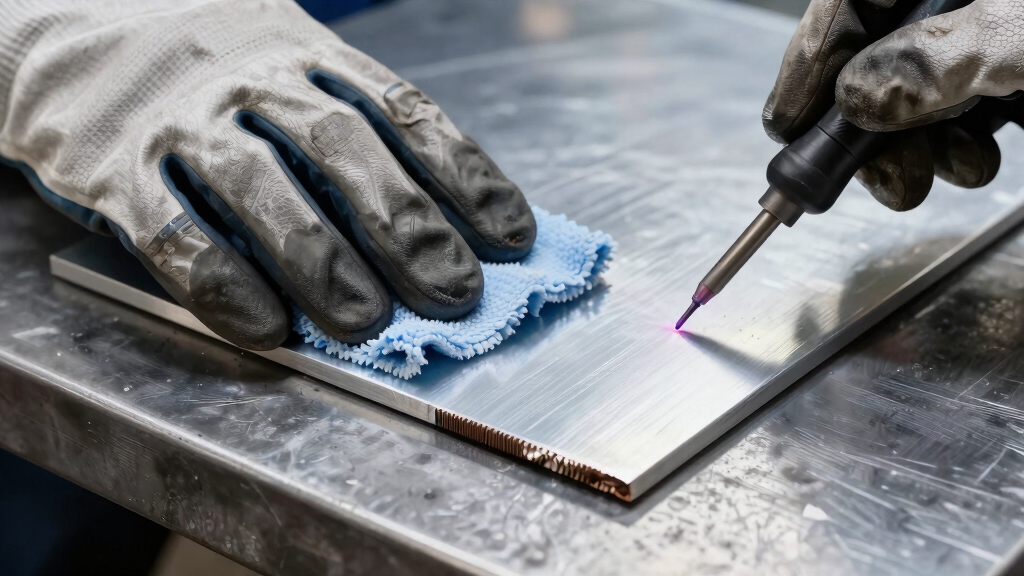
Preparing aluminum for TIG welding starts with thoroughly cleaning the base metal to ensure a contaminant-free surface.
Begin by wiping the aluminum with acetone to remove oils and dirt. Next, use a stainless steel wire brush dedicated exclusively to aluminum, brushing in the welding direction to eliminate oxide layers without embedding contaminants.
Make sure you use 100% argon shielding gas at a flow rate of 17 cubic feet per hour, with a post-flow duration of 9 seconds to protect the weld zone from oxidation.
Scribe a precise guideline on your workpiece to maintain consistent weld bead width throughout the process.
Always select an AC TIG power source, applying the rule of 1 amp per 0.001 inch of material thickness to determine your initial amperage.
Finally, prepare your tungsten electrode with a 2.4mm gas lens, #6 cup, and a ball tip smaller than the tungsten diameter for prime arc stability.
Adjustable AC balance control is essential to optimize the breaking of the aluminum oxide layer and improve weld penetration.
When setting up your TIG welding torch and power, hold the torch with a firm grip while applying light pressure to maintain control and accuracy.
Position the torch at a 90-degree angle to the workpiece, ensuring the tungsten tip remains steady and the distance consistent.
Use a 2.4mm gas lens with a #6 cup and prepare a ball-shaped tungsten tip slightly smaller than its diameter.
Set your AC TIG power source following the rule of 1 amp per 0.001 inch of aluminum thickness; a typical start point is about 140 amps.
Adjust the AC balance to 70% electrode negative for penetration and 30% electrode positive for cleaning, with a frequency around 100 Hz.
Employ a foot pedal for precise amperage control during welding.
Maintain the electrode tip within 1.5 to 3 mm from the workpiece to ensure a stable arc and consistent penetration.
To start the arc, you’ll want to position your tungsten close to the workpiece and strike quickly. Aim to form a weld pool within just 1 to 2 seconds.
This way, you’ll establish a stable arc length and keep a good torch angle.
Now, let’s talk about that pesky oxide layer. When working with aluminum, it’s crucial to manage it. You can effectively etch away the surface contamination by utilizing the AC cycle’s positive phase.
Once you’ve got your arc going, it’s all about controlling the puddle size. You can do this by adjusting the amperage and your torch movement.
Just remember to maintain a consistent heat input; this will help you avoid issues like washout or irregular weld profiles.
Using AC TIG with inverter technology assists in breaking down oxide during welding, improving weld penetration and quality.
Kick off the arc by establishing a stable weld pool within the first 1 to 2 seconds. This ensures proper heat input and consistent arc length.
Use AC TIG with a 70% electrode negative and 30% electrode positive balance to alternate between cleaning and penetration. Position the torch at a 90-degree angle, maintaining a tight, steady arc length to prevent erratic arc behavior.
Watch for a frosty etching zone, signaling effective oxide removal during the electrode positive cycle. Control amperage with the foot pedal, starting near 140 amps for typical thickness, adjusting to stabilize the puddle without overheating.
Avoid dragging the torch; push forward smoothly to maintain puddle shape and heat distribution. Form the initial puddle before adding filler, ensuring the weld pool remains fluid and consistent for prime fusion.
For optimal arc stability and electrode longevity, consider using lanthanated tungsten electrodes suited for AC aluminum TIG welding.
Although aluminum’s tough oxide layer can impede weld quality, you can manage it effectively by using the AC TIG cycle’s electrode positive phase to etch away the oxide before penetration.
Begin by guaranteeing your tungsten has a small ball tip and set your AC balance to about 70% electrode negative and 30% positive cleaning.
As you start the arc, hold the torch at a steady 90-degree angle and maintain a short, consistent arc length.
Watch for a frosty, etched zone that indicates effective oxide removal.
The electrode positive current breaks down the oxide, while the negative phase heats the base metal to form the weld pool.
Controlling the arc duration and balance guarantees thorough cleaning without excessive base metal overheating, setting the stage for a smooth, defect-free weld.
For optimal results, use 2% lanthanated tungsten electrodes which promote stable arc and ball formation when welding aluminum.
Establish the arc swiftly and precisely to form a stable weld pool within 1 to 2 seconds.
Focus on maintaining a consistent arc length and torch angle to prevent erratic behavior.
Watch the puddle’s size carefully; too large risks burn-through, while too small leads to inadequate fusion.
Control heat input using your foot pedal, adjusting amperage to balance puddle fluidity without overheating edges.
Keep the puddle width uniform by moving the torch steadily with full-hand motion, never just fingers.
Add filler metal on the leading edge once the puddle is stable, assuring smooth integration.
Monitor the frost-like etching zone to confirm oxide removal and proper heat.
Mastering these details guarantees clean, consistent welds with strong fusion and minimal defects.
Using 100% pure argon as a shielding gas helps maintain arc stability and prevents oxidation during welding.
Absolutely! Let’s dive into the process of tack welding aluminum joints for a solid alignment.
First things first, you’ll want to clamp those plates down tightly and make sure they’re perfectly aligned. This step is crucial because a strong joint fit starts with a good setup.
Now, here comes the fun part! We’ll use a two-step tack welding process. For the first tack, place it about half an inch from the edge. This helps you control the puddle and gives you a chance to test your settings.
Oh, and don’t forget to keep an eye on the temperature! It’s a good idea to cool down the workpiece between tacks, especially if you’re working with thicker aluminum. This helps prevent warping and keeps everything aligned just right.
Also, be sure to remove oxide layers and clean the aluminum surface thoroughly before welding to ensure proper fusion and avoid porosity.
And that’s it! You’re well on your way to creating strong, reliable aluminum joints.
When preparing to tack weld aluminum joints, ensuring proper plate alignment is critical to achieving strong, reliable welds. Start by securely clamping the plates to prevent movement during welding.
Use precise alignment tools or fixtures to maintain consistent joint gaps, especially for lap or butt joints. Before tacking, clean the mating surfaces thoroughly with acetone and a stainless steel wire brush, following the welding direction to remove oxide layers and contaminants.
Check the plates’ edges for even contact and adjust as needed to avoid misalignment that can weaken the joint. Proper alignment assures uniform heat distribution and consistent weld penetration.
Maintain firm clamping pressure while placing initial tacks inset about half an inch from the joint ends, preventing warping or distortion during the welding process. It is also important to avoid damaging the aluminum’s protective oxide film during cleaning to preserve the metal’s corrosion resistance and structural integrity.
Although precise plate alignment sets the foundation, executing a two-step tacking process guarantees your aluminum joints stay securely positioned throughout welding.
Begin by clamping and brushing the joint surfaces, ensuring clean contact. Place your first tack about ½ inch from the joint end, establishing a stable weld puddle before applying full heat.
This initial tack prevents the joint from popping loose during subsequent handling. Next, strategically add a second tack midway along the joint, confirming alignment and further securing the plates.
Each tack should be formed with controlled heat input to avoid distortion or burn-through. Maintain consistent torch angle and arc length to produce uniform puddles.
This two-step approach provides strong, stable alignment, reducing the risk of joint movement and ensuring precise weld bead placement during the final pass. Proper heat input control is essential to minimize distortion and maintain joint integrity during tacking.
Allowing the aluminum joint to cool between tacks prevents overheating and distortion, preserving the integrity of your weld.
After placing each tack, pause long enough to let the metal temperature drop to near ambient. This cooldown reduces residual stress and minimizes warping, especially critical with thicker aluminum sections.
Use a temperature-indicating crayon or infrared thermometer to monitor heat buildup if needed. Avoid rushing the process, as excessive heat can alter joint alignment and compromise strength.
When ready, resume tack welding, ensuring consistent puddle formation and firm fusion without remelting previous tacks. This controlled approach maintains dimensional accuracy and optimizes joint stability, setting a solid foundation before executing full weld passes.
Cooling between tacks is essential for strong, distortion-free aluminum welds that meet structural requirements.
Controlling amperage to establish a stable puddle quickly is key to preventing overheating and maintaining weld quality during tack welding, as explained in the Heat control technique.
Adding filler metal during TIG welding requires steady coordination between your hands to guarantee consistent heat input and weld pool control.
Hold the torch at a 90-degree angle, pushing it forward smoothly while feeding the filler rod into the leading edge of the puddle.
Maintain a 90-degree torch angle, advancing smoothly as you feed the filler rod into the puddle’s leading edge.
Use a slow, steady motion with your filler hand, dipping the rod just enough to maintain a consistent bead size without disrupting the arc.
Control heat by adjusting the foot pedal, starting at the calculated amperage and easing off as the weld progresses to prevent burn-through.
Monitor puddle size and color closely; an overly large puddle signals excess heat, while a small puddle indicates insufficient penetration.
Manage heat precisely to maintain weld integrity and avoid defects like porosity or warping.
Controlling the weld puddle requires constant attention to heat input and bead shape as you progress.
You’ll want to monitor the puddle closely, adjusting your foot pedal to maintain a consistent width and prevent washout or overheating at the edges.
Use smooth, full-hand torch movements rather than finger-only motions for longer welds to keep heat distribution even.
Add filler metal steadily at the leading edge, matching travel speed to puddle size.
As you approach the end, ease off the amperage gradually to avoid crater formation.
Hold the torch steady during post-flow to shield the weld as it cools.
These precise adjustments guarantee a clean, uniform weld bead with straight toes and effective oxide removal, giving you a strong finish every time.
You need a welding helmet with a proper shade (usually #10-13) to protect your eyes from intense UV and IR radiation.
Wear flame-resistant gloves and a long-sleeve jacket to shield your skin from sparks and heat.
Use safety glasses beneath your helmet for extra eye protection.
Ensure good ventilation to avoid inhaling aluminum fumes, and wear hearing protection if noise levels are high.
Always use leather boots to protect your feet from molten metal.
Just like a chef adjusts seasoning for each dish, you must tweak TIG settings for aluminum alloys.
High-strength 6000-series needs lower amps to avoid cracking, while softer 1000-series demands more heat for fusion.
You’ll alter AC balance too; more cleaning for oxidized 3000-series, less for clean 5000-series.
Adjust frequency and pulse to control penetration and puddle fluidity, ensuring precise, defect-free welds every time.
You can tig weld aluminum outdoors in windy conditions, but you’ll need to take extra precautions.
Wind disrupts your argon shielding gas, causing oxidation and poor weld quality. To prevent this, use windshields or enclosures around your weld area.
Increase gas flow slightly and position yourself to shield the torch from wind. Always monitor your weld puddle closely for signs of contamination.
Adjust your technique accordingly to maintain a clean, consistent weld.
You know what they say: “A stitch in time saves nine.”
Common defects you’ll face when TIG welding aluminum include porosity from trapped gases, cracking due to rapid cooling or contamination, and lack of fusion caused by insufficient heat or improper torch angle.
You might also see oxide inclusions if you don’t clean properly.
Precise control of heat input, shielding gas, and surface prep is vital to avoid these flaws and guarantee a strong, clean weld.
You clean TIG welding equipment after aluminum welding by first turning off and unplugging the machine.
Remove the tungsten electrode, inspect it for contamination, and sharpen or replace it as needed.
Clean the torch cup and gas lens with a stainless steel wire brush to remove aluminum oxide residue.
Wipe down surfaces with acetone to eliminate grease or debris.
Finally, check the gas lines and fittings for leaks or blockages before reassembling.
You might think welding aluminum is all about brute force and high heat, but it’s actually precise control and delicate technique that make the difference.
Preparing the metal meticulously contrasts with the fluid motion you’ll use to guide the torch.
Tack welding aligns the pieces firmly, yet adding filler metal demands a gentle balance to avoid burn-through.
Mastering these opposing actions guarantees your TIG welds are both strong and flawless every time.