Phone:
(701)814-6992
Physical address:
6296 Donnelly Plaza
Ratkeville, Bahamas.
Phone:
(701)814-6992
Physical address:
6296 Donnelly Plaza
Ratkeville, Bahamas.

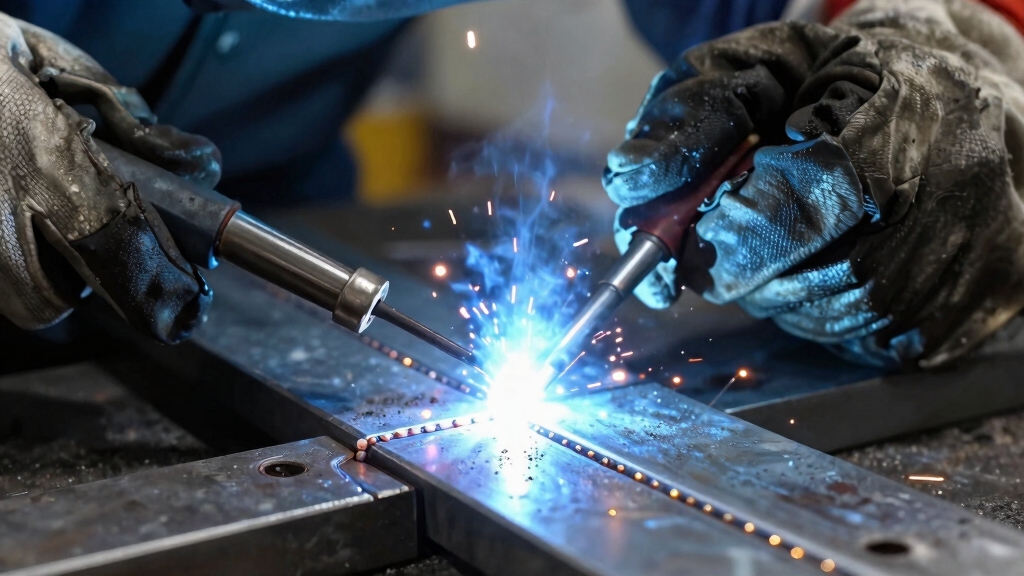
When you tack weld, you create small, temporary welds to hold parts precisely in place before final welding.
This method minimizes heat input, prevents distortion, and maintains joint alignment and gap integrity.
You can quickly adjust or reposition parts, reducing the need for bulky clamps and fixtures.
Tack welds come in several types depending on your material and gap size, ensuring stability while controlling heat.
Understanding these basics sets the stage for mastering effective welding setups.
Tacking in welding involves applying small, temporary welds to hold metal pieces in precise alignment before completing the final weld.
You’ll use low heat and short arcs to create these small, dot-like welds, typically no longer than one inch, to secure parts in place.
This temporary process prevents movement, maintains joint gap and orientation, and reduces distortion caused by heat during the final weld.
By applying tacks with the same welding method as the final weld, often at lower power, you guarantee compatibility and stability.
Tacking also lets you test and adjust fit-up before committing to permanent welding, minimizing errors and improving overall quality.
You’ll find it essential for maintaining precision and controlling assembly integrity throughout the welding process.
Proper tacking ensures the joint meets minimum leg lengths specified by relevant welding codes, which is critical for weld strength and integrity.
When it comes to tack welds, you’ll find a variety of types, each one designed for specific conditions. For instance, bridge tack welding is a great choice when you’re looking to maintain gaps. It involves alternating tacks to keep everything in place.
On the other hand, if you’re dealing with larger gaps, hot tack applications are the way to go. They fill those spaces with extra filler metal, ensuring a solid hold.
And if your parts fit tightly, standard tacking is perfect. It allows for precise alignment before you dive into the final welding process. So, depending on your project, there’s a tack weld that’s just right for the job! Proper weld pool control during tacking is essential to prevent defects and ensure strong, reliable joints.
Bridge tack welding employs strategically placed weld dots on alternating sides of a joint gap to control heat distribution and minimize distortion. You’ll find this technique essential when working with materials prone to warping due to uneven heating.
By alternating the tacks, you allow the metal to cool more evenly, preserving alignment and joint integrity.
When applying bridge tack welding, consider these key points:
This method effectively stabilizes parts before final welding, reducing rework and maintaining dimensional accuracy. Controlling heat input during tacking is crucial to prevent undesirable microstructural changes in the weld and heat-affected zone.
Applying hot tacks involves depositing excess filler metal to bridge gaps between workpieces. This provides a robust temporary connection where direct contact isn’t possible.
You use hot tacking primarily when gaps exceed typical tack weld thickness or when parts can’t be clamped tightly. This technique guarantees structural stability by creating a strong filler bridge that resists movement during final welding.
Unlike standard tacks, hot tacks require controlled heat input to avoid excessive distortion while maintaining sufficient fusion. You’ll find hot tacks essential in assembling thick sections or irregular joints where alignment must be preserved without full contact.
Selecting the right filler material compatible with base metals and adjusting arc parameters is critical to achieve reliable hot tack welds. This facilitates efficient, precise final welds.
Maintaining proper heat input control during hot tacking is vital to prevent weakening the joint or causing distortion.
While hot tacks address gaps that prevent direct contact between parts, standard tacks focus on securing components that are already closely aligned or touching.
You use standard tack welding to maintain precise alignment and prevent movement during final welding. This method typically involves small welds no longer than an inch, applied intermittently along the joint.
You should consider these types of standard tacks:
Each type helps maintain joint stability while limiting heat input and distortion. Properly clamping the workpiece with a C-clamp to stabilize during tack welding ensures consistent bead quality and a solid foundation for final welds.
When you use bridge tack welding, it’s all about how you place those tacks. You want to alternate the tack placement on either side of the gap. This helps control the heat input and encourages even cooling.
Plus, it does a great job of stabilizing the joint and keeping distortion at bay, which can happen when heat gets concentrated in one spot. Managing heat input carefully is essential to minimize distortion and cracking in thicker materials.
Mastering alternating tack placement, known as bridge tack welding, is essential for maintaining joint integrity when gaps exist between metal pieces. This technique involves placing small welds alternately on each side of the gap, creating a “bridge” that holds parts together securely while allowing controlled cooling.
When you apply alternating tacks, you:
You’ll use the same welding process as the final weld but at lower heat input, ensuring strong, temporary bonds. Alternating tack placement is especially useful when fixtures can’t fully stabilize the assembly or when joint gaps vary. This provides flexibility and enhanced control during preparation for the final weld. Employing short, controlled weld passes during alternating tack placement helps absorb excess heat and prevents localized overheating.
Managing heat effectively during bridge tack welding is critical for preserving the integrity of joints with gaps. By alternating tacks on each side, you allow sections to cool between welds. This minimizes thermal distortion and residual stress.
This controlled heat input prevents warping and maintains gap uniformity, essential for the final weld quality.
| Aspect | Benefit | Impact |
|---|---|---|
| Alternating tacks | Even heat distribution | Reduces distortion |
| Cooling intervals | Controlled thermal cycles | Preserves metal properties |
| Minimal heat input | Limits expansion | Maintains joint alignment |
You optimize heat management by balancing short weld times and cooling phases. This ensures dimensional stability and superior mechanical properties in the welded assembly. Proper preheating and controlled cooling improve weld durability by minimizing residual stresses and cracking risks.
Effective heat management sets the stage for employing gap bridging techniques, particularly bridge tack welding. This method addresses the challenges of joining metal pieces separated by small gaps.
You apply small, alternating tacks on either side of the gap. This allows controlled cooling and prevents excessive heat buildup that can cause warping. Bridge tack welding maintains alignment without fully fusing the joint, preserving gap integrity for final welding.
To execute gap bridging effectively, you should:
This method guarantees precise joint preparation, reduces thermal stress, and facilitates a high-quality final weld. Mastery of precise positioning is essential to ensure strong seam formation and reliable joints when performing bridge tack welding.
Choosing the best welding process for tack welding often depends on the specific materials, joint configuration, and production requirements you’re working with.
MIG welding offers speed and ease for most common metals. TIG welding provides precise heat control for thin or exotic materials.
Stick welding suits thicker or dirty metals but may introduce more heat distortion. Flux-cored arc welding (FCAW) balances penetration and speed, ideal for outdoor or heavy-duty jobs.
Consider your project’s material type, thickness, and environment to select the most suitable tack welding method. Proper wire feed speed and voltage adjustments are essential to ensure a stable arc and strong tack welds.
| Welding Process | Best Application |
|---|---|
| MIG | General purpose, mild steel |
| TIG | Thin materials, stainless steel |
| Stick | Thick or contaminated metals |
| FCAW | Outdoor, heavy-duty structures |
| Spot Arc Mode | Thin plates, precise dot placement |
Selecting the right filler metal complements your choice of welding process by ensuring compatibility with the base materials and maintaining joint integrity during tack welding.
Choosing the proper filler metal enhances welding process compatibility and preserves joint strength during tack welding.
You want to focus on three key factors to make an informed decision:
Before you begin tack welding, prepare your work area and materials meticulously to ensure precise alignment and peak weld quality.
Start by cleaning joint surfaces and selecting compatible filler metal. Position parts firmly and set your welding machine to lower power than the final weld.
Apply small, evenly spaced tacks, alternating sides if using bridge tacking to control heat distribution.
Inspect each tack for penetration and consistency to ensure proper hold without excessive heat input.
| Step | Action | Key Consideration |
|---|---|---|
| 1 | Clean surfaces | Remove contaminants |
| 2 | Align and clamp workpieces | Prevent movement |
| 3 | Set welding parameters | Use reduced power |
| 4 | Apply tack welds | Keep length under 1 inch |
| 5 | Inspect tacks | Check penetration, spacing |
While fixtures and clamps provide mechanical stability, tack welding offers distinct advantages that can streamline your welding process.
Tack welding secures parts with minimal heat input, maintaining alignment without bulky hardware. This flexibility allows you to make quick adjustments, avoiding time-consuming fixture reconfigurations.
Tack welding holds parts securely with minimal heat, enabling quick alignment adjustments without heavy fixtures.
Additionally, tack welds reduce metal distortion compared to clamping pressure, preserving material integrity. Here are three key advantages for you to take into account:
Tack welding offers flexibility and control that often reduce the need for traditional fixtures. It’s important to understand how it compares to spot welding, another common joining method.
Tack welding uses low heat and a small arc to create temporary welds that hold parts in position for final welding. It applies filler metal compatible with the base material, forming small beads or dots along the joint.
In contrast, spot welding fuses metals permanently through electrical current and pressure, creating round dimples without filler. Tack welding suits various metals and thicknesses, while spot welding mainly targets thin sheets.
Additionally, tack welding allows for adjustments before the final weld, whereas spot welding provides immediate, permanent fusion. Recognizing these differences helps you select the appropriate technique for your project’s requirements.
Because metal expands and contracts unevenly during welding, you’ll often face distortion and misalignment issues if parts aren’t securely fixed.
Tacking addresses this by stabilizing components early in the process, minimizing heat-induced movement.
When you tack weld, you:
You should let each tack weld cool for at least a few seconds to a minute before proceeding with the final weld, depending on the material thickness and heat input.
Allowing adequate cooling prevents distortion and maintains joint alignment.
Cooling too quickly or too slowly can affect weld quality, so monitor temperature carefully.
For thicker metals or high heat applications, longer cooling times may be necessary to stabilize the workpieces before final welding.
Yes, you can inspect tack welds for strength before final welding, but methods are typically non-destructive and limited in scope.
Visual inspection guarantees proper size, location, and absence of cracks or porosity.
For critical applications, you might use ultrasonic or dye penetrant testing to detect defects.
However, tack welds are temporary; their primary role is alignment, so extensive destructive testing isn’t common before final welding.
Think of tack welding like putting tiny anchors before setting a heavy sail; if you skip safety, everything can slip.
You need to wear proper PPE, especially eye protection, since short arcs can flare unexpectedly.
Make certain good ventilation because fumes spike with quick, repetitive tacks.
Also, secure your workspace to avoid sparks igniting nearby materials.
These precautions prevent accidents unique to the concentrated, rapid heat input of tack welding.
Tack welding affects post-weld heat treatment by stabilizing the assembly and reducing distortion during heating cycles.
Because tacks use less heat and minimal filler, they limit residual stresses and microstructural changes.
This allows you to apply heat treatment more uniformly.
However, you must ensure that tack welds are properly integrated or removed before final treatment.
This is crucial to avoid localized hardness or weak spots that could compromise mechanical properties or cause uneven thermal expansion.
Imagine you’re fabricating an aircraft frame from aluminum alloys. You’d use TIG bridge tacking to minimize heat input and distortion while maintaining precise alignment.
Yes, specific techniques like alternating bridge tacks or pulse TIG tacking help control thermal stress and prevent warping.
These methods use lower amperage and shorter arcs, ensuring the aluminum’s delicate microstructure stays intact. This is essential for structural integrity and corrosion resistance.
Tacking in welding is the compass guiding your project’s alignment, ensuring every piece holds firm before the final bond.
By mastering tack welds, you control heat distribution, prevent distortion, and maintain precision, like setting the foundation stones for a structure.
Embrace tacking not just as a step, but as the anchor that secures your work’s integrity. This approach turns your welding from a hopeful connection into a guaranteed success.