Phone:
(701)814-6992
Physical address:
6296 Donnelly Plaza
Ratkeville, Bahamas.
Phone:
(701)814-6992
Physical address:
6296 Donnelly Plaza
Ratkeville, Bahamas.
Start by stripping 1 to 1.25 inches of outer sheathing. Then remove 1 inch of inner insulation and twist exposed wires evenly.
Secure argon flow at 8–25 cubic feet per hour and hold wires with 0.5–1 mm bare metal protruding beyond jaws.
Position the carbon electrode 5–6 mm from wires, strike the arc briefly, and avoid overheating.
Use capacitor discharge welding for delicate wires. Proper technique guarantees strong, contamination-free joints. There’s more to mastering this process for flawless thermocouple welds.

Begin by stripping 1 to 1.25 inches of the outer sheathing from both ends of the thermocouple wire.
Next, carefully remove 1 inch of inner insulation from each lead at both ends, exposing the metal conductors.
Use pliers or side cutters to twist the exposed wire ends evenly 2 to 3 times, guaranteeing a tight and uniform twist.
Trim the twisted wires square, leaving a precise 1 millimeter to 1/8 inch protrusion to facilitate gripping during welding.
For larger diameter wires, align the exposed wires firmly side-by-side to maximize contact area.
This preparation guarantees clean, stable electrical contact, essential for a reliable weld.
Maintain steady hands and use appropriate tools to avoid damaging the wire strands or insulation during this critical setup phase.
Ensure to maintain a proper electrode distance during welding to avoid contamination and ensure arc stability.
When setting up argon gas and welding equipment, connect the argon hose securely to the supply. Adjust the flow regulator to maintain a consistent flow rate between 8 and 25 cubic feet per hour.
Press the purge button to flush the weld area, guaranteeing an inert atmosphere that prevents oxidation.
Next, select pliers or a wire holder matching your thermocouple wire gauge.
Grip the prepared wires so that 0.5 to 1 mm protrudes beyond the jaws, contacting only bare metal to avoid insulation interference.
Position the wire holder precisely 5 to 6 mm from the carbon electrode or block to optimize arc stability.
Confirm all connections are tight and check argon flow before proceeding to welding. This setup guarantees a controlled environment for reliable welds.
Using a consistent argon flow rate ensures stable arc conditions that minimize contamination and improve weld quality.
Although thermocouple welding involves small-scale arcs, you must wear shaded goggles or protective glass to shield your eyes from intense light and sparks.
Wear shaded goggles during thermocouple welding to protect your eyes from intense light and sparks.
Always confirm your argon gas flow rate is adequate before welding to minimize carbon burning and fumes.
Work in a well-ventilated area or outdoors to avoid inhaling hazardous gases.
Maintain a steady hand when positioning wires near the carbon electrode to prevent accidental contact that could cause shorts or inconsistent welds.
Avoid over-tightening wire holders; use finger-tight plus a slight turn to secure wires without damaging insulation or metal.
Regularly inspect your equipment for wear, and never bypass safety interlocks.
Following these precautions safeguards both your safety and the quality of your thermocouple welds.
Ensure you always wear properly fitted, certified Personal Protective Equipment to prevent burns and eye injuries during welding.
To get the best weld, you’ll want to align those thermocouple wires side-by-side. This ensures they’ve consistent contact, which is key for a reliable weld. Grab some pliers or wire holders that fit the wire gauge you’re working with. Make sure to grip the bare metal firmly, but don’t overdo it—too much tightness can cause issues.
Now, when you position the wires, do so carefully. Keep them close to the carbon electrode, and make sure everything is stable. This setup will help you achieve peak arc contact, which is exactly what you want for optimal welding results. Maintaining the correct arc length between the electrode and wires is essential to ensure a stable electric arc and consistent weld quality.
For ideal welding contact, position the twisted thermocouple wires so their bare metal ends lie firmly side-by-side without overlapping.
Make sure the stripped ends extend about 1 mm beyond the twist, forming a clean, flat interface for the weld.
Align the wires parallel, maintaining consistent contact along their length to promote uniform heat distribution during arcing.
Avoid gaps or angular misalignment, as these can cause weak joints or incomplete fusion.
Use precision pliers or a wire holder to maintain this alignment steadily without compressing the wires excessively, which could deform or damage them.
Confirm the exposed metal surfaces are free from oxidation or contamination before welding.
Proper alignment minimizes resistance and guarantees a strong metallurgical bond, essential for reliable thermocouple performance.
To ensure weld integrity, clean the wire surfaces immediately before welding to remove any contaminants or oxide layers that could cause defects in the joint, as explained in the importance of cleaning aluminum.
Once the twisted thermocouple wires are aligned side-by-side with clean, oxide-free surfaces, securing them firmly without damaging the metal is the next step.
Use pliers or a wire holder sized to the wire gauge, gripping only the bare metal 0.5 to 1 mm beyond the jaws. Avoid over-tightening; apply finger-tight pressure plus a slight turn to prevent deformation.
Position the wires so their ends protrude evenly for consistent arc contact. Maintain a 5-6 mm distance from the carbon electrode to the grip point to stabilize welding.
Make certain no insulation contacts the holder to avoid grounding issues. A steady hand and proper grip guarantee reliable electrical contact and prevent slippage during welding, ensuring a strong, consistent weld joint.
Wearing heat-resistant gloves during this process helps protect your hands from burns and electrical shock while maintaining dexterity.
Alright, let’s get into it!
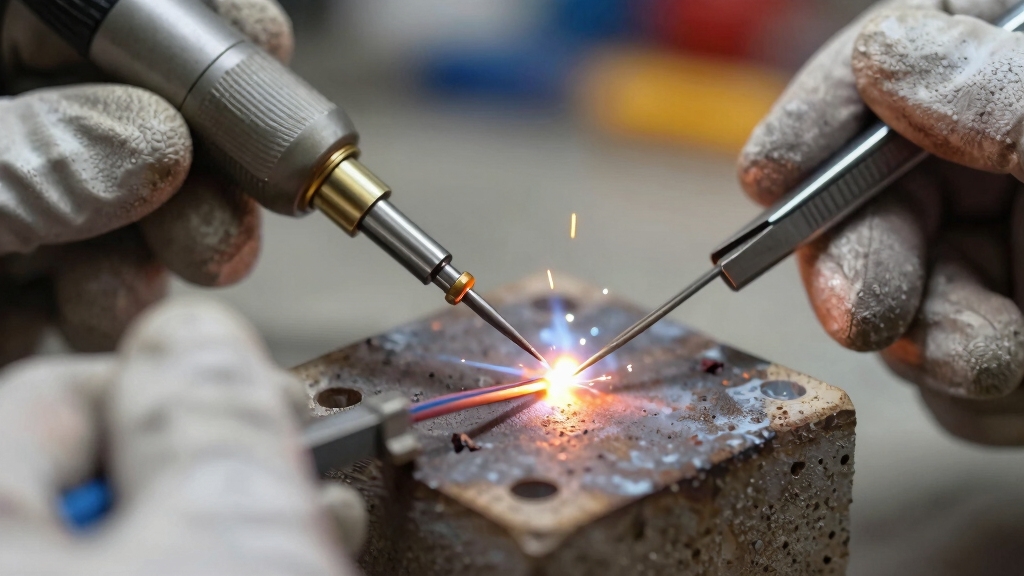
First, you’ll want to position the carbon electrode about 5-6mm away from those twisted wire ends. It’s all about getting that alignment just right to strike the arc.
Once you’ve got it in place, go ahead and press the weld button or foot switch. You’ll want to hold it down just long enough to see that weld flash—then release it right away.
It’s a quick motion, but super important!
As you do this, keep a steady hand. You’re aiming for a consistent, momentary arc that fuses those wires perfectly without any overheating.
Remember, maintaining proper arc control ensures precision and prevents damage during welding.
Easy peasy, right?
Strike the arc by pressing the weld button or foot switch while holding the carbon electrode close to the twisted thermocouple wires.
Maintain steady control to initiate a stable arc, indicated by a visible weld flash.
Release the switch immediately once the arc strikes to prevent wire damage.
Draw the electrode slightly away to sustain a momentary arc, allowing the metals to fuse.
| Step | Action |
|---|---|
| 1 | Hold carbon electrode near wires |
| 2 | Press weld button or foot switch |
| 3 | Observe weld flash |
| 4 | Release switch immediately |
| 5 | Draw electrode away slightly |
This precise technique guarantees a reliable weld without overheating or excess burn.
It is essential for thermocouple integrity.
Proper arc initiation technique is critical to avoid unintended arc strikes that can weaken the base metal and compromise the weld quality.
Proper carbon electrode positioning is essential for achieving a stable arc when welding thermocouple wires. Position the wire holder 5-6mm from the carbon electrode to guarantee consistent arc striking.
Grip the prepared wires firmly in pliers with 1/2-1mm protruding beyond the jaws. Avoid insulation contact to prevent grounding issues. Hold the carbon rod steady and approach the wire tips carefully, maintaining the correct distance to initiate the arc without excessive contact.
Once the arc strikes, quickly draw the carbon electrode away to sustain a momentary arc on the twisted wires, allowing proper fusion. Adjust your hand steadily to prevent arc instability.
Assure argon gas flows steadily at 8-25 cubic feet per hour to shield the weld zone effectively during this process. Maintaining consistent argon shielding gas flow is critical to prevent oxidation and ensure weld integrity.
When working with fine thermocouple wires, employing capacitor discharge welding guarantees a controlled, high-energy pulse that fuses the twisted wire ends without excessive heat buildup. This method charges the capacitor between welds, delivering a precise burst of energy that minimizes thermal distortion and preserves wire integrity.
Ensure wires are properly twisted and held firmly, protruding slightly beyond the holder jaws. Position the wire holder 5-6mm from the carbon electrode or block. Trigger the capacitor discharge weld; the arc duration is brief and consistent. Using a sharp electrode tip can further improve arc stability and weld quality during this process.
| Step | Detail |
|---|---|
| Preparation | Twist wires 2-3 times evenly |
| Positioning | Hold wires 5-6mm from carbon rod |
| Welding | Discharge capacitor for pulse arc |
This technique is ideal for delicate wire diameters requiring precision without overheating.
Before adding heat shrink or finalizing your thermocouple assembly, you need to verify the weld quality and electrical functionality.
Start by visually inspecting the weld for a uniform ball joint that blends both wire metals without cracks or voids.
Next, confirm no insulation contacts the weld to prevent grounding issues.
Ensure insulation is clear of the weld to avoid any potential grounding problems.
Use an amplifier or LabVIEW system to test the thermocouple’s voltage output under controlled temperature conditions.
Confirm the output matches expected temperature readings on a calibrated thermometer.
Finally, perform a mechanical stress test by gently flexing the wires near the weld to verify joint integrity.
Although standard welding setups offer reliable results, exploring alternative techniques can provide effective solutions for joining thermocouple wires in varied conditions.
You can use carbon rods clamped in a vice, touching and momentarily arcing without a machine to form a weld.
For Type K wires, applying an oxy-acetylene or hydrogen torch allows precise fusion, especially where electric arc access is limited.
Capacitor discharge welders generate short, controlled arcs forming functional joints without creating a rounded tip, ideal for fine wires.
Another method involves striking a TIG arc on a copper plate and transferring it to the wires, ensuring localized heating.
For less critical applications, twisting and soldering or brazing the wires offers a simpler, though less robust, connection option.
Always match the technique to wire type and weld quality requirements.
To achieve reliable thermocouple welds, you must avoid common mistakes that compromise joint integrity and measurement accuracy.
Make sure proper wire preparation by stripping and twisting wires evenly. Uneven twists cause weak welds.
Maintain consistent argon flow to prevent oxidation.
Don’t apply excessive pressure with holders, as it damages insulation and wires.
Avoid prolonged arcing, which can overheat and alter thermocouple characteristics.
Finally, verify welds immediately to catch defects before insulation application.
You’ll find Type K (Chromel-Alumel) wires best suited for welding due to their widespread use and compatibility with welding methods like carbon arc or capacitor discharge.
Type J (Iron-Constantan) and Type T (Copper-Constantan) also weld well, but require careful heat control.
Avoid wires with delicate coatings or very fine gauges unless using specialized capacitor discharge welders.
Always match your welding technique to wire composition and diameter for peak joint integrity.
Think of wire diameter like the thickness of a rope you’re tying; thicker ropes need more careful handling.
Larger diameters demand stronger arc power and longer weld times to guarantee proper fusion.
Smaller wires require delicate, short bursts to avoid melting through.
You’ll adjust argon flow and electrode distance accordingly.
Thicker wires need more gas and a wider gap.
Precision here guarantees a solid, reliable weld every time.
Yes, you can reweld thermocouple wires if the first weld fails. Carefully remove any oxidation or residue from the initial weld area.
Re-strip and twist the wire ends as needed for a clean, even contact. Make certain proper argon flow and electrode positioning before reigniting the arc.
Use precise, momentary arcs to prevent overheating. Always verify the rewelded joint’s integrity with testing equipment before proceeding.
You’ll notice ambient temperature affects your welding by influencing wire conductivity, arc stability, and gas flow consistency.
In colder environments, metal contracts, making perfect contact harder and arc initiation slower.
In warmer settings, increased conductivity can cause premature arcing or overheating.
You must adjust argon flow, hold wires steady, and monitor arc duration carefully.
Consistent temperature control guarantees precise, reliable welds and prevents defects caused by thermal expansion or contraction.
You need to regularly inspect your argon hose and flow regulator for leaks or blockages, ensuring consistent gas delivery.
Clean the carbon electrode and replace it when worn to maintain arc stability.
Check the capacitor discharge welder’s charge capacity and wiring for damage.
Lubricate moving parts in holders or pliers lightly to prevent stiffness.
Always verify electrical connections are secure.
Store equipment in a dry, dust-free environment to avoid contamination or corrosion.
Welding thermocouple wire demands the precision of a surgeon and the patience of a craftsman.
By preparing your wires carefully, maintaining a stable arc with argon shielding, and employing capacitor discharge welding, you guarantee reliable, accurate temperature readings.
Like Da Vinci’s meticulous brush strokes, your methodical technique will prevent common errors and extend the life of your thermocouples.
Follow these steps closely, and your welds will stand the test of time and heat.