Phone:
(701)814-6992
Physical address:
6296 Donnelly Plaza
Ratkeville, Bahamas.
Phone:
(701)814-6992
Physical address:
6296 Donnelly Plaza
Ratkeville, Bahamas.
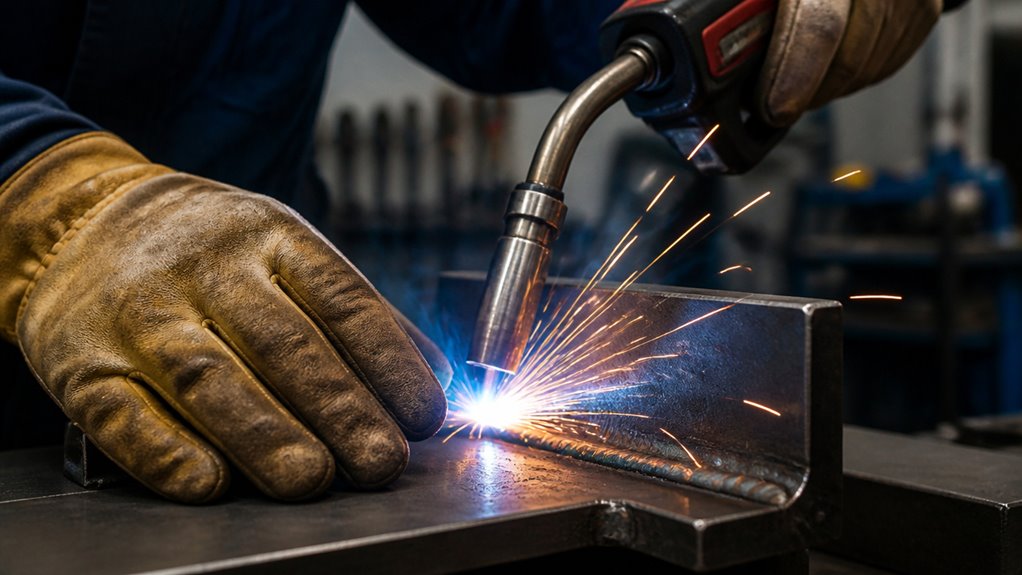
To use a welding gun effectively, hold it with a relaxed, firm grip to support balance and reduce fatigue. Maintain a travel angle around 15 degrees and keep the nozzle ¼ to ½ inch from the workpiece for a stable arc and good penetration.
Adjust wire feed speed, voltage, and shielding gas flow to match the joint type and thickness. Move the gun steadily at an appropriate speed to ensure a consistent bead shape. Proper handling and settings are key to strong, clean welds. Understanding these basics sets you up for refining your technique.
When you activate a welding gun, it simultaneously feeds the electrode wire, supplies shielding gas, and delivers electrical current to the weld zone. This initiates the arc needed to generate heat.
The electrode wire contacts the workpiece, completing the electrical circuit and causing the arc to melt both the wire and base metal. This molten pool forms the weld puddle.
As you move the gun steadily along the joint, the wire continuously feeds, filling the gap with molten metal that solidifies into a strong weld bead.
Shielding gas protects the molten weld from atmospheric contamination, ensuring sound fusion and preventing oxidation.
Proper coordination of wire feed, gas flow, and arc initiation is essential to create clean, durable joints that meet structural requirements.
Selecting the appropriate shielding gas mixture based on the base metal and welding conditions helps optimize weld quality and minimize spatter.
Mastering your grip on the welding gun markedly improves control and reduces hand fatigue during operation.
Hold the handle with a relaxed but firm grip, placing your thumb and forefinger comfortably around it.
Maintain a relaxed yet firm grip, comfortably positioning your thumb and forefinger on the handle.
Avoid gripping too tightly, which can cause unnecessary strain.
Use your remaining fingers to support balance without excessive pressure.
Position your hand so a light pinch forms just behind the trigger and below the stem, minimizing trigger fatigue.
When possible, stabilize the gun with your other hand to enhance smoothness and precision during movement.
This two-handed support is especially helpful for longer welds or intricate work.
Maintaining this grip technique allows precise manipulation of the gun, improving weld quality and operator comfort throughout your welding tasks.
Additionally, maintaining the correct stickout length helps ensure a stable arc and consistent weld quality.
When you’re welding, it’s important to hold your welding gun at the right angle. A good rule of thumb is to keep it at about 15 degrees. This helps ensure that your arc stays stable and your weld quality remains high.
Now, you’ll also want to think about whether to use a push or drag technique. Each has its own benefits depending on what you need—like how deep you want your penetration or how well you can see what you’re doing.
Don’t forget to adjust your work angle based on the type of joint you’re working with! For butt joints, aim for 90 degrees, while for fillet welds, a 45-degree angle works best. This way, you’ll get the best results for your specific project.
Maintaining a 10–15° travel angle and keeping the nozzle 1/4–1/2 inch from the workpiece are also key to achieving consistent weld quality.
Although choosing the correct travel angle might seem straightforward, it critically influences weld quality and consistency.
Aim for a travel angle between 5 and 20 degrees from vertical, adjusting based on joint type and position. For typical MIG welding, start around 15 degrees.
Maintain this angle steadily as you move the gun along the joint to guarantee consistent heat input and filler metal deposition.
Too steep or shallow an angle can cause irregular bead shape, poor fusion, or excessive spatter.
Keep your wrist relaxed to hold the gun firm but flexible, allowing smooth movement.
Monitor the weld pool closely and adjust the angle as needed to maintain control and penetration.
Precise angle control directly affects bead uniformity and overall weld strength.
Using the correct travel angle helps optimize arc stability, which is essential for high-quality MIG welds.
When deciding how to hold your welding gun, understanding the push and drag techniques can make a significant difference in weld quality.
The push technique involves angling the gun so the nozzle points away from the weld puddle, pushing the puddle forward. This provides better visibility, a cleaner bead, and less spatter. It’s ideal for thinner materials and out-of-position welding.
Conversely, the drag technique means pulling the gun toward the puddle, with the nozzle angled back into the weld. This increases penetration and heat input, suitable for thicker metals requiring stronger fusion.
You’ll typically hold the gun at about 10 to 20 degrees from vertical in both methods, adjusting slightly based on material and position. Mastering these angles guarantees consistent arc stability and weld bead control.
The choice between push and drag also affects gas shielding efficiency, which is crucial for preventing contamination and ensuring weld quality.
Three primary joint types—butt, fillet, and lap—each require specific work angles to guarantee ideal weld penetration and bead shape. Holding your welding gun correctly assures consistent arc stability and weld quality.
Here’s what you need to do:
Adjusting your gun angle per joint type will help you achieve strong, defect-free welds every time. When welding thin metals, controlling heat input is crucial to prevent burn-through and warping, especially with precise angling and steady travel speed.
Mastering the correct welding gun settings for different joint types guarantees peak weld quality and efficiency.
Start by adjusting voltage and wire feed speed based on joint thickness and configuration. For butt joints, use moderate voltage and steady wire feed to ensure full penetration without burn-through.
Fillet welds require slightly lower voltage and slower wire feed to control bead shape and avoid excessive spatter.
When welding lap joints, increase wire feed speed to compensate for thicker cross sections and maintain consistent fusion.
Modify stickout length accordingly; shorter for thinner materials to enhance arc stability, longer for thicker joints to improve penetration. Always monitor bead appearance and adjust settings incrementally.
Consistent travel speed and angle complement these adjustments, securing uniform weld beads for each joint type.
Never attempt welding while the train is moving to prevent weld failures and ensure a strong bond.
Adjusting your welding gun settings to match joint types sets the stage for effective shielding gas flow management. Proper gas flow shields the weld pool from oxidation and contamination, ensuring strength and appearance. Start with the recommended flow rate, usually around 12 cubic feet per hour (CFH), then fine-tune based on conditions.
Use a flowmeter to monitor and adjust flow precisely. Always check for leaks in hoses and connections before welding.
Selecting the appropriate shielding gas blend can also influence optimal flow settings for different metals and welding methods.
Setting the correct shielding gas flow protects your weld integrity and maximizes your welding gun’s performance.
When you’re setting up your welding gun, getting the stickout length just right is super important. Aim for around 3/8 inch—that’s usually the sweet spot for ensuring a stable arc and top-notch weld quality.
If you go too far with it or not far enough, you might run into issues like spatter or weak penetration, which we definitely want to avoid.
Also, keep in mind that the ideal stickout can vary based on the thickness of the material and the type of joint you’re working with. So, don’t hesitate to adjust it as needed.
Finding that balance will help you maintain consistent weld performance every time!
Maintaining the correct stickout length is essential because it directly influences arc stability, which in turn affects penetration and bead quality.
Typically, maintaining the correct stickout length plays a crucial role in achieving consistent weld quality. You’ll want to keep the stickout around 3/8 inch (approximately 9.5 mm) for most MIG welding tasks.
Too short, and you risk excessive heat and spatter; too long, and you lose control over the arc and gas coverage.
To set the ideal stickout length, focus on these key points:
Consistently correct stickout improves your welding precision and efficiency. Proper stickout also helps maintain arc stability, which is essential for uniform welds and minimal spatter.
Maintaining the correct stickout length directly influences weld quality by controlling heat input, arc stability, and gas coverage.
Too short a stickout increases heat, risking burn-through and poor bead shape.
Too long reduces shielding gas effectiveness, causing porosity and spatter.
You must adjust stickout to balance penetration and weld appearance.
| Stickout Length | Effect on Heat Input | Weld Quality Impact |
|---|---|---|
| Short (< 3/8″) | High heat | Excess penetration, burn |
| Ideal (~3/8″) | Balanced heat | Stable arc, clean bead |
| Long (> 3/8″) | Low heat | Porosity, spatter issues |
Set your stickout precisely to maintain arc stability and consistent gas coverage.
This ensures a durable, defect-free weld bead every time.
When welding different materials or joint types, adjusting the stickout length guarantees peak heat input and gas coverage for each specific task.
Stickout, the distance the wire extends beyond the contact tip, directly affects weld quality and penetration.
Too short stickout overheats the tip and reduces gas shielding. Too long causes arc instability and poor fusion.
To set the right stickout:
Because travel speed directly affects weld quality and penetration, you need to move your welding gun steadily and at the correct pace. Moving too fast reduces penetration and causes weak welds.
Moving too slow increases heat input, causing burn-through or excessive bead width.
Use the following as a general guide for travel speed:
| Material Thickness | Wire Feed Speed (in/min) | Travel Speed (in/min) |
|---|---|---|
| 1/16″ | 150 | 8-12 |
| 1/8″ | 200 | 10-15 |
| 3/16″ | 300 | 12-18 |
| 1/4″ | 350 | 15-20 |
| 3/8″ | 400 | 18-22 |
Adjust your speed to maintain a consistent weld pool and uniform bead shape.
To keep your welding gun under smooth control, it’s important to grip it in a relaxed yet firm way. Try wrapping your thumb and forefinger comfortably around the handle. This way, you can maintain a good hold without straining.
You’ll also want to support the gun with your other fingers. This helps balance it out and reduces any unnecessary tension.
And whenever you can, use both hands for extra support. It really makes a difference in keeping your movements precise and steady along the weld joint.
Mastering the proper grip technique sets you up for smooth control and reduces hand fatigue during welding.
Hold the welding gun with a relaxed but firm grip. Your thumb and forefinger should rest comfortably around the handle, while your other fingers support balance without squeezing tightly. Lightly pinch behind the trigger and below the stem; this reduces strain and improves precision.
Follow these key steps:
This method guarantees consistent wire feed and steady travel speed, critical for producing quality welds with minimal strain on your hand.
Steady your welding gun by using two-handed support whenever possible to enhance control and reduce hand fatigue.
Place your dominant hand firmly around the gun handle with a relaxed grip. Your non-dominant hand should support either the gun body or the cable bundle close to the nozzle.
This stabilizes the gun, preventing unwanted movement and improving precision when maintaining the proper travel angle and stickout.
Two-handed support also helps you execute smoother, more consistent travel speeds, which are critical for uniform bead formation and penetration.
Avoid excessive squeezing; instead, apply balanced pressure to maintain control without muscle strain.
Although welding gun operation may seem straightforward, common mistakes can quickly compromise weld quality and safety. You need to watch for these errors and fix them promptly:
Correct these to improve your welds and avoid costly defects or hazards.
Fixing common welding gun mistakes sets the foundation for producing high-quality welds.
Evaluating your welds critically helps you refine your technique further. Examine your weld bead for a slightly crowned profile with smooth tie-ins at the edges.
Consistent width and height indicate steady travel speed and proper voltage settings. Watch for excessive spatter, which signals issues with your gun angle, travel speed, or voltage.
Check for full penetration without excessive backside bleed-through. Perform a bend test to confirm weld strength; ideally, the parent metal should fail before the weld.
Adjust your gun angle, wire feed, or travel speed based on these observations. Consistent evaluation and adjustment will improve your weld quality and overall technique efficiently.
You’ll want a MIG gun for thin to medium steel and aluminum, as it offers clean, controlled welds with shielding gas.
For heavy steel and outdoor work, a stick welding gun suits you better due to its versatility and tolerance to contaminants.
TIG guns are your best choice for stainless steel, aluminum, and non-ferrous metals needing precision.
Flux-cored guns work well with thicker metals and outdoor conditions where shielding gas isn’t practical.
Did you know that 80% of welding gun failures stem from poor maintenance? To keep yours running smoothly, regularly clean the contact tip and nozzle to prevent spatter buildup.
Use a wire brush or specialized nozzle cleaner, and replace worn tips promptly. Inspect the gun liner for debris and replace if necessary.
Always disconnect power before maintenance to avoid shock. Proper cleaning guarantees consistent arc stability and prolongs your gun’s lifespan.
You generally can’t use a MIG welding gun without shielding gas because it protects the weld pool from contamination and oxidation.
Without gas, the weld quality will degrade due to porosity and weak fusion.
However, flux-cored wire guns can operate without external shielding gas since the flux generates its own protective gas.
Always verify your wire type and manufacturer guidelines before attempting gasless welding to assure safety and weld integrity.
You should watch for electric shock by never touching the live wire or contact tip while the machine’s energized.
Protect your eyes and skin from arc rays with proper gear. Avoid burns from hot metal and sparks.
Guarantee good ventilation to prevent inhaling harmful fumes. Secure the ground clamp firmly to clean metal to prevent poor connections.
Always disconnect power before adjusting or replacing consumables to reduce injury risk.
When wire feeding acts like a stubborn mule, first check for clogged liners or worn drive rolls. These often cause jams. Clean or replace these parts as needed.
Next, verify your wire spool spins freely and that tension isn’t too tight or loose. Also, make certain the contact tip is clear and properly sized.
Finally, confirm your settings match the wire type and thickness to maintain smooth feeding and avoid interruptions.
Now that you know how to use your welding gun effectively, don’t treat it like a Victorian quill. Precision and control matter.
Hold your gun at the right angle, adjust settings carefully, and maintain consistent speed for strong, clean joints.
Support your gun steadily, avoid common mistakes, and regularly check weld quality to improve technique.
Master these steps, and your welding will be as reliable and sharp as a well-crafted chronometer.
Keep practicing to perfect your craft.