Phone:
(701)814-6992
Physical address:
6296 Donnelly Plaza
Ratkeville, Bahamas.
Phone:
(701)814-6992
Physical address:
6296 Donnelly Plaza
Ratkeville, Bahamas.
To weld a copper pipe, start by measuring and cutting it cleanly to length.
Next, thoroughly clean the pipe and fitting surfaces to remove oxidation and dirt.
Apply a thin, even layer of lead-free flux to both pipe and fitting.
Insert the pipe fully without twisting, then heat the joint evenly with a torch.
Touch solder opposite the flame; it should melt and flow smoothly.
Once cooled, wipe off excess flux for a strong, leak-free joint.
Keep following to master every step with confidence.
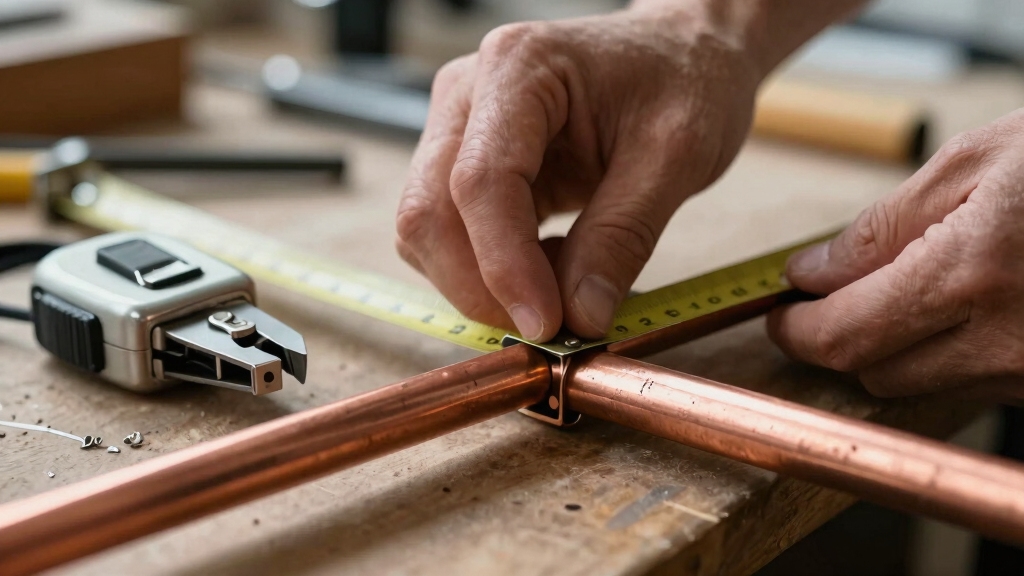
Start by measuring the copper pipe carefully to your desired length before cutting. Mark the spot clearly with a pencil or marker.
Position a tubing cutter around the pipe at the mark, guaranteeing it sits squarely. Rotate the cutter while gradually tightening the knob to avoid crushing the pipe.
Place the tubing cutter evenly on the mark and rotate while slowly tightening to ensure a clean cut without damage.
Continue rotating the cutter around the pipe, tightening a bit after each full turn. Maintain steady pressure, and keep going until the pipe separates cleanly.
After cutting, deburr both the inside and outside edges using a reamer or file to remove any sharp burrs or rough spots. This step guarantees a smooth fit and prevents damage to fittings during assembly.
Precise measurement and clean cuts set the foundation for a strong, leak-free joint. Proper surface cleaning is essential before welding to ensure a sound metallurgical bond and prevent defects.
Clean the end of the copper pipe and the inside of the fitting thoroughly using emery cloth or a wire brush.
Remove all oxidation, dirt, and any residue until the surfaces shine with bare metal.
This step is vital because any contamination can prevent a strong bond.
After cleaning, wipe away all debris with a dry cloth to avoid particles interfering with the joint.
Be careful not to touch the cleaned areas with your bare hands, as oils from your skin can cause poor adhesion later.
Remember, proper surface preparation accounts for about 90% of a successful joint.
Taking your time here sets the foundation for a reliable weld, so confirm every surface is spotless before moving on to the next step.
For the best results, perform cleaning immediately before welding to prevent surface re-oxidation that can compromise the joint quality.
Always apply a thin, even layer of lead-free flux to the outside of the pipe before assembly. Use a small brush to cover the entire pipe end evenly, avoiding thick spots or drips.
Next, coat the inside of the fitting to the full depth where the pipe will insert. When you apply flux, it helps clean the metal and promotes solder flow by capillary action.
Don’t overapply; excess flux can burn or cause uneven solder joints. After coating, you’ll be ready to join the pipe and fitting.
Proper flux application techniques ensure optimal wetting and prevent corrosion during soldering.
Once you’ve applied flux, insert the pipe fully into the fitting until it bottoms out, guaranteeing a snug and secure fit. This step is vital for a leak-free joint.
Insert the pipe fully into the fitting after applying flux to ensure a tight, leak-free connection.
Make sure the pipe and fitting align properly without disturbing the flux layer. If the pipe is vertical, you can secure it temporarily to prevent slipping during the heating process. Avoid rotating the pipe after insertion, as this can remove flux and compromise the bond.
Confirm pipe is fully seated to prevent gaps.
Check alignment for straightness and proper direction.
Hold pipe steady to maintain contact with fitting.
Inspect joint visually to ensure flux coverage remains intact.
Avoid contamination by not touching cleaned surfaces after assembly.
Proper surface preparation is essential before applying flux to ensure a strong and reliable brazed joint.
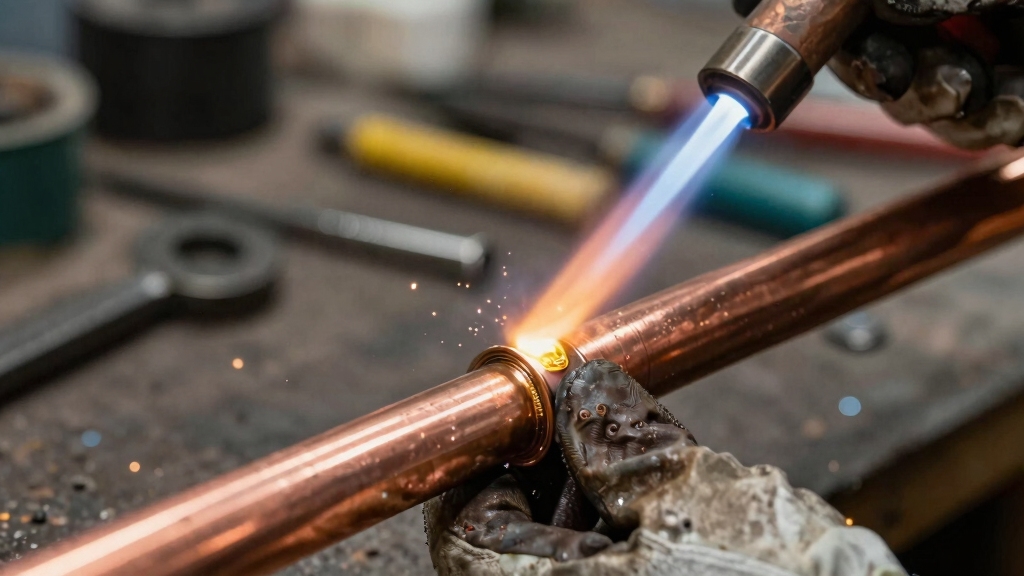
Begin heating the joint by holding the torch tip at a 45-degree angle to the fitting.
Focus the flame on the fitting side, not directly on the pipe, to encourage even heat distribution.
Move the flame around the base of the fitting in a circular motion, ensuring you heat all sides evenly.
For vertical joints, apply the flame to the middle of the fitting to control heat flow.
Avoid overheating any one spot, which can cause uneven solder flow or damage the pipe.
Keep the flame steady and consistent until the fitting feels uniformly hot.
Proper, even heating prepares the joint for smooth solder flow by activating the flux and drawing solder through capillary action when you’re ready.
Maintaining precise heat control is essential to prevent damage and ensure a strong joint.
After heating the joint evenly, touch the solder to the side opposite the flame. It should melt instantly and flow smoothly into the gap by capillary action.
Heat the joint evenly, then apply solder opposite the flame for smooth, instant melting and proper flow.
Feed solder steadily around the joint until you see a continuous bead form and solder starts to drip. Remove the heat immediately to prevent overheating.
Let the joint cool naturally without disturbance. Once cool, wipe off any excess flux residue to avoid corrosion.
Make certain solder flows evenly around the entire joint for a strong seal. Avoid overheating, which can burn flux and weaken the joint.
Use lead-free solder suitable for potable water systems. Inspect the joint for a smooth, shiny fillet without gaps or cracks.
If solder doesn’t flow, reheat slightly until it does before cooling.
Proper surface preparation and cleaning are essential to ensure a durable bond and prevent adhesion failure during thermal cycling.
You should wear safety goggles to protect your eyes from sparks and molten solder.
Use heat-resistant gloves to shield your hands from burns.
Wear long sleeves and pants made of non-synthetic materials to avoid burns from hot metal or flux.
A respirator or mask helps prevent inhaling fumes, especially in poorly ventilated areas.
Always work in a well-ventilated space to minimize exposure to harmful gases.
Stay alert and keep a fire extinguisher nearby.
You shouldn’t use leaded solder for drinking water pipes because it can contaminate the water and pose health risks.
Instead, always choose lead-free solder specifically rated for potable water systems.
It meets safety standards and guarantees your water remains safe to drink.
Using the right solder protects you and your family from potential lead poisoning and complies with plumbing codes.
Always check the label before buying solder for drinking water lines.
To fix a leaking soldered copper joint, first shut off the water supply and dry the joint completely.
Then, carefully heat the joint with a torch until the solder melts.
Use a cloth to wipe away the old solder and apply fresh flux.
Insert new solder evenly around the joint, allowing it to flow smoothly.
Finally, let it cool undisturbed and check for leaks before restoring water flow.
You’ll need tools so essential they might as well be glued to your hands.
Grab a tubing cutter for precise pipe cuts, a reamer or file to deburr edges, and emery cloth or wire brush to clean surfaces spotless.
Don’t forget a brush to apply flux, a propane torch with the right tip, and lead-free solder.
Finally, keep a dry cloth handy to wipe excess flux and cool your joint properly.
You should wait at least 30 minutes before testing the soldered joint to ensure the solder has fully cooled and solidified.
Avoid moving or disturbing the joint during this time to prevent leaks.
After cooling, visually inspect for a shiny, smooth fillet, then pressurize the system carefully to check for leaks.
Waiting patiently helps guarantee a strong, durable seal and prevents damage or failure during testing.
By following these steps, you’ll weld your copper pipe with precision and confidence. The same care you take cleaning and heating the joint guarantees a leak-free connection every time.
Don’t skip measuring or applying flux properly; these small actions make a big difference. With practice, you’ll find soldering copper pipes isn’t just doable, it’s straightforward.
So grab your tools and get started; your perfect joint is just a weld away.