Phone:
(701)814-6992
Physical address:
6296 Donnelly Plaza
Ratkeville, Bahamas.
Phone:
(701)814-6992
Physical address:
6296 Donnelly Plaza
Ratkeville, Bahamas.

You’ll find MIG welding the easiest type to learn because it uses a continuous wire feed system. This provides consistent welds and reduces electrode changes.
It produces minimal spatter, so cleanup is quicker. MIG works well on various metals and thicknesses, and its handheld gun simplifies operation.
While it needs external shielding gas, limiting outdoor use, it offers faster welding speeds and better quality indoors.
Keep exploring to discover setup tips, metal choices, and troubleshooting strategies for successful MIG welding.
Choosing MIG welding as your starting point makes sense because it streamlines the welding process with its continuous wire feed system. This delivers consistent welds and reduces the need for frequent electrode changes.
You’ll appreciate how MIG produces clean welds with minimal spatter, eliminating slag cleanup. Its versatility lets you weld a range of metals, from thin 26-gauge sheets to thick structural steel, using a handheld gun without managing separate filler rods.
Compared to stick welding, MIG offers faster speeds and less post-weld cleanup. It’s also less complex than TIG welding, which demands precise amperage control and foot pedal use.
MIG’s gas-shielded environment guarantees quality welds indoors, making it an ideal choice to build your welding skills efficiently and confidently.
Additionally, the semi-automatic operation of MIG welding provides consistent welds with minimal spatter, reducing cleanup time and making it especially beginner-friendly.
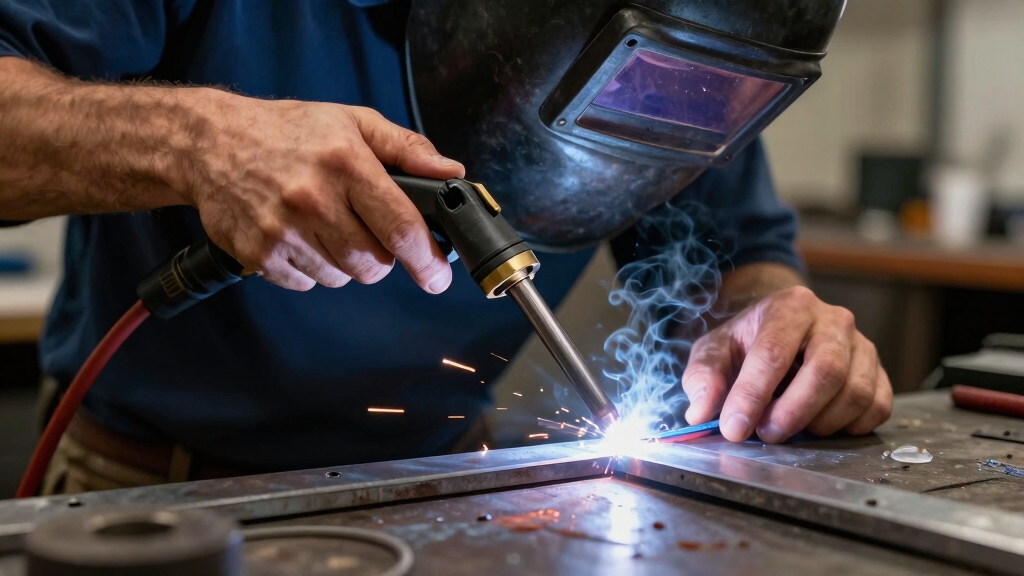
Setting up your MIG welding machine is straightforward and can be done in just a few steps. First, connect the torch and cable to the machine. Then attach the work cable and clamp to your metal workpiece.
Install the wire drive roller that matches your wire size to guarantee smooth feeding. Next, load the wire spool and feed the wire through the cable liner. Finally, attach the contact tip and gun nozzle, connect the power cord, and adjust voltage and wire speed settings for your material thickness.
Properly securing a solid electrical ground close to the weld area helps ensure a strong, stable weld.
| Step | Action |
|---|---|
| Connect cables | Torch, work clamp, power cord |
| Install wire spool | Match roller size, feed wire |
| Attach gun parts | Contact tip, nozzle |
This setup gets you welding quickly with minimal hassle.
Steel stands out as the most practical metal for MIG welding practice due to its affordability and wide availability.
You’ll find carbon steel ideal for developing MIG skills because it’s compatible with standard shielding gases and wire types. This compatibility provides consistent arc stability and weld quality.
Its versatility allows you to weld both thin gauges, such as 26-gauge sheet metal, and thicker plates without adjusting your setup drastically.
Additionally, mild steel offers predictable heat input and minimal warping, helping you focus on technique rather than compensating for metal behavior.
While aluminum and stainless steel are weldable with MIG, they require more advanced equipment and gas mixtures.
These metals are better suited after you master steel. Starting with steel lets you build confidence efficiently and achieve clean, strong welds.
MIG welding is often preferred for steel because it offers high travel speeds and increased productivity, making it ideal for practice and learning.
Once you’ve gained proficiency welding steel, you’ll encounter different challenges when working with thin versus thick metals using MIG.
Controlling heat input and wire feed speed is critical to avoid burn-through on thin metals while guaranteeing deep penetration on thick metals.
Here’s what you need to know:
Adjusting your machine settings according to a thickness-to-voltage chart ensures optimal amperage and voltage for the metal gauge.
Mastering these variables guarantees strong, professional welds across metal thicknesses.
Frequently, beginners find MIG welding easier to master than TIG welding due to its straightforward operation and faster setup.
With MIG, you feed a continuous wire electrode automatically, eliminating the need to manually add filler material as in TIG welding. This simplifies coordination and reduces the skill level required.
MIG welding setups take only minutes to connect the torch, cable, and load the wire spool, while TIG demands precise foot pedal control for amperage and separate filler rod handling.
Additionally, MIG produces clean welds with minimal spatter and no slag cleanup, speeding up the process.
TIG welding, although precise, requires fine motor skills and practice to manage the torch, filler rod, and gas flow simultaneously.
For these reasons, MIG welding offers a more accessible entry point for beginners.
MIG welding’s versatility across many metals also makes it a practical choice for those learning different welding applications.
Although MIG welding is often preferred for its ease and clean results, you should choose flux-cored welding when working outdoors or in windy conditions where shielding gas from MIG would be compromised.
Flux-cored arc welding (FCAW) provides reliable shielding without external gas, making it ideal in such environments. You should also consider flux-cored welding when:
To achieve consistent results, it is essential to maintain proper wire feed speed and fine-tune settings based on material and conditions.
While flux-cored welding offers advantages outdoors and on contaminated metals, stick welding remains a common choice for many applications due to its simplicity and low equipment cost.
You’ll find stick welding equipment cheaper, but you’ll replace electrodes frequently and deal with slag that slows your progress.
MIG welding, on the other hand, feeds wire continuously, requires less cleanup, and allows faster welding speeds, making it easier to learn indoors.
However, MIG welding requires an external shielding gas supply, which limits its effectiveness in windy or outdoor conditions.
| Feature | MIG Welding |
|---|---|
| Equipment Cost | Higher |
| Cleanup | Minimal spatter, no slag |
| Learning Curve | Easier |
| Outdoor Use | Less effective |
| Feature | Stick Welding |
| Equipment Cost | Lower |
| Cleanup | Slag removal required |
| Learning Curve | Steeper |
| Outdoor Use | Highly effective |
When you start MIG welding, one of the first challenges you might run into is wire feed issues. You know, things like inconsistent speed or even tangling. These little hiccups can really disrupt your welding flow, making it tough to get that perfect bead.
Speaking of beads, have you noticed how inconsistent weld beads can be? This often comes down to incorrect settings or maybe just using a poor technique. It can affect not only the strength of your weld but also how it looks, which can be frustrating.
And let’s not forget about gas flow problems. If you’re dealing with leaks or inadequate shielding, it can lead to contamination in your welds. This ultimately results in weak joints, and that’s the last thing you want. So, keeping an eye on these issues can save you a lot of headaches down the line! Adjusting your voltage and wire speed properly can help stabilize the arc and reduce spatter, improving overall weld quality.
Dealing with wire feed issues is a common challenge beginners face when starting MIG welding. These problems can disrupt your weld and slow progress.
To tackle wire feed issues effectively, focus on these key areas:
Addressing these factors will help you achieve steady wire feed and improve your overall MIG welding experience. Additionally, ensuring the wire diameter matches your equipment settings is crucial for optimal wire feed control.
Smooth wire feeding sets the foundation for consistent weld beads, but even with proper wire feed, beginners often encounter irregular bead patterns.
These inconsistencies arise from variations in travel speed, gun angle, or distance from the workpiece. Moving too fast can produce thin, narrow beads with inadequate penetration.
Conversely, moving too slow leads to excessive weld buildup and potential burn-through. Maintaining a steady gun angle, usually between 10 to 15 degrees from vertical, ensures ideal shielding gas coverage and stable arc behavior.
Additionally, keeping a consistent contact tip-to-work distance, typically 3/8 inch, prevents spatter and uneven deposition.
Mastering these parameters helps you achieve uniform weld beads, improving joint strength and appearance while minimizing defects such as undercut or porosity.
Choosing the appropriate transfer mode based on material thickness and welding position is crucial to minimize spatter and ensure weld integrity.
Although MIG welding generally produces clean welds, improper gas flow can quickly compromise arc stability and weld quality.
You need to make certain the shielding gas consistently protects the weld pool to avoid contamination and porosity.
Here are the three common gas flow problems you might face:
1. Insufficient Gas Flow
Set too low, it allows air infiltration, causing oxidation and weak welds. Adjust flow rate to recommended levels, typically 20-25 CFH.
2. Excessive Gas Flow
Too high a flow creates turbulence, blowing away shielding gas and causing spatter. Avoid setting above 30 CFH.
3. Leaking Connections
Loose fittings or damaged hoses let gas escape before reaching the weld, reducing protection. Regularly inspect and tighten all gas lines.
Proper gas management is critical for stable arcs and strong, clean welds.
Getting started with MIG welding confidently means mastering a few key setup and technique principles.
First, make certain you install the correct wire size in the drive roller and feed it smoothly through the cable liner. Connect the torch, work clamp, and power cord securely.
Set the wire feed speed and voltage according to the metal thickness and type. Maintain a consistent gun angle, typically between 10 to 15 degrees off vertical.
Keep the nozzle about ¼ inch from the workpiece to ensure proper shielding gas coverage. Use steady, even travel speed to produce uniform weld beads with minimal spatter.
Practice on scrap metal to fine-tune settings and develop smooth hand movements. Following these steps helps you achieve clean, strong welds quickly and builds your confidence as a beginner.
Regularly cleaning and maintaining your MIG welder guarantees peak performance and extends the machine’s lifespan. Neglecting upkeep can cause inconsistent wire feed, poor arc stability, and equipment failure.
Follow these key steps to keep your welder in optimal condition:
Consistent maintenance improves weld quality and reduces downtime during projects.
For MIG welding beginners, you’ll need essential safety gear: a welding helmet with an auto-darkening filter to protect your eyes from intense light.
Flame-resistant gloves shield your hands from heat and sparks, and a long-sleeve flame-resistant jacket or shirt protects your skin.
Also, wear safety boots and ear protection, especially in noisy environments.
Ensure good ventilation or use a respirator to avoid inhaling fumes, keeping your workspace safe and comfortable.
You might think mastering MIG welding takes months, but with focused practice, you can become proficient within a few weeks.
By consistently setting up your equipment, adjusting wire feed speed, and welding on various metals, you’ll develop steady hand control and quality welds quickly.
No, MIG welding requires a constant power supply to maintain the arc and feed the wire continuously.
Without steady electricity, the wire feed and shielding gas flow would be interrupted, causing inconsistent welds and potential defects.
Portable inverter power sources can provide this constant supply, allowing MIG welding in remote locations.
However, you can’t perform MIG welding without some form of reliable electrical power running the equipment.
You probably won’t notice the “aroma” of MIG welding fumes until it sneaks into your lungs.
These fumes contain metal oxides and gases like ozone and nitrogen oxides, which can irritate your respiratory system and cause long-term health issues.
Even though MIG welding produces less smoke than flux-cored welding, you still need proper ventilation and protective gear to minimize exposure and protect yourself from these invisible environmental hazards.
Yes, you’ll need certifications to start MIG welding professionally.
The most recognized is the AWS (American Welding Society) Certified Welder program, which tests your welding skills on specific metals and positions.
Employers often require this or equivalent certifications to guarantee quality and safety.
Depending on your region and industry, additional certifications or licenses may apply.
Getting certified proves your competence and can open more job opportunities in professional welding.
Now that you’ve got the lowdown on MIG welding, you’re ready to hit the ground running. Its straightforward setup, versatility with metals, and forgiving technique make it the easiest welding type to master.
While challenges may pop up, staying sharp with maintenance and practice will keep you ahead of the curve. Remember, every expert was once a beginner, so don’t be afraid to spark up your welder and get started today.