Phone:
(701)814-6992
Physical address:
6296 Donnelly Plaza
Ratkeville, Bahamas.
Phone:
(701)814-6992
Physical address:
6296 Donnelly Plaza
Ratkeville, Bahamas.
You can make a spot welder by repurposing a battery charger’s transformer, rectifier, and capacitors to deliver controlled high-current pulses needed for welding battery tabs.
Use a low-voltage, high-current transformer, a bridge rectifier for DC conversion, and SCR switching for precise pulse timing. Design electrodes with nickel strips and proper pressure for consistent welds.
Incorporate a control circuit with adjustable pulse duration and guarantee safe wiring and grounding. Explore further to optimize performance and safety details.
Although spot welders might seem specialized, you can build one yourself using components from a battery charger and other readily available materials.
A spot welder delivers a controlled, high-current pulse to join thin metal sheets or battery tabs by localized resistance heating. This process requires precise timing and current regulation to guarantee reliable welds without damaging sensitive materials.
Building your own allows you to customize parameters such as pulse duration, current amplitude, and electrode design. This optimizes performance for specific applications like lithium-ion battery pack assembly.
By repurposing battery charger parts—transformers, rectifiers, and capacitors—you gain a cost-effective, adaptable tool. Understanding the underlying electrical and thermal dynamics helps you engineer a spot welder that balances energy delivery with safety and repeatability.
Proper control of electrode force, current, and weld time is essential for consistent weld quality.
Start by identifying key components within a battery charger that can be repurposed for your spot welder.
Focus on high-current parts critical for welding: the step-down transformer, bridge rectifier, and SCR, which regulate and convert voltage and current.
Also, locate capacitors for energy storage and nickel strips for battery tab welding.
Extract thick copper conductors for electrode leads and consider carbon-composite resistor material for custom electrode resistance.
| Component | Purpose |
|---|---|
| Step-down transformer | Voltage regulation |
| Bridge rectifier | AC to DC conversion |
| SCR | Controlled current switching |
| Capacitor | Voltage smoothing |
| Nickel strips | Battery tab attachment |
Selecting these parts guarantees efficient current delivery and precise control in your spot welder design. Proper selection and handling of the step-down transformer ensure sufficient current capacity and safe operation in your homemade spot welder.
Let’s kick things off by picking a step-down transformer. This is super important because it reduces the AC line voltage to a safer, more manageable level for welding. You definitely want to start with the right transformer to ensure everything runs smoothly.
Once you’ve got that sorted, it’s time to set up a high-current bridge rectifier. This component will convert the AC output from the transformer into a steady DC supply. Make sure this part is done right! Proper voltage regulation here is key. It helps guarantee that your welding performance stays consistent and protects all those downstream components from any hiccups.
Be sure to select a transformer with a low secondary voltage of 2–4 V and a high current rating of 1,000–3,000 A to achieve the necessary heat for effective spot welding.
When setting up the transformer for your spot welder, you need to make sure it steps down the line AC voltage to a safe, workable level tailored for welding tasks.
Typically, this means reducing from 120V or 240V AC mains to around 12-24V AC, guaranteeing the output current rating matches your welding current demands.
Proper voltage regulation prevents excessive heat and component stress. Use a step-down transformer with a robust core and thick copper windings for high current capacity.
Securely insulate and ground the transformer to avoid electrical hazards. Monitor output voltage under load to verify stability and ensure consistent weld quality.
Avoid voltage spikes by maintaining the transformer’s integrity, as fluctuations can affect welding pulse timing and overall power supply performance critical to spot welding efficacy.
Adjusting the turns ratio is essential to achieve the desired voltage reduction and current increase for effective welding operation.
Once the transformer provides a stable, stepped-down AC voltage, you’ll need to convert that AC output into a controlled DC supply suitable for the welding circuit.
Begin by integrating a high-current bridge rectifier, sourced from the battery charger internals, to transform AC into pulsating DC.
Connect the rectifier’s output to a capacitor bank or a single large electrolytic capacitor to smooth voltage ripple. This ensures consistent current flow during welding pulses.
This filtered DC supply feeds the welding electrodes, enabling reliable spot welds.
Additionally, isolate and regulate the control circuit power using an LDO regulator fed from a separate, low-current bridge rectifier.
Proper wiring and heat dissipation for the rectifier diodes are critical, as they handle substantial current.
This setup guarantees efficient energy conversion and stable welding currents.
For optimal performance, ensure the power source and components are compatible with the welding machine specifications used in the rig.
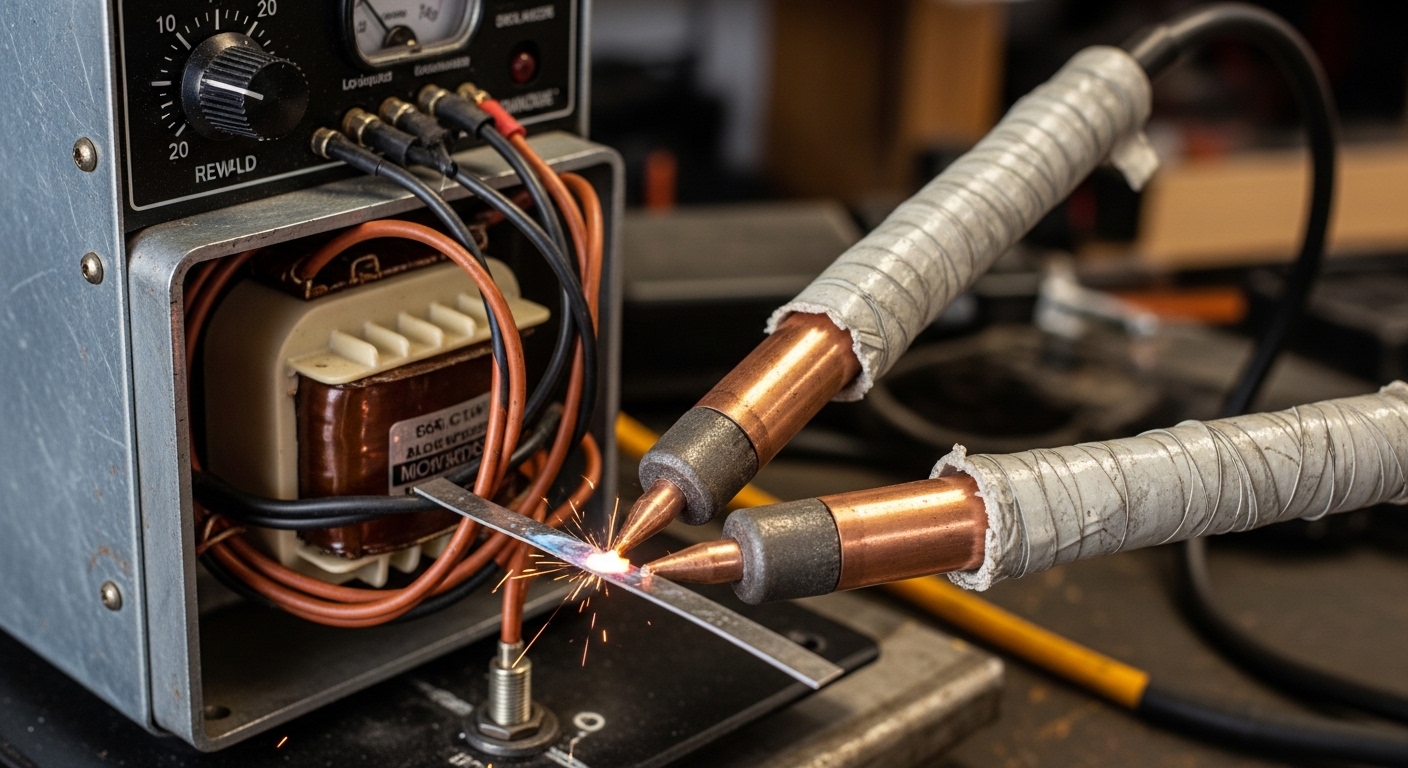
Focus on selecting electrode materials that balance electrical conductivity, thermal resistance, and mechanical durability to guarantee effective spot welding performance.
Use chrome/nickel leads from type K thermocouple wire for positive electrodes due to their corrosion resistance and stable electrical properties.
For battery tabs, choose nickel strips specifically designed for lithium-ion cells, assuring peak weld integrity and minimal contamination.
Design electrodes with fastener connection points to enable modularity and ease of replacement.
Calculate electrode resistance precisely using known material resistivity values to maintain consistent welding current and heat generation.
Shape electrodes to maximize contact area while minimizing thermal mass to prevent excessive heat dissipation.
This approach guarantees efficient energy transfer and weld quality when joining thin battery tabs without damaging cells or causing weak joints.
Maintaining proper electrode pressure is crucial to ensure consistent metal contact and optimal heat generation during the spot welding process.
To start, you’ll want to trigger the SCR using zero-crossing detection. This technique ensures that you have precise timing and helps prevent any pesky inrush currents. It’s a smart way to keep everything running smoothly.
Next up, let’s talk about wiring a high current relay. A motorcycle starter relay works great for this purpose since it can handle the welding pulse without causing much voltage drop. You definitely want to keep that in mind for effective performance.
Now, when it comes to controlling the relay coil, using a MOSFET is a solid choice. It allows for reliable switching, especially since you’re working with your microcontroller’s low-current output. This way, everything stays efficient and responsive!
When designing your circuit, be sure to apply the NEC 200% rule to ensure your breaker size can handle surge currents safely during welding operations.
Although the SCR forms the core of your spot welder’s switching mechanism, triggering it accurately demands a carefully designed control circuit.
You’ll use an analog comparator to detect the AC zero-crossing point, ensuring precise timing for the SCR gate pulse. Adjust the pulse duration via a potentiometer, controlling the welding heat by varying conduction angle.
Incorporate a debounce circuit to avoid false triggers from switch bounce. The SCR gate should receive a clean, well-timed pulse through a resistor to limit gate current and prevent damage.
Use a low-voltage isolated power supply, like an LDO regulator, to protect control electronics. Finally, interface the SCR trigger output with a high-current relay driver, typically a MOSFET board, to isolate low-current control signals from the welding load safely and efficiently. Proper adjustment of welding current and heat input is essential for consistent weld quality.
Begin by connecting the SCR control circuit output to a high-current relay designed to handle the welding current load. This relay acts as the main switch, controlling the heavy current flow for spot welding.
Use a MOSFET board to drive the relay coil with the low-current signal from your control circuit. Make certain that the relay contacts are rated well above the peak welding current to avoid contact welding or failure.
Key wiring considerations include:
These methods guarantee reliable, safe operation of your spot welder’s relay system. Ensure that cable gauge selection accounts for total cable length and required ampacity to minimize voltage drop and prevent overheating.
Before powering up your DIY spot welder, prioritize safety measures to protect yourself and your equipment. Always wear eye protection to guard against sparks generated by capacitors operating above 10 volts.
Verify capacitor voltage ratings to prevent catastrophic failure. Make certain complete isolation between your 5V logic control circuits and the 120VAC mains to avoid damaging sensitive electronics.
Ground and insulate all high-current pathways properly. When testing, start with low-current settings and monitor voltage and current closely using a multimeter.
Confirm relay activation timing aligns with zero-crossing detection for precise pulse control. Finally, conduct trial welds on scrap nickel strips to evaluate weld quality and electrode performance before applying the welder to lithium-ion battery tabs.
Meticulous testing reduces risk and ensures reliable, repeatable welds. Additionally, always ensure proper grounding and insulation to prevent electric shock hazards during welding operations.
Yes, you can use this spot welder on metals beyond nickel strips, but you’ll need to adjust parameters.
Different metals have varying electrical resistivities and thermal conductivities, affecting weld quality and required pulse duration.
For example, welding copper or steel demands recalibrated timing and current levels to guarantee proper fusion without overheating.
Always test on sample materials first and consider electrode material compatibility to avoid contamination and guarantee strong, reliable welds.
You maintain electrodes by regularly cleaning them with fine sandpaper or a wire brush to remove oxidation and buildup.
Make sure contacts stay smooth and shiny for consistent conductivity.
After each session, inspect for pitting or deformation, replacing electrodes if necessary.
Apply a light coating of anti-oxidation spray to prevent corrosion.
Keep electrode tips properly aligned and tightened to maintain uniform pressure during welding cycles, ensuring repeatable weld quality.
You’ll find the lifespans vary: SCRs and high-current relays typically last thousands of weld cycles but degrade faster under overheating.
Capacitors endure several years if voltage ratings aren’t exceeded, while copper electrodes wear down after hundreds of welds due to erosion.
Proper cooling, cleaning, and avoiding voltage spikes extend component longevity.
Expect frequent maintenance on consumables like electrodes, but solid-state parts should serve reliably if you monitor operating conditions precisely.
Yes, you can modify the control circuit to extend pulse duration beyond the default range.
Adjust the potentiometer that sets the threshold voltage in the analog comparator circuit to allow longer conduction times for the SCR.
Additionally, tweaking the microcontroller’s timing parameters or debounce settings can refine pulse length.
Just make sure changes maintain safe current levels and avoid overheating components or damaging the battery tabs during welding.
Environmental factors can make or break your weld quality and safety.
Humidity affects electrical resistance, causing inconsistent welds and potential shorts.
Temperature variations influence metal expansion, altering contact pressure.
Dust or contaminants may degrade electrode contact, risking poor fusion and sparks.
Always control your workspace conditions, assure proper ventilation, and maintain clean electrodes to guarantee precise, safe spot welding results every time.
Building a spot welder from a battery charger is a cost-effective way to achieve precise, high-current welding. Did you know that typical spot welders operate at currents exceeding 3,000 amps briefly to fuse metals?
By repurposing a battery charger transformer and integrating an SCR control circuit, you can safely replicate this process. Always test thoroughly and follow safety protocols to guarantee reliable performance and avoid electrical hazards during operation.