Phone:
(701)814-6992
Physical address:
6296 Donnelly Plaza
Ratkeville, Bahamas.
Phone:
(701)814-6992
Physical address:
6296 Donnelly Plaza
Ratkeville, Bahamas.
To MIG weld vertical, lower your power about 10–15% from flat settings to control heat and prevent sagging.
Maintain a short arc length and stickout around ½” for better penetration and stability.
Use steady uphill travel with an upside-down V or weaving pattern, keeping the arc focused on the puddle’s front edge for consistent fusion.
Adjust travel speed depending on metal thickness, moving slower on thick metals.
Mastering these steps sets you up to perfect your vertical welds effectively.
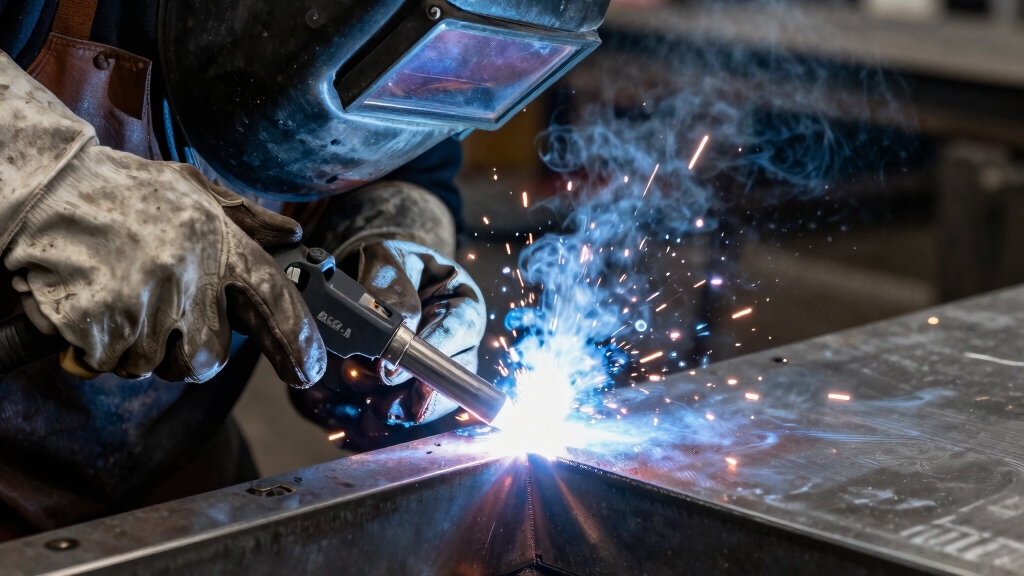
Although vertical MIG welding shares fundamental principles with flat welding, it demands critical technique adjustments to manage gravity’s impact on molten metal.
You must control the weld puddle carefully to prevent sagging or dripping. This requires steady hand movement and precise arc placement at the puddle’s front edge.
Vertical welding also demands slower travel speeds to counter gravitational pull. This ensures proper fusion and penetration without excessive buildup.
Unlike flat welding, you’ll use weaving patterns such as upside-down V or triangle weaves to distribute heat evenly and maintain puddle control.
Handling the molten metal requires consistent motion and avoiding pauses that can cause defects. Mastering these technique shifts is essential to produce structurally sound and visually clean vertical MIG welds.
Additionally, maintaining a proper stickout distance is crucial to ensure arc stability and consistent heat input during vertical welding.
Adjusting power and heat settings is essential when performing vertical MIG welding to guarantee proper penetration and prevent defects.
Properly adjusting power and heat is key to effective vertical MIG welding and defect prevention.
You’ll need to reduce the power by about 10-15% from your flat position settings to accommodate the uphill weave and thicker metal. This reduction prevents excessive heat buildup and sagging.
Follow these key points:
Maintaining a 10–15° travel angle and steady gun movement also improves bead control and weld quality in vertical positions.
Fine-tuning these parameters will help you achieve consistent, defect-free vertical welds.
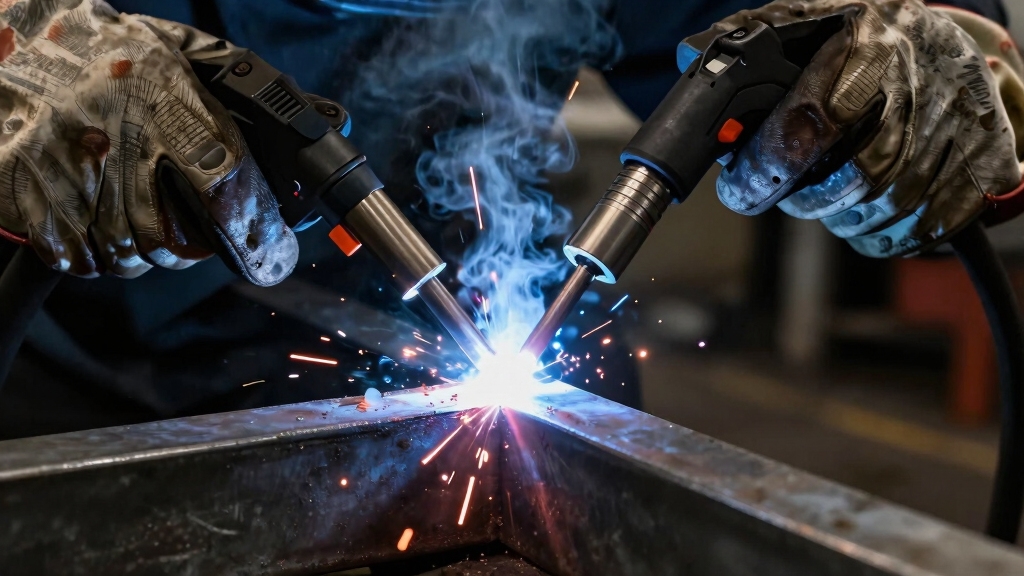
Once you’ve set the proper power and heat parameters for vertical MIG welding, focus on optimizing your equipment and wire setup to maintain arc stability and control.
Keep your stickout length short—around 1/2″—and position the contact tip flush with the nozzle to improve arc force. Use .035″ ER70S-6 wire for consistent feed and penetration.
Secure your ground clamp directly on the workpiece to reduce arc disturbance.
| Equipment Aspect | Recommended Setup |
|---|---|
| Stickout Length | 1/2″ or less |
| Wire Diameter | .035″ ER70S-6 |
| Contact Tip Position | Flush with nozzle |
These configurations help you achieve a stable arc, proper puddle control, and penetration needed for uphill vertical MIG welding. Matching wire size and amperage is essential to prevent burn-through and maintain weld quality.
Maintain a short arc length and controlled stickout to maximize penetration during vertical MIG welding. Keeping the arc length short guarantees a concentrated heat zone, preventing spatter and undercut.
Keep arc length short and stickout controlled to ensure deep penetration and reduce spatter in vertical MIG welding.
Likewise, controlling stickout, ideally at 1/2 inch or less, boosts arc force. This helps the weld puddle penetrate the joint deeper.
Follow these steps:
Mastering these controls enhances weld quality, especially when working uphill on thicker materials. Choosing the correct shielding gas mixture can further improve arc stability and penetration for vertical welds.
You’ll manage the puddle by using that upside-down V motion. Just trace the front edge steadily, and don’t pause at all. It’s all about keeping that flow going!
Now, if you mix in some triangle or Z-weaving patterns, you’ll really help to spread the heat evenly.
This way, you won’t have to worry about any excessive buildup.
And remember, keeping a consistent arc in your movements is key. It really helps with proper penetration and ensures that you’re managing the puddle effectively, especially when you’re working uphill. Keep it steady, and you’ll do great!
For vertical welding, using short circuit transfer or pulsed MIG modes is recommended due to their low heat input and stable puddle control.
Mastering the upside-down V technique involves tracing the front edge of the weld puddle in a steady, continuous V pattern as you move uphill.
This method controls heat input and distributes molten metal evenly, preventing sagging and undercut.
To apply it effectively:
Additionally, paying attention to voltage and wire speed settings can further stabilize the arc and reduce spatter during vertical welding.
Building on the upside-down V technique, triangle and Z-weaving motions help you manage the weld puddle more effectively during vertical MIG welding.
With triangle weaving, you move the arc side to side, crossing the puddle center with brief pauses at each toe and top. This allows controlled puddle cooling and solid fusion.
The Z-weave pattern requires a smooth side-to-side motion completed in about one second. Pause momentarily on each toe and quickly cross the center to maintain puddle shape and prevent sagging.
Both patterns distribute heat evenly, preventing excessive reinforcement and undercutting. Keep the arc focused on the front edge of the puddle for proper penetration and advancement.
Use these weaving motions to maintain a consistent weld bead profile and puddle control as you progress uphill.
Controlling weld pool fluidity with these techniques is essential to avoid defects common in vertical welding, such as porosity and uneven penetration, which are often caused by gravity effects and shielding gas coverage.
Control heat distribution in the weld puddle by applying the upside-down V and weaving motions consistently while moving uphill. These techniques guarantee even thermal input, preventing excessive heat buildup and undercutting.
Keep the arc focused on the front edge of the puddle to maintain forward penetration and solid fusion.
To manage heat effectively:
Consistent application of these motions provides uniform puddle temperature and superior weld quality in vertical MIG welding. Optimizing wire feed speed and voltage simultaneously ensures a stable arc and uniform bead profile during vertical welding.
When welding vertically, you need to adjust your travel speed based on the metal thickness to maintain proper puddle control and penetration.
Adjust travel speed to match metal thickness for optimal control and penetration when welding vertically.
For thin metals (1/8″ and below), you can increase your travel speed slightly since the puddle heats quickly and requires less time to fuse. However, maintain a steady pace to prevent burn-through and guarantee consistent sidewall fusion.
For thicker metals (over 1/4″), slow your travel speed considerably to allow adequate heat input and penetration. Use weaving techniques rather than stringer beads to distribute heat evenly and avoid excessive buildup.
The slower speed also combats gravity’s pull on the molten puddle, preventing sagging. Adjusting speed precisely helps you control the weld profile, reduces defects, and guarantees a structurally sound joint in vertical MIG welding.
Additionally, maintaining the correct gun angle (10–15° off vertical) and a steady arc length is essential for achieving clean beads and strong fusion in vertical welding.
Adjusting travel speed based on metal thickness helps reduce many issues. However, vertical MIG welding still presents unique challenges that require specific corrections.
To fix common problems like undercutting, heat buildup, and puddle control, you need targeted adjustments:
Following these steps, alongside proper stickout and contact tip positioning, will guarantee consistent vertical weld quality and penetration. Additionally, ensuring proper polarity is selected before welding can improve arc stability and penetration in vertical welding.
When you’re trying to decide between MIG, Stick, and TIG for vertical welding, it’s important to think about the pros and cons of each method, as well as your own skill level.
MIG is great for speed since it offers faster deposition rates. However, you’ll need to have a good handle on controlling the puddle and managing the heat. It can take a bit of practice to get just right, but once you do, it’s a real time-saver.
On the other hand, Stick welding is a solid choice for thicker materials. It’s also more forgiving for beginners, so if you’re just getting started, this might be the way to go.
You can really get a good weld without needing a ton of finesse.
Then there’s TIG welding. This method shines when it comes to working with thin metals and provides exceptional control. But be warned: it does require advanced technique and a steady hand. If you’re up for the challenge, the results can be stunning.
Evaluate the advantages of MIG, Stick, and TIG welding to select the best method for vertical welding tasks. Each method offers distinct benefits depending on material thickness, position, and skill level. Consider these points:
Choose based on joint requirements and operational conditions.
Choosing the right welding method for vertical applications depends heavily on your skill level and familiarity with each process.
MIG welding requires precise control of travel speed, stickout, and weaving patterns like the upside-down V or triangle weave to prevent puddle sagging and undercut.
If you’re less experienced, stick welding offers greater forgiveness on uphill welds, promoting better penetration on thick metal with less technique sensitivity.
TIG welding demands the highest skill, as you must coordinate torch angle, filler addition, and heat input meticulously to maintain puddle control vertically.
For vertical MIG, make sure you’re comfortable adjusting voltage and wire feed speed, managing arc placement, and using appropriate weave techniques.
Match your skill to the method to optimize weld quality and minimize defects in vertical MIG welding.
Although vertical MIG welding poses unique challenges, mastering consistent puddle control is essential for producing strong, defect-free welds. To maintain control, focus on precise arc placement and motion patterns that keep the molten metal from sagging or dripping.
Use these techniques:
You need a welding helmet with a proper shade to protect your eyes from intense UV and infrared rays during vertical MIG welding.
Wear flame-resistant gloves and long-sleeve clothing to guard against sparks and hot metal.
Use ear protection to shield against noise, and ensure adequate ventilation or respiratory protection since welding fumes can be hazardous.
Don’t forget safety boots with steel toes to protect your feet from falling objects or molten metal.
Weather conditions profoundly impact your vertical MIG weld quality.
Wind can blow shielding gas away, causing porosity and weak welds.
Cold temperatures may cool the puddle too quickly, leading to poor fusion and undercutting.
High humidity risks moisture contamination, increasing hydrogen-induced cracking.
You should weld in sheltered, temperature-controlled environments or use windshields and proper gas flow adjustments.
This helps maintain consistent shielding and peak puddle control for reliable vertical welds.
Yes, you can automate vertical MIG welding with robotic systems.
Robots act like steady hands tracing precise patterns, such as upside-down V or triangle weaves. This ensures consistent arc placement and travel speed.
You’ll need to program adjusted power and wire feed settings, reduce stickout, and control heat to manage puddle behavior uphill.
Automation offers repeatability and quality, but you must fine-tune parameters to handle vertical challenges like gravity and heat distribution effectively.
When welding overhead, you’ll reduce heat to avoid excessive puddle sagging. Use a tight arc with short stickout. Maintain a steady travel speed to control molten metal flow.
For vertical welding, you’ll slow travel speed further. Use weaving patterns like upside-down V to distribute heat evenly. Reduce power 10-15% from flat settings.
Always keep the arc on the leading edge of the puddle to guarantee proper penetration and minimize undercutting.
Think of joint design as the blueprint that guides your vertical MIG weld’s flow. Proper groove angles and fit-up reduce puddle sagging and ensure consistent penetration.
A tight root gap prevents excessive weld buildup, while beveled edges help heat distribution. You’ll find that joints designed with controlled bevels and consistent spacing make your weaving technique more effective.
This minimizes defects and enhances strength in your uphill vertical welds. Always tailor joint prep to your material thickness.
Mastering vertical MIG welding is like climbing a steep mountain. You need steady control and the right tools.
Just as climbers adjust their grip and pace to avoid slipping, you must fine-tune power, arc length, and travel speed to maintain a consistent puddle.
Remember, precision and patience turn tough vertical welds into strong, reliable joints. Keep practicing these techniques, and you’ll conquer vertical welding challenges with confidence and skill.