Phone:
(701)814-6992
Physical address:
6296 Donnelly Plaza
Ratkeville, Bahamas.
Phone:
(701)814-6992
Physical address:
6296 Donnelly Plaza
Ratkeville, Bahamas.
To master ultrasonic welding, you must precisely control joint design, material compatibility, energy director shape, and weld parameters like amplitude, force, and time.
Opt for self-aligning joints such as tongue-and-groove and use sharp, triangular energy directors suited to your material’s crystallinity.
Maintain consistent wall thickness and proper fixturing to guarantee uniform energy transmission and reduce defects.
Managing heat input and alignment prevents weak bonds and excessive flash. Explore deeper strategies to optimize cycle speed and weld quality further.
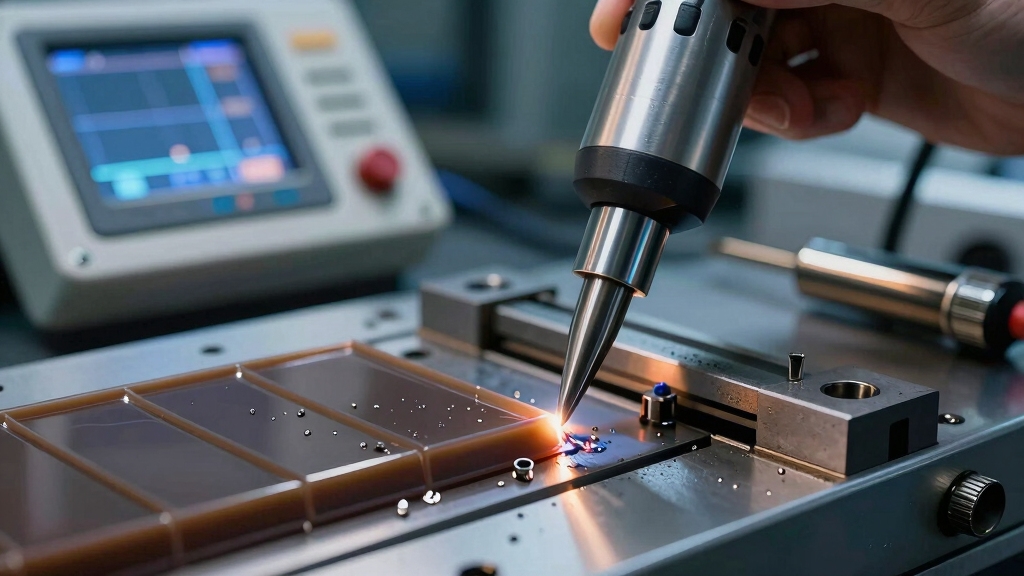
Although ultrasonic welding may seem complex, it works by converting high-frequency vibrations into localized frictional heat at the joint interface. You apply a horn that transmits ultrasonic energy precisely to the weld area, generating rapid frictional heating without bulk heating the parts.
This heat melts the thermoplastic surfaces, enabling them to fuse under pressure. You control the process through specific parameters: vibration amplitude, frequency, weld force, and time. Typically, the cycle completes in 1-2 seconds, combining force, vibration, and hold stages to assure a robust joint.
Preload pressure maintains intimate contact during vibration, critical for energy transfer. The process demands rigid materials with compatible melting points and uniform wall thickness to avoid voids or weak spots. You’ll find that precise energy delivery and part design optimize weld quality and repeatability.
Ultrasonic processes leverage high-frequency sound waves to achieve precise and efficient energy transfer during bonding.
When selecting the right joint design for ultrasonic welding, you must consider how the geometry influences energy delivery, alignment, and final weld strength.
Choosing the right joint design is crucial for optimal energy delivery, precise alignment, and strong welds.
The four primary joint designs—Butt, Step, Shear, and Tongue and Groove—each affect the welding process differently. Your choice depends on required seal integrity, ease of alignment, and cosmetic demands.
For example, shear joints offer hermetic seals through vertical walls, while tongue and groove joints provide precise alignment and minimize flash.
Focus on these factors to optimize your joint design:
Selecting the proper joint design guarantees consistent energy application and weld quality. Additionally, managing heat input precisely is critical to prevent material distortion and ensure strong welds, as effective heat control directly impacts weld quality and durability.
You know, when it comes to ultrasonic welding, having well-designed energy directors makes a huge difference. They really focus that ultrasonic energy on a small initial contact area, which helps with rapid melting and creates a strong fusion.
Plus, if you optimize the triangular cross-section and add in some interrupted or criss-cross patterns, you can actually minimize flash. This means you maintain weld integrity while keeping everything neat and tidy.
All these design choices? They don’t just enhance weld strength; they also cut down on the cleanup you’d usually have to deal with after the process. It’s all about making things easier and more efficient!
Additionally, maintaining an inert atmosphere during the welding process can prevent contamination and improve bond quality.
Optimize your ultrasonic weld strength by carefully designing the energy director, a vital feature that initiates melting at the joint interface. Its triangular cross-section concentrates vibrational energy, creating the localized heat necessary for reliable fusion.
To maximize effectiveness, ensure the energy director has a 90° included angle for amorphous resins and a base width of 20-25% of the wall thickness. For thicker walls, consider dual energy directors.
Key design considerations include using interrupted or criss-cross patterns to reduce energy consumption and minimize flash. Align energy directors precisely to maintain uniform initial contact and consistent melting.
Select appropriate variations like perpendicular or chisel shapes for thin sections or flash reduction. Maintaining a controlled environment during welding is essential to ensure consistent weld quality and prevent contamination.
By integrating well-designed energy directors into your ultrasonic welds, you can effectively minimize flash formation while enhancing joint strength. Energy directors concentrate ultrasonic energy at a small initial contact point, ensuring rapid localized melting. This controlled melt flow limits excess material expulsion, reducing flash.
Utilizing a triangular cross-section with a 90° included angle for amorphous resins optimizes energy concentration. Interrupted or criss-cross energy directors further decrease energy requirements and flash by breaking continuous melt paths. Additionally, selecting perpendicular or chisel-shaped directors helps control flash on thin sections by regulating melt direction.
Properly dimensioned energy directors, about 20-25% of wall thickness, ensure consistent melt volume, improving weld integrity. Through precise design and placement, energy directors not only reduce cosmetic defects but also increase joint strength by promoting uniform bonding and controlled material flow. Maintaining stable heat input and controlling heat buildup during welding further enhances joint quality and reduces defects.
When it comes to ultrasonic welding, choosing the right materials really makes a difference. You’ll get the best results if you pick materials that have rigid structures and thermoplastic resins that work well together.
Now, let’s break it down a bit. Amorphous plastics tend to respond really well to energy directors that have sharp angles. On the flip side, if you’re working with semi-crystalline plastics, shear joint designs are the way to go.
For metals, selecting the appropriate shielding gas is crucial to prevent contamination and ensure strong weld integrity.
Although ultrasonic welding can accommodate various thermoplastics, materials with rigid structures and low friction coefficients weld more reliably and produce stronger joints.
You’ll find that selecting materials with consistent modulus and favorable thermal behavior enhances energy transmission and joint integrity. Key properties to consider include:
Materials like amorphous resins respond well to standard energy directors, while semi-crystalline polymers benefit from shear joint designs.
You should also make certain that materials are compatible to avoid weak bonds. By focusing on these properties, you’ll optimize weld strength and process repeatability.
In industrial applications, using inert gases like argon can improve weld quality by providing a contamination-free environment that preserves material integrity.
Material compatibility plays a key role in achieving strong ultrasonic welds.
You’ll find rigid thermoplastics generally weld better due to their higher modulus and lower friction, which promotes efficient energy transmission.
Amorphous resins like ABS and polycarbonate respond well to energy directors with a 90° included angle.
Semi-crystalline materials such as polyethylene and polypropylene benefit from shear joints to handle their crystalline structure.
You should always weld identical or chemically compatible thermoplastics to ensure molecular fusion.
Incompatible blends cause weak bonds.
Pay attention to melting temperatures; placing the horn on the higher melting point side improves energy flow.
Avoid materials with additives or fillers that disrupt ultrasonic vibrations.
Choosing the appropriate shielding gas, such as argon blends, can significantly enhance weld stability and quality in ultrasonic welding applications.
When designing parts for consistent ultrasonic welding results, you must guarantee uniform initial contact areas and incorporate precise alignment features such as pins or ribs. This ensures repeatable energy transmission and reduces weld variability.
Focus on maintaining consistent wall thickness to prevent voids and uneven melting. Sharp corners should have radii to minimize stress concentrations that can lead to fractures during or after welding. Avoid features like holes or bends in the weld zone, as these disrupt vibration flow and reduce weld integrity.
Key design considerations include:
Adhering to these principles improves weld strength and process reliability. Additionally, precise positioning and alignment are critical to ensure strong seam formation and avoid defects that compromise joint integrity.
Because ultrasonic welding relies on precise energy transmission at the joint interface, aligning and fixturing parts accurately is critical to ensuring consistent weld quality.
Misalignment can cause uneven energy distribution, weak welds, or excessive flash. You should use alignment features like pins, ribs, or tongue-and-groove joints to maintain exact positioning during welding.
Fixtures must hold parts firmly without distortion, ensuring uniform pressure and contact.
Proper surface preparation and thorough cleaning are essential to avoid masking defects and ensure optimal weld integrity through visual weld inspection.
| Alignment Method | Purpose |
|---|---|
| Pins and Ribs | Precise lateral and vertical positioning |
| Tongue and Groove | Self-aligning, minimizes flash |
| External Fixtures | Maintain pressure, prevent movement |
| Clamping Mechanisms | Uniform force distribution |
Proper fixturing guarantees repeatable, high-quality welds by stabilizing parts throughout the ultrasonic cycle.
Although ultrasonic welding is a rapid process, setting the correct parameters demands careful calibration of force, vibration amplitude, and weld time to guarantee peak energy delivery and joint integrity.
You must start by selecting an appropriate preload force to assure intimate contact without deforming parts. Next, adjust vibration amplitude to optimize frictional heat generation at the energy director or joint interface.
Finally, set weld time precisely to allow sufficient melting without excessive thermal damage.
Key considerations include:
Force: Balances material deformation and energy transfer efficiency.
Amplitude: Controls heat generation rate and weld quality.
Weld Time: Dictates energy input duration, affecting bond strength and consistency.
Systematic parameter tuning based on material properties and joint design assures reliable, repeatable ultrasonic welds.
Ultrasonic weld flash frequently compromises both the aesthetic appeal and functional tolerances of assembled parts. Its reduction is a critical focus in process optimization.
To minimize flash, carefully design energy directors with optimized geometry. Triangular profiles at 90° for amorphous resins work best, with base widths around 20-25% of wall thickness.
Interrupted or criss-cross energy director patterns reduce energy requirements and control flash formation. Employ joint designs like tongue and groove or step joints to enhance alignment and contain molten material, improving appearance.
Controlling welding parameters like force, vibration amplitude, and weld time is essential. Excessive energy causes overheating and flash. Additionally, placing stiffer materials on the horn side helps localize melting.
Minimizing flash and optimizing weld appearance require more than just selecting the right energy director or joint design.
Avoiding common design mistakes plays a significant role in achieving reliable ultrasonic welds.
You need to ensure uniform initial contact and consistent wall thickness.
Uneven surfaces or thickness cause irregular energy distribution and weak welds.
Avoid holes or bends in the weld area, which disrupt energy transmission and reduce bond strength.
Choose appropriate alignment features like tongue and groove or ribs to maintain joint stability and reduce flash.
Key mistakes to avoid include:
To speed up ultrasonic welding assembly, start by optimizing your energy director design. This is key for achieving efficient initial melting while keeping flash to a minimum. By getting this right, you can really enhance your overall process.
Next, let’s talk about part alignment. It’s crucial to ensure that everything is precisely aligned. Using features like tongue-and-groove or pins can help with this. Not only does it reduce cycle time, but it also boosts consistency in your welds.
Also, don’t overlook the importance of maintaining consistent wall thickness. This is vital for promoting uniform energy transmission. It’ll help you avoid any weld defects that can slow you down. Keep these tips in mind, and you’ll see a noticeable improvement in your assembly process!
Streamline your assembly process by optimizing the energy director design. It plays a critical role in initiating and controlling the weld. You want the energy director to concentrate ultrasonic energy precisely, ensuring rapid melting and strong joints.
Focus on these key factors: Use a triangular cross-section with a 90° included angle for amorphous resins. The base width should be 20-25% of wall thickness to balance melting speed and strength.
Consider interrupted or criss-cross energy directors to reduce energy consumption and minimize flash without sacrificing weld integrity. For thicker walls, deploy dual energy directors or chisel variations to enhance energy concentration and weld consistency.
Optimizing these parameters reduces cycle time and improves weld quality. This accelerates your ultrasonic welding assembly without compromising structural performance.
Although ultrasonic welding delivers rapid bonding, precise part alignment is critical to maintaining consistent weld quality and reducing cycle times.
You must design parts with alignment features like tongue-and-groove joints or external pins to ensure repeatable positioning during assembly.
Misalignment can cause uneven energy distribution, resulting in weak welds or excessive flash, which increases post-process cleanup and inspection.
Implement rigid fixturing or automated positioning systems to minimize human error and cycle variability.
Pay close attention to mating surfaces; they should fit snugly without gaps that disrupt ultrasonic energy transmission.
By guaranteeing exact alignment, you reduce rework and optimize energy director engagement, leading to faster, more reliable welds.
This precision ultimately enhances throughput and maintains the structural integrity of the assembled components.
Maintaining consistent wall thickness throughout your parts plays a crucial role in accelerating ultrasonic welding cycles and improving weld quality. Variations in thickness cause uneven energy absorption, leading to inconsistent melting and longer cycle times.
By ensuring uniform thickness, you improve energy transmission and reduce voids or weak welds. Focus on these key design aspects:
Design walls with minimal thickness variation to promote uniform frictional heat generation at the joint. Avoid abrupt thickness changes that cause stress concentrations and irregular melt flow. Use simulation or measurement tools to verify thickness consistency before production.
This approach optimizes the weld interface, ensuring rapid, repeatable bonding cycles with reduced flash and stress fracturing. Ultimately, it boosts assembly efficiency and part integrity.
You need to regularly inspect the horn and booster for wear or damage, ensuring their surfaces remain clean and free of debris.
Check the transducer’s electrical connections and mounting tightness to maintain energy transmission efficiency.
Calibrate the system periodically to verify vibration amplitude and welding parameters.
Replace worn parts promptly to avoid inconsistent welds.
Also, monitor cooling systems and clean air filters to prevent overheating and maintain peak equipment performance.
Absolutely, automation accelerates assembly in high-volume production.
You can synchronize ultrasonic welders with robotic arms to secure swift, seamless, and consistent sealing.
By integrating sensors and programmable logic controllers, you’ll precisely control force, vibration, and time parameters, guaranteeing repeatable results.
Automated systems reduce human error, enhance throughput, and maintain tight tolerances.
Just make certain your joint design and part alignment support robotic handling for peak efficiency and quality in your production line.
Environmental factors like temperature fluctuations, humidity, and chemical exposure can degrade weld quality over time by causing stress, corrosion, or material embrittlement.
You need to take into account these effects during design and material selection to maintain hermetic seals and mechanical strength.
Using compatible thermoplastics and minimizing voids helps resist environmental stress.
Proper joint design and protective coatings also reduce degradation, ensuring consistent weld performance throughout the product’s lifecycle.
You need to wear hearing protection since ultrasonic welding can exceed 120 decibels, risking immediate hearing damage.
Always use safety goggles to shield your eyes from potential particulate ejection.
Make certain proper ventilation to avoid inhaling fumes from melting plastics.
Keep hands clear of the horn and joint area to prevent burns or mechanical injury.
Finally, follow lockout/tagout procedures during maintenance to avoid accidental machine activation.
Yes, you’ll face size limitations in ultrasonic welding. The process suits small to medium parts because the horn’s energy transfer concentrates on localized joints.
Large parts often require specialized equipment or multiple weld points to guarantee uniform energy distribution. Maintaining consistent pressure and vibration over large surfaces is challenging, risking weak bonds.
You should design parts with manageable dimensions and consider joint placement to optimize weld quality and process efficiency.
You might think ultrasonic welding is just about pressing parts together, but precision in joint design and parameter settings proves otherwise.
While materials and energy directors seem straightforward, mastering their interplay transforms weak bonds into robust, consistent welds.
Avoiding common mistakes and optimizing flash control aren’t optional; they’re essential for high-quality results.
By integrating these technical insights, you’ll speed up assembly without sacrificing strength or appearance, ensuring your ultrasonic welding process is efficient and reliable.