Phone:
(701)814-6992
Physical address:
6296 Donnelly Plaza
Ratkeville, Bahamas.
Phone:
(701)814-6992
Physical address:
6296 Donnelly Plaza
Ratkeville, Bahamas.
To weld effectively as a beginner, choose a method matching your metal’s thickness and environment. Use TIG for thin, precise work and stick or flux-cored for outdoors.
Wear an auto-darkening helmet, flame-resistant clothing, gloves, and proper boots. Prepare by cleaning and aligning metal with clamps, then tack weld to secure.
Start welding in flat and horizontal positions using steady travel speed and correct electrode angles. Avoid common mistakes by maintaining equipment and settings.
You’ll build skill and troubleshoot confidently by mastering these basics before progressing further.
When selecting the best welding method, you must analyze the metal’s thickness, type, and size to guarantee compatibility with the welding process.
Thin metals often require TIG welding for precision, while thicker metals suit MIG or stick welding for deeper penetration.
Consider the project’s scale: small, detailed tasks benefit from TIG’s control, whereas larger jobs favor MIG or flux-cored methods for speed.
Environmental conditions also affect your choice; outdoor welding typically demands flux-cored or stick welding due to shielding gas susceptibility.
Finally, determine the desired weld appearance. TIG produces clean, aesthetically pleasing welds, while stick welding leaves more slag and spatter.
Additionally, mastering proper heat input management is essential to produce strong welds with adequate fusion and minimize distortion.
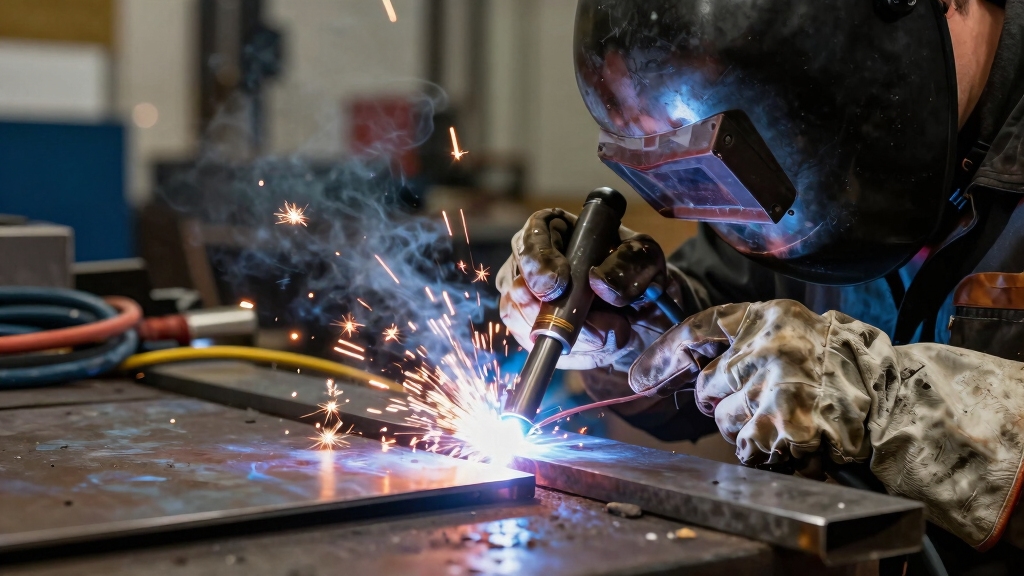
Before you dive into welding, it’s super important to gather all your safety gear. You want to make sure your eyes, skin, and lungs are well protected.
First up, grab a helmet with auto-darkening features. This is a game changer! It helps you see clearly while keeping your eyes safe from those intense lights and flying sparks.
Next, don’t forget about your protective clothing. Make sure it’s made from flame-resistant materials. This way, you’ll have full coverage and reduce the risk of burns. Safety first, right?
Also, select the correct lens shade level based on your welding amperage to ensure proper UV and IR radiation protection.
Although selecting the right welding method is critical, you can’t start without essential safety gear that protects you from intense heat, bright light, and hazardous fumes.
You need to equip yourself properly to prevent burns, eye damage, and respiratory issues. Make certain each item fits correctly and functions as intended before beginning.
Gather these essentials:
Prioritize safety by maintaining your gear and inspecting it regularly for wear or damage. Wearing proper welding gloves is crucial to protect your hands from burns, cuts, and electrical shocks during welding.
How do you make sure maximum protection and visibility while welding? Start by selecting a welding helmet with auto-darkening technology. This feature automatically adjusts lens shade based on the arc’s brightness, ensuring constant visual input without manual switching.
Choose a helmet with the appropriate shade range, typically 9 to 13, for your welding type and amperage. Confirm the helmet includes UV and infrared protection to shield your eyes from harmful radiation at all times.
Fit the helmet securely and comfortably, allowing a full field of vision and easy head movement. Test the sensitivity and delay settings to match your welding environment and preferences.
Investing in a reliable helmet not only prevents injury but also enhances precision by maintaining clear visibility throughout your weld. Always start with the helmet at maximum darkness and reduce one shade at a time to optimize visibility and protection.
Gather all essential protective clothing and safety gear before you begin welding to guarantee maximum safety and comfort. Proper attire minimizes exposure to sparks, UV radiation, and molten metal splatter.
Choose materials that resist heat and flames, and make certain all gear fits snugly for unrestricted movement. Prepare these key items:
Inspect your gear for damage before use and replace any worn or compromised items. Wearing the right protective clothing is critical for safe welding practice and injury prevention. Selecting gloves with the appropriate heat resistance levels ensures your hands remain protected against the specific temperatures generated by your welding process.
Align your metal pieces carefully to make certain a consistent gap across the joint before welding. Use magnets and clamps to hold the metals firmly in place, preventing movement during welding.
Ensure metal pieces are aligned with a consistent gap, securing them firmly using magnets and clamps before welding.
Make sure edges are clean and free of rust or debris to promote proper fusion. Trim any excess wire or burrs to avoid contamination.
Once aligned, tack weld small segments along the joint to secure the positioning temporarily. Check the alignment again after tack welding to confirm no shifts occurred.
Maintain a uniform gap suited to your welding method and metal thickness to guarantee optimal penetration and bead formation.
Proper preparation and alignment reduce defects and improve weld strength, setting a solid foundation before you proceed with the full welding process.
Always ensure your fillet weld meets the minimum leg length specified by AWS D1.1 for the base metal thickness.
With your metal pieces securely aligned and tack welded, you can focus on mastering the fundamental welding techniques that form the foundation of strong, clean welds.
Start by practicing stringer beads, which are straight, narrow welds with minimal electrode side-to-side movement. These are ideal for metals thinner than 1/4 inch.
Next, learn the weaving technique, which involves a controlled zig-zag motion to fill wider gaps on thicker materials.
Use the scratch arc start to initiate the arc reliably by touching and dragging the electrode tip on the metal surface.
Finally, adopt the correct electrode motion: pull for stick and flux-cored welding to avoid slag entrapment, and push for TIG welding to maintain arc stability and puddle control.
For best results when vertical welding, maintain a short arc length and hold the electrode at a 10–15° uphill angle to control the weld puddle effectively.
Welding in flat and horizontal positions simplifies controlling the weld puddle, as gravity naturally assists in maintaining proper metal flow and fusion.
Begin by securing your workpieces with clamps or magnets to guarantee proper alignment and a consistent gap.
Use a stringer bead technique, keeping your electrode or wire aimed at the leading edge of the puddle to promote smooth penetration.
Maintain a steady travel speed to avoid overheating or undercutting the joint.
For flat welding, position your electrode perpendicular to the surface; in horizontal welding, angle slightly upward to counteract gravity.
These positions reduce weld pool sagging and allow you to focus on bead consistency and uniform fusion.
Practice here builds confidence before moving to more challenging vertical or overhead welds.
Mastering these positions is essential for progressing toward more complex multi-positional welding.
To improve your weld quality, it’s essential to spot and fix common welding mistakes. You might encounter issues like poor penetration, excessive spatter, or uneven beads. But don’t worry; these problems are manageable with a little attention.
First things first, take a moment to troubleshoot. Start by checking your equipment settings—are they dialed in correctly? Next, look at your material preparation. Sometimes, a clean surface makes all the difference!
And don’t forget to assess your technique. Small adjustments can lead to significant improvements. Understanding the causes of common weld defects can help you prevent them effectively.
Although mistakes are common when learning to weld, identifying and correcting them early guarantees stronger, cleaner joints.
You should inspect your welds for common errors such as undercutting, porosity, and lack of fusion. Correcting these involves adjusting technique, settings, or preparation.
For example, reduce travel speed to avoid undercutting and assure proper shielding gas coverage to prevent porosity. Consistent electrode angle and motion improve fusion quality.
Check joint fit-up and clean metal surfaces before welding. Adjust voltage and wire feed speed to match material thickness.
Maintain steady hand movement and correct electrode angles. Re-weld areas showing cracks or insufficient penetration after grinding.
Addressing these errors promptly refines your skills and results in durable welds. Using post-weld heat treatments can further reduce residual stresses and prevent cracking in your welds.
Building on the corrections of common errors, troubleshooting welding issues requires systematic identification of the root cause to apply the proper fix.
Start by inspecting weld bead appearance: porosity often indicates contaminated materials or insufficient shielding gas flow. Excessive spatter suggests incorrect voltage or wire feed speed settings.
If you experience poor penetration, check joint fit-up and increase welding current carefully. Cracking may result from rapid cooling or improper welding sequence, so adjust your technique or preheat thicker metals.
Additionally, inconsistent arc stability often relates to damaged consumables or improper electrode angle. Use magnets and clamps to assure proper alignment before welding.
Always clean metal surfaces thoroughly and monitor gas flow rates. By methodically analyzing these factors, you’ll correct defects efficiently and improve weld quality consistently.
Once the weld has cooled sufficiently, you should begin grinding to achieve a smooth, uniform surface. Use a right-angle grinder with a suitable abrasive disc, applying light pressure to avoid removing too much material. Focus on blending the weld bead into the base metal for a clean finish.
After grinding, clean the area thoroughly to remove dust and residue, ensuring no contaminants remain.
Keep these tips in mind:
These steps will enhance weld appearance and structural integrity.
After completing the finishing steps, focus on refining your welding skills through consistent practice.
Begin by repeating basic weld beads, controlling speed, angle, and electrode motion to build muscle memory.
Experiment with stringer and weaving techniques on different metal thicknesses, adjusting wire feed speed and voltage incrementally.
Use magnets and clamps to hold pieces steady, ensuring proper alignment during practice.
Record settings and results, changing only one variable at a time to isolate effects on bead quality.
Practice various positions, flat, horizontal, and eventually vertical, to develop versatility.
Incorporate cooling periods between passes to prevent overheating.
Prioritize safety by wearing appropriate gear and maintaining equipment.
With disciplined repetition and incremental adjustments, you’ll accelerate skill acquisition and produce cleaner, stronger welds faster.
You should store welding consumables in a dry, clean environment to prevent moisture absorption and contamination.
Keep MIG wire and flux-cored wire sealed in airtight containers or original packaging with desiccants.
Store electrode sticks and TIG rods in sealed, rust-proof containers away from humidity.
Avoid exposure to dust, oil, and grease by using dedicated storage bins or cabinets.
Regularly inspect consumables for rust or damage before use to ensure consistent weld quality.
To keep your multi-function welder running like clockwork, regularly inspect cables and connections for wear or corrosion.
Clean the cooling vents to prevent overheating and check the gas flow system for leaks.
Replace worn consumables promptly and calibrate settings according to the manufacturer’s specs.
Don’t let dust and debris pile up; wipe down the machine after each use.
Routine maintenance guarantees peak performance and extends the welder’s lifespan.
You shouldn’t weld directly in humid or rainy weather because moisture increases the risk of electric shock and weld defects like porosity.
If you must weld outdoors, use a waterproof shelter or tent to keep your equipment and work area dry.
Make certain proper insulation on cables and wear dry protective gear.
Always check for condensation on metals before welding, as wet surfaces compromise weld quality and safety.
You should collect used welding rods and scrap metal separately, ensuring rods are cooled and free of contaminants.
Take scrap metal to a certified recycling center, where metals are properly processed.
Dispose of used rods according to local hazardous waste regulations, as some may contain flux or coatings harmful to the environment.
Always consult your municipality’s guidelines to avoid improper disposal and promote responsible recycling practices.
You mightn’t notice it immediately, but if your eyes sting, burn, or water excessively after welding, that’s a red flag.
Blurred vision, sensitivity to light, or a gritty feeling inside your eyes also signal strain or injury.
If you experience headaches or intense eye discomfort, stop welding and seek medical attention.
Always wear an auto-darkening welding helmet to minimize these risks and protect your vision during every weld.
Welding is like painting with fire. Each spark shapes your craft. By choosing the right method, gearing up safely, and mastering basic techniques, you’ll weld strong, clean joints every time.
Remember to align metals precisely and practice flat and horizontal positions to build confidence. When mistakes pop up, troubleshoot quickly and finish with careful grinding.
Keep honing your skills steadily, and soon your welds will shine like polished steel, solid and flawless.