Phone:
(701)814-6992
Physical address:
6296 Donnelly Plaza
Ratkeville, Bahamas.
Phone:
(701)814-6992
Physical address:
6296 Donnelly Plaza
Ratkeville, Bahamas.
To use JB Weld Quick Setting epoxy, first clean and roughen surfaces to remove contaminants and boost adhesion.
Mix equal parts resin and hardener thoroughly for at least 60 seconds, avoiding air bubbles.
Apply generously to the prepared area, then press and clamp with moderate pressure to avoid squeeze-out.
Make certain the workspace temperature stays above 40°F for peak curing.
After set, allow the recommended cure time before finishing.
Following these steps guarantees a strong bond and reliable repair. Explore further for detailed guidance and troubleshooting.
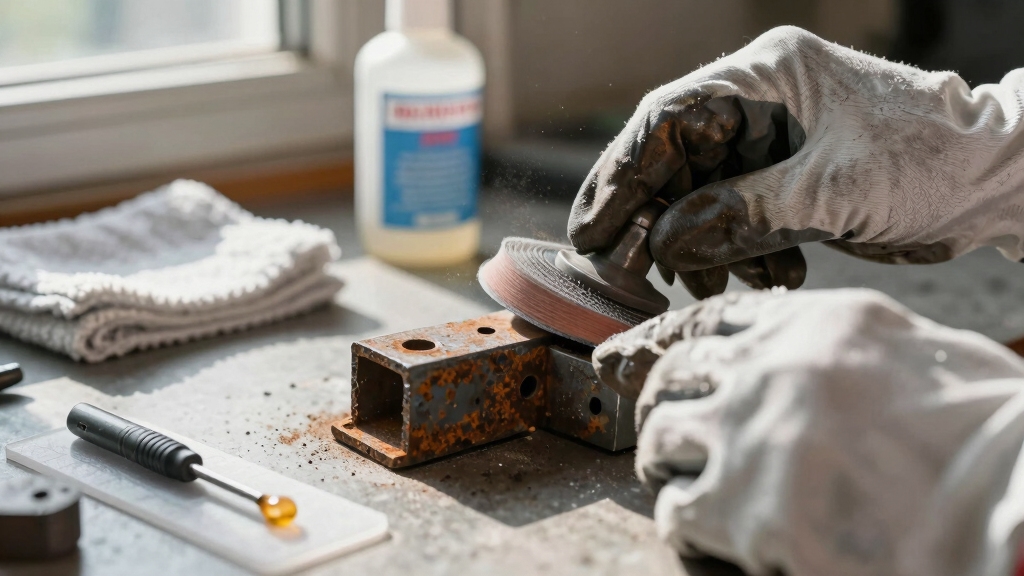
Before applying JB Weld Quick-Setting Epoxy, thoroughly prepare the surfaces to guarantee maximum adhesion. Start by removing all dirt, grease, oil, paint, rust, and loose debris using a detergent or degreaser to ensure the bonding area is uncontaminated.
Next, roughen the surfaces with coarse sandpaper or a 60-grit file to increase mechanical interlocking. This abrasion enhances adhesive strength markedly compared to smooth surfaces.
After roughening, wipe the surfaces with a suitable solvent to eliminate residual particles and oils. Allow them to dry completely.
Avoid applying epoxy on surfaces below 40°F, as low temperatures extend set time and can compromise bonding. Proper surface preparation is critical; neglecting any step reduces bond integrity and final tensile strength of up to 4000 PSI, compromising repair durability.
Creating a textured profile by scuffing the surface improves the epoxy’s mechanical grip and overall durability.
Achieve a reliable bond by mixing JB Weld Quick-Setting Epoxy components in a precise 1:1 ratio. Start by dispensing equal amounts of resin and hardener onto a clean, disposable surface or use the built-in static mixer attached to the syringe.
If mixing manually, stir the components vigorously for 60 seconds, using a stir stick with a pulling and poking motion to guarantee uniform integration. When using the mixer, discard the initial bead to avoid unmixed material.
Avoid introducing air bubbles during mixing, as they can weaken the bond. If no tray is available, you can mix within the syringe by drawing air and blending gently.
Accurate proportioning and thorough mixing are critical to achieve ideal curing time and mechanical strength for a durable repair. Proper handling and maintenance, similar to material-specific cleaning techniques, help ensure the longevity and effectiveness of repair tools and materials.
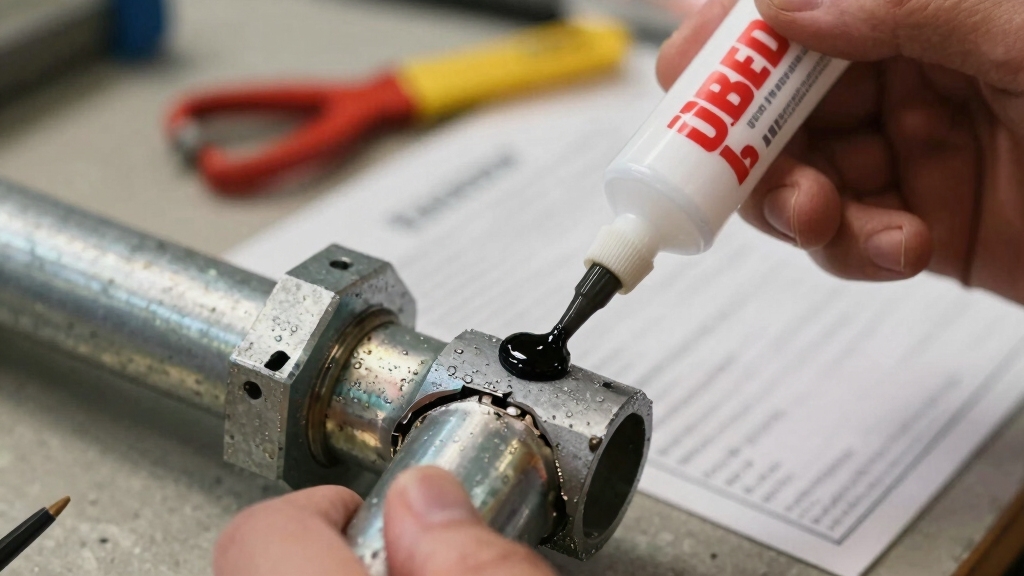
When applying JB Weld epoxy, use a generous amount to fill gaps and imperfections. This guarantees a stronger bond than thin layers of adhesive.
Follow these steps precisely to maximize adhesion and structural integrity:
Adhere closely to these steps to ensure maximum bonding strength and long-lasting repair results.
This method secures peak penetration and mechanical interlocking for a robust, lasting repair. Applying heat evenly while curing can improve bonding, similar to how heat is used for shrinking materials in other applications.
Although the initial set time varies among JB Weld products, you should allow the epoxy to fully cure before subjecting the repair to stress or machining.
InstantWeld and ClearWeld reach initial set in 1-5 minutes, but require at least 1 hour to achieve functional strength.
KwikWeld needs about 6 minutes to set and 4-6 hours to cure fully.
After curing, you can precisely shape or finish the bond by filing, sanding, drilling, or tapping.
Keep in mind that cured epoxy withstands temperatures up to 300°F, so apply finishing techniques accordingly.
For ClearWeld, expect a crystal-clear finish under 15 mil thickness; KwikWeld cures to a dark grey.
Proper curing guarantees maximum adhesion, tensile strength, and durability of your repair.
For enhanced surface preparation before applying epoxy, consider mechanical surface profiling to improve adhesion and coating durability.
If you encounter issues with JB Weld Quick-Setting Epoxy, understanding the root causes can help you resolve them efficiently. Common problems often stem from preparation, mixing, or environmental factors.
Troubleshooting JB Weld epoxy involves focusing on preparation, mixing, and environmental conditions for best results.
Proper surface preparation and ensuring the metal is dry before application are crucial to achieve optimal adhesion and curing of the epoxy, as highlighted in inspection and preparation guidelines.
Addressing these factors will optimize performance and durability of your epoxy repair.
You shouldn’t use JB Weld epoxy underwater or on wet surfaces because moisture disrupts its bonding process.
The epoxy requires clean, dry, and properly prepared surfaces for peak adhesion and curing. If you apply it in wet conditions, the bond strength and cure time will suffer considerably.
To guarantee maximum performance, thoroughly dry and prep the area before applying the epoxy. Avoid any exposure to water until curing completes.
You shouldn’t consider JB Weld epoxy food-safe once cured. Although it creates a strong, durable bond, it’s not certified for direct food contact or potable water applications.
Its chemical composition may leach substances under certain conditions, posing health risks. For food-safe repairs or containers, use products specifically labeled NSF-approved or FDA-compliant.
Always verify certifications before applying epoxy in food-related environments to guarantee safety and compliance.
You can’t stash mixed epoxy forever; it’s a ticking clock!
Once mixed, you’ve got about 1 to 6 minutes before it starts setting, depending on the product.
InstantWeld kicks off in around a minute, while ClearWeld and KwikWeld give you up to 6 minutes.
After that, it thickens and loses workability.
For best bonding, apply it promptly; storing mixed epoxy longer than this risks curing issues and weak adhesion.
Yes, you can paint over JB Weld epoxy after it has fully cured.
Make sure the epoxy is completely hardened—typically 1 to 6 hours depending on the variant, with some requiring up to 24 hours for maximum strength.
For best adhesion, lightly sand the cured surface to create a rough texture.
Then clean off debris before applying paint.
Use compatible paint types for best results, as the epoxy forms a durable, heat-resistant base.
You can expect unopened JB Weld epoxy syringes to have a shelf life of about two years when stored properly.
Keep them sealed tightly, away from extreme temperatures and moisture, ideally at room temperature.
Over time, chemical components can degrade, reducing bonding effectiveness and set time reliability.
Always check the manufacturer’s date on the package to guarantee peak performance before use, as expired epoxy won’t cure or bond as designed.
By carefully preparing surfaces, mixing precisely, and applying JB Weld Quick-Setting Epoxy with intent, you’re not just repairing. You’re crafting resilience.
Allowing proper cure and finishing guarantees your work won’t just hold; it’ll endure subtle tests of time and stress.
If challenges arise, troubleshooting sharpens your skill. In mastering these steps, you’re not merely fixing; you’re engineering a quiet strength that speaks volumes beneath the surface.