Phone:
(701)814-6992
Physical address:
6296 Donnelly Plaza
Ratkeville, Bahamas.
Phone:
(701)814-6992
Physical address:
6296 Donnelly Plaza
Ratkeville, Bahamas.
To TIG weld steel effectively, start by thoroughly cleaning and degreasing the surface to remove contaminants.
Use a 1.6 mm zirconated tungsten electrode and maintain a short arc length around 1.6 to 2.4 mm for stable, precise welding.
Employ high-purity argon shielding gas with proper flow and post-flow for protection.
Keep your torch at a 15–20° angle, steadily feed clean filler rods, and control heat to avoid distortion.
Master these basics, and you’ll build a solid foundation for advanced weld techniques.
Start by thoroughly cleaning the steel surfaces with a degreaser and metal brush to remove all contaminants. This ensures peak weld quality. Use separate brushes for different metals to avoid cross-contamination.
Thoroughly clean steel surfaces with a degreaser and separate brushes to ensure optimal weld quality.
Next, achieve a tight fit-up with minimal gaps, especially on sheet metal, to reduce warping and filler consumption. For thick or brittle steel, preheat to around 500°F to prevent brittle welds caused by rapid cooling.
Begin practicing on thinner 2mm or 3mm steel, which allows you to control larger weld pools easily. Select the correct tungsten electrode and set appropriate shielding gas, maintaining a steady arc length.
Keep a consistent torch angle and movement, feeding filler rods steadily into the weld puddle. End the weld by gradually reducing heat and maintaining shielding gas until cooled.
Before starting, be sure to securely connect the TIG torch, gas hose, and work clamp to the welding machine to ensure safety and proper operation.
Thoroughly clean the steel surfaces using a degreaser and a metal brush to eliminate all debris, dust, dirt, and metal shavings.
Use separate brushes for different metals to avoid contamination, especially between stainless steel and aluminum.
Guarantee tight fit-up with minimal gaps to prevent warping and reduce filler use.
Preheat thick or brittle steel to 500°F to slow cooling and avoid brittle welds.
Start practice on thinner steel (2-3mm) for better control of the weld pool.
Maintaining proper surface preparation ensures improved weld quality and corrosion resistance.
| Step | Purpose |
|---|---|
| Degreasing | Remove oils and contaminants |
| Metal brushing | Eliminate rust and oxides |
| Separate brushes | Prevent cross-metal contamination |
| Tight fit-up | Minimize warping and filler use |
| Preheating | Prevent cracks in thick steel |
When selecting a tungsten electrode for TIG welding, you’ll want to match its composition and size to the metal you’re working with and the welding parameters.
For steel, use a 1.6mm zirconated (white) tungsten, which offers excellent arc stability and longevity.
Maintain an arc length of 1 to 1.5 times the electrode diameter, about 1.6 to 2.4mm, to guarantee consistent heat input and arc control.
Set your TIG welder to a constant current mode, adjusting amperage based on material thickness.
Enable high-frequency start with a brief pre-flow gas duration to prevent tungsten contamination.
Position the tungsten properly in the torch, keeping it steady and sharp for precise arc initiation.
Proper setup guarantees weld quality, penetration, and reduces defects during the TIG welding process.
Using an inert gas shielding system like argon protects the weld pool from atmospheric contamination and ensures clean, defect-free welds.
When it comes to TIG welding steel, you’ll definitely want to stick with high-purity argon as your main shielding gas. It really helps ensure a stable arc and gives you those clean welds we all aim for.
Now, if you’re working with thicker materials, consider adding some helium to the mix. It can increase heat input and penetration, which is super helpful for those tougher jobs.
Just a heads-up: steer clear of using gases like CO2 or any air contaminants. They can lead to oxidation and pretty much guarantee some weld defects, which nobody wants. So, keep it simple and stick with argon, maybe add a bit of helium if needed, and you’ll be set for success!
Proper shielding gas flow rates must be optimized to avoid contamination or turbulence during welding.
Argon gas remains the most effective and widely used shielding gas for TIG welding steel. It provides a stable and inert atmosphere that prevents oxidation during the welding process.
You’ll find argon’s high density creates excellent arc stability and smooth metal transfer. This helps produce clean, precise welds.
It also guarantees consistent coverage around the tungsten electrode and weld pool, minimizing contamination and porosity. Because argon doesn’t react with molten steel, it maintains weld integrity and mechanical properties.
Additionally, argon’s ability to displace atmospheric gases reduces the risk of weld defects like oxidation and nitrides. When setting your flow rate, aim for 15 to 20 cubic feet per hour to maintain optimal shielding without turbulence.
Using pure argon simplifies setup and delivers reliable, high-quality welds on steel every time. Its high ionization energy enables smooth arc initiation and consistent maintenance, minimizing fluctuations for a stable welding process.
Incorporating helium into your shielding gas mix can markedly enhance penetration and heat input during TIG welding of steel.
Helium’s higher ionization potential compared to argon increases arc voltage, delivering intensified arc energy that improves weld pool fluidity and depth of fusion.
When you add helium, expect faster welding speeds and better bead profile control, especially on thicker sections.
Typically, blends range from 25% to 75% helium mixed with argon, balancing cost and performance.
Higher helium content demands adjustments in amperage to prevent overheating.
Use helium-enriched gas when welding steel requiring deep penetration without sacrificing weld integrity or when increased heat input counteracts heat dissipation in large or thick parts.
Proper flow rate calibration is essential to maintain a stable arc and effective shielding.
Higher helium content also requires increased flow rates to ensure proper shielding and arc stability during welding.
Although shielding gas protects the weld pool from atmospheric contamination, selecting the wrong gas or allowing impurities like oxygen, nitrogen, or carbon dioxide to enter can introduce defects that compromise weld quality.
Use high-purity argon as your primary shielding gas for steel. It guarantees an inert atmosphere that prevents oxidation and contamination.
Avoid CO2, which can cause porosity and brittle welds. In stainless steel welding, a controlled 1-5% oxygen or nitrogen addition can improve fluidity but must be precisely regulated.
Maintain steady gas flow and check for leaks in hoses and fittings to prevent air infiltration. Also, keep the torch gas pre-flow and post-flow times adequate to shield the weld before striking the arc and during cooling.
These steps minimize contamination, guaranteeing clean, strong TIG steel welds.
For enhanced arc stability and penetration in certain applications, consider using argon+helium blends tailored to the metal thickness and type.
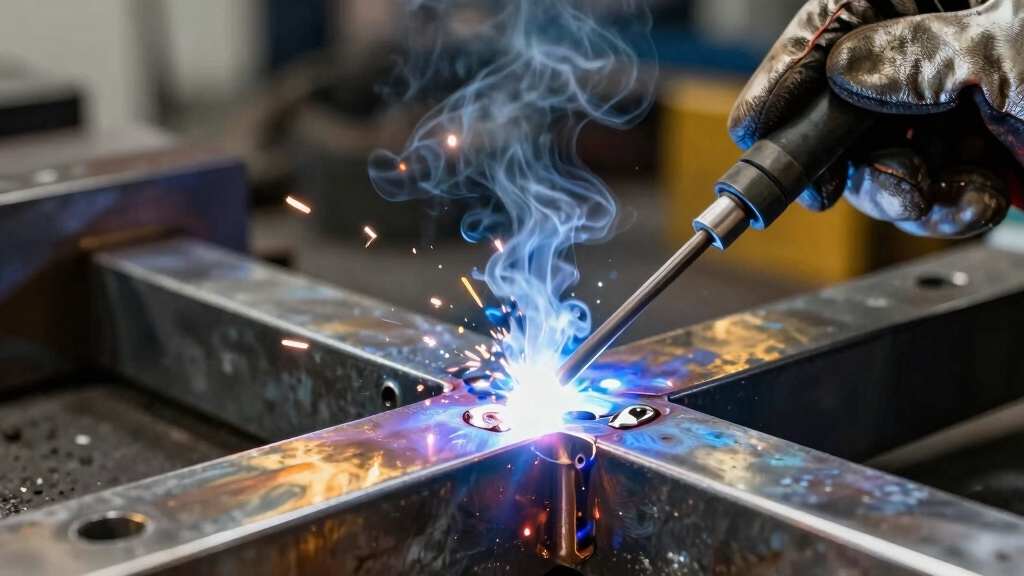
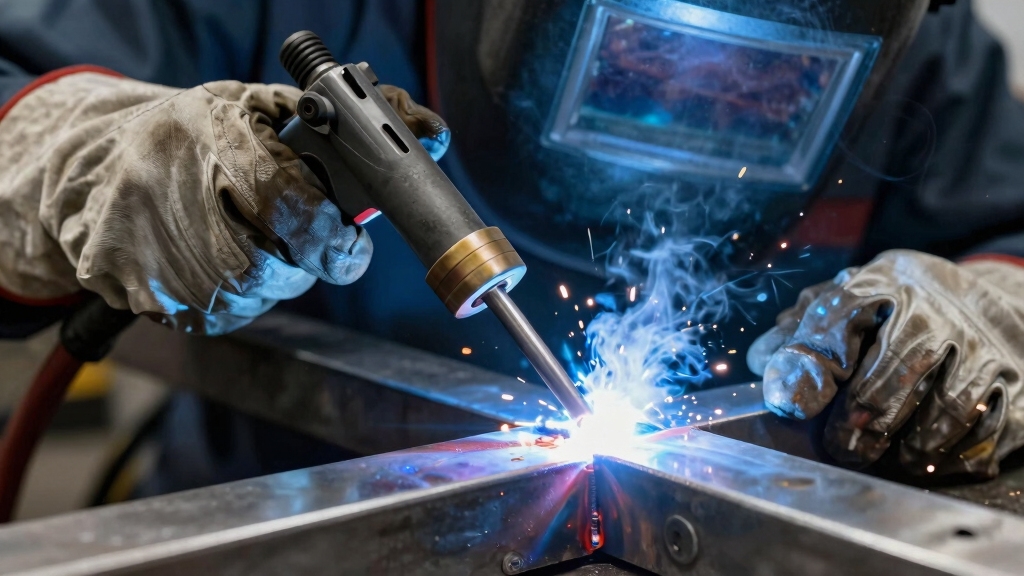
Getting your torch angle and distance right is essential for achieving a stable arc and ideal weld penetration when TIG welding steel.
Hold the torch at a 15-20° angle from vertical, tilting it slightly toward the weld direction to guide the molten pool effectively.
Maintain a consistent tungsten-to-work distance of about 2mm; this guarantees stable arc voltage and peak heat input.
Too close, and you risk tungsten contamination or sticking. Too far, and the arc becomes erratic with increased oxidation.
Keep your torch steady and move it smoothly along the joint, allowing the weld pool to form properly.
Adjust your angle and distance as needed for changes in joint geometry, but always prioritize a short arc length to maintain control and prevent defects.
Proper torch assembly, including correctly inserting the tungsten electrode, is crucial for maintaining arc stability and precision.
When you’re getting ready to TIG weld steel, picking the right filler rod is crucial. Aim for a diameter between 1.0 and 1.6mm. This size makes feeding the rod easier and gives you better control, which is super important for a clean weld.
Now, remember to keep that filler rod under the gas shield. This little trick helps prevent oxidation, which can mess with your weld quality. And don’t forget to feed it steadily into the weld pool, especially when you’re working with thin sheet metal. If you’re not careful, you could end up with drop-through, and nobody wants that!
For steel, a good choice is the ER70S2 filler type. It’s reliable and works well for most applications. Just handle those rods with care. Consistent fusion and weld quality are what you’re after, so treat them right! Also, selecting the correct wire composition ensures the weld has the necessary strength and corrosion resistance.
Select the appropriate filler rod size based on your steel thickness and welding position to guarantee smooth feeding and proper fusion.
For most TIG welding on steel, rods between 1.0mm and 1.6mm diameter provide ideal control and melting rates.
Thinner rods (around 1.0mm) suit thin sheet metal and out-of-position welds. They allow precise feeding and reduce the risk of burn-through.
Thicker rods (1.6mm) work better on heavier sections, enabling you to add filler efficiently without overheating the base metal.
Match the rod diameter to your welding current. Too large a rod can cause inconsistent melting, while too small may slow deposition and cause rod sticking.
Consistent rod size maintains stable arc characteristics and weld bead quality, ensuring strong, defect-free joints.
Adjusting the filler rod size in harmony with your welding current helps maintain arc stability and optimal heat input for quality welds.
When handling filler rods for TIG welding steel, keep the rod consistently shielded under the gas flow to prevent oxidation that can weaken the weld.
Select a filler rod diameter between 1.0 and 1.6mm for easier control and smooth feeding into the weld pool.
Always feed the rod quickly into the molten puddle to avoid burn-through, especially on thin sheet metal.
Warm the rod slightly in the gas shielded area before melting to guarantee consistent melting rates.
During welding, add filler inside the newly formed puddle while pushing the torch forward, securing proper fusion and penetration.
Avoid exposing the rod outside the gas shield to prevent contamination.
Maintaining these practices secures clean, strong welds with minimal defects.
Proper filler rod selection directly influences weld quality, strength, and compatibility with the base metal.
When TIG welding steel, choose a filler that matches or closely aligns with the base metal’s composition to guarantee fusion and mechanical integrity. Common filler rods include ER70S-2, which works well for mild steels, and higher alloy rods for specialized steels.
Consider these factors when selecting your filler:
Use 1.0-1.6mm diameter rods for better control and feedability.
Match rod composition to base steel to avoid cracking and weak welds.
Prefer ER70S-2 for general mild steel welding, especially with preheat.
Keep filler rods clean and feed them steadily into the molten pool under shielding gas to prevent oxidation.
Choosing the right rod guarantees a strong, defect-free weld.
Although controlling heat and arc length might seem straightforward, maintaining the right balance is critical for producing strong, defect-free TIG welds.
You need to keep your arc length between 1 and 1.5 times the tungsten diameter, typically 1.6 to 2.4mm, to guarantee stable voltage and consistent heat input.
Too long an arc increases voltage and heat, risking tungsten contamination and excessive penetration.
Too short causes arc instability and poor shielding gas coverage.
Use your foot pedal to modulate current precisely, adapting heat to material thickness and joint design.
Monitor the weld pool carefully, adjusting torch speed and angle to avoid overheating or undercut.
Consistently maintaining this balance secures proper fusion, reduces defects like porosity or cracking, and produces welds with optimal mechanical strength and appearance.
To steer clear of common TIG welding mistakes on steel, it’s super important to start with clean surfaces. Make sure you give everything a good scrub and use dedicated brushes for different types of metals. This helps prevent contamination, which can really mess up your welds.
Now, let’s talk about heat input. Controlling it precisely is key! If you don’t, you might end up with warped pieces or brittle welds, especially when working with thicker or more fragile materials.
Contamination errors frequently cause weld defects and weaken steel joints during TIG welding. To prevent these issues, you must prioritize cleanliness and proper handling throughout the process.
Start by thoroughly cleaning surfaces with a degreaser and metal brush to remove dirt, oil, and metal shavings. Use separate brushes for different metals to avoid cross-contamination.
Always maintain the tungsten electrode free of oxide buildup and avoid touching it with bare hands, which transfers oils. Make certain shielding gas flow is stable and uninterrupted to protect the weld pool from atmospheric contamination.
Key practices include:
Following these steps keeps your welds strong and defect-free.
Consistently managing heat input during TIG welding is essential to producing strong, defect-free steel joints. You need to maintain a short arc length, about 1 to 1.5 times the tungsten diameter, to control voltage and avoid excessive heat.
Use the foot pedal to adjust current dynamically, guaranteeing prevention of overheating and warping. Preheat thick or brittle steel to around 500°F to slow cooling and reduce cracking risks.
Employ the backstep technique on thin metals, welding short sections and blending to minimize distortion. Keep your torch steady at a 15-20° angle, pushing the weld pool to ensure proper penetration without overheating.
Finally, end the weld gradually by reducing current and maintaining shielding gas during post-flow to prevent crater cracks and oxidation.
When wrapping up your weld, controlling the arc reduction and maintaining shielding gas flow are essential steps to guarantee a clean, crack-free finish.
Gradually decrease the current to avoid abrupt cooling that causes crater cracks. Keep the shielding gas flowing for 5-8 seconds after extinguishing the arc to protect the weld from oxidation.
Reduce current gradually and maintain gas flow post-arc to prevent cracks and oxidation.
Hold the torch steady and lift it at an angle to prevent contamination from tungsten or air exposure.
Focus on these key finishing techniques:
These steps help you produce durable, high-quality TIG welds every time.
Start by setting up your workspace to handle the delicate nature of thin steel sheets. These require careful control of heat input and torch movement.
Use clean, degreased surfaces and ensure tight fit-up to minimize gaps and reduce warping. Select a 1.6mm tungsten electrode and maintain a short arc length of 1–1.5 times the electrode diameter.
Hold the torch at a 15–20° angle, using a steady push technique to promote penetration and gas coverage. Practice on 2mm or 3mm steel first to develop control over the weld pool and filler rod feeding.
Keep the filler rod under the gas shield, feeding it quickly to avoid drop-through. Use short weld sections with backstepping to prevent distortion and cracking.
End each weld with a slow arc lift and post-flow gas to cool.
You need essential safety gear for TIG welding steel: a properly rated welding helmet with auto-darkening lens to protect your eyes from UV and IR radiation.
Flame-resistant gloves shield your hands from heat and sparks, and a long-sleeve flame-resistant jacket or sleeves protect your skin.
Wear safety boots and ensure proper ventilation or respiratory protection to avoid inhaling fumes.
Don’t forget ear protection if noise levels are high.
Always prioritize your safety before welding.
Did you know tungsten electrodes can last up to 10 times longer with proper care?
Store them in a clean, dry container to prevent contamination. Always use separate tungsten for different metals like stainless or aluminum to avoid cross-contamination.
After grinding, clean them with a dedicated brush. Avoid touching the tip with bare hands; oils degrade performance.
Proper storage and maintenance guarantee consistent arc stability and weld quality every time.
Yes, you can automate TIG welding steel for production.
Automated systems provide consistent weld quality, precise control over heat input, and repeatable torch movements.
You’ll need programmable welding equipment with accurate torch positioning, controlled filler feeding, and reliable shielding gas flow.
Automation suits high-volume, complex welds where precision matters.
However, you must guarantee proper joint fit-up and parameter optimization to avoid defects and maintain the benefits of TIG’s clean, high-quality welds.
Think of welding galvanized steel like finding your way along a foggy path. You need clear vision and careful steps.
To weld it properly, clean the surface thoroughly to remove zinc coating, which produces harmful fumes. Use low heat to avoid burning through the coating and guarantee excellent ventilation.
Preheat thick sections slightly, and use a filler rod compatible with steel. Always wear proper respirators; safety is your guiding light through this foggy process.
Humidity increases moisture on steel surfaces, causing hydrogen absorption during TIG welding. This leads to porosity and hydrogen-induced cracking.
You’ll notice unstable arcs and contamination in your weld pool if surfaces aren’t properly dried and cleaned.
To maintain quality, you must store materials in low-humidity environments and thoroughly clean and dry the steel before welding.
Using proper shielding gas flow also helps minimize moisture-related defects during TIG welding.
Now that you’ve mastered the art of TIG welding steel, you’re basically a metal whisperer. Just remember: keep your tungsten sharp, your shielding gas flowing, and resist the urge to snack mid-weld.
Precision and patience are your best friends here; skip those, and you’ll end up with a weld that looks like modern art gone wrong. So, go ahead, weld like a pro. Your steel deserves nothing less.