Phone:
(701)814-6992
Physical address:
6296 Donnelly Plaza
Ratkeville, Bahamas.
Phone:
(701)814-6992
Physical address:
6296 Donnelly Plaza
Ratkeville, Bahamas.
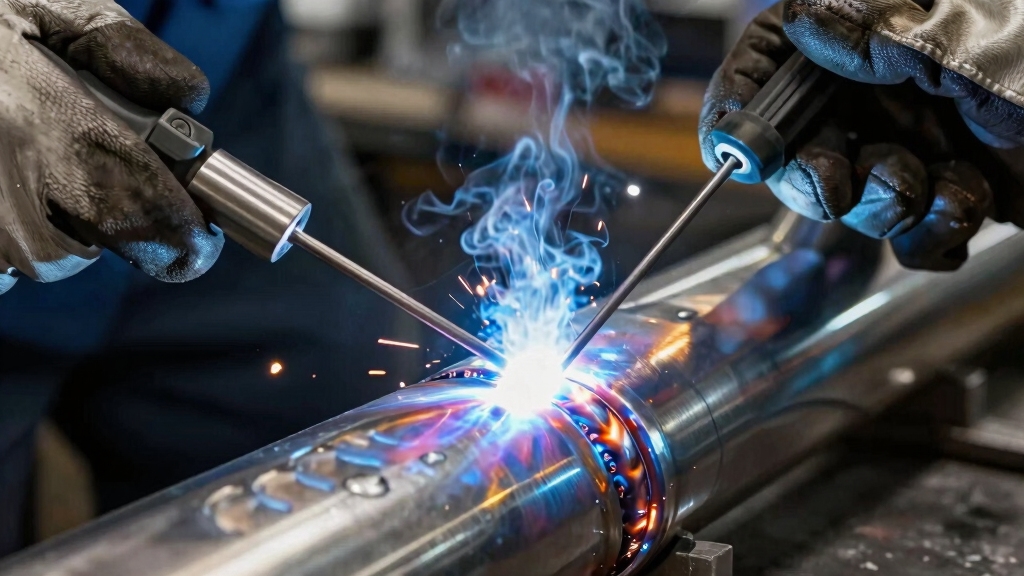
To TIG weld stainless steel, use a 2% lanthanum tungsten electrode sized to your material, typically 3/32 inch. Clean the surfaces thoroughly and maintain a consistent joint gap.
Angle your torch 15–20 degrees and employ the pull technique for deeper penetration. Use ER308L filler rod, add filler steadily, and maintain 20 cfh argon shielding to prevent oxidation.
Control amperage to minimize distortion and purge pipes with argon to avoid backside sugaring. Proper setup guarantees strong, clean welds; following these steps lays the groundwork for advanced techniques.
When welding stainless steel with the TIG process, you need to focus on equipment selection, gas control, and technique to achieve clean, durable welds.
Start by choosing the proper filler rod, typically ER308L at 1/16 inch diameter, matching electrode size to material thickness.
Use a #8 gas lens cup and maintain a consistent 20 cfh argon flow to shield the weld area effectively.
Angle the torch 15-20 degrees from the base metal, use a pulling technique opposite the weld direction, and establish the puddle within 1-2 seconds to control heat input.
Add filler metal at regular intervals, advancing approximately 1/8 inch between dabs.
Practicing precise heat management, including minimizing amperage and using chill bars, helps prevent distortion and discoloration for peak weld quality.
It is essential to avoid using improper shielding gases like 75/25 argon-CO2 to prevent oxidation and maintain corrosion resistance in the weld.
Selecting the right tungsten electrode directly impacts the quality and consistency of your stainless steel TIG welds.
Choosing the correct tungsten electrode is crucial for producing high-quality, consistent stainless steel TIG welds.
For stainless steel, choose a 2% lanthanum (blue) tungsten electrode, which offers excellent arc stability and longevity compared to pure tungsten.
Avoid pure tungsten, as it contaminates the weld pool and degrades performance.
Match the electrode diameter to the material thickness; typically, 3/32 inch (2.4 mm) suits most stainless applications.
Maintain a clean, sharp tip with a taper no longer than 2.5 times the diameter to guarantee precise arc control.
Proper electrode selection minimizes contamination and guarantees consistent arc initiation, leading to smooth, defect-free welds.
Lanthanated electrodes are also recommended for inverter machines due to their reliable performance and extended electrode life.
When setting up your TIG welder for stainless steel, you’ll want to start with a 2% lanthanum tungsten electrode.
The size should match the thickness of your material, and for most stainless steel projects, a 3/32 inch electrode works well.
Next up, you’ll need to choose the right filler rod. An ER308L filler rod with a diameter of 1/16 inch is a great choice.
This will help ensure that you achieve proper fusion and maintain corrosion resistance in your welds.
Lastly, don’t forget about your shielding gas! Maintaining an argon gas flow rate of about 20 cubic feet per hour through a #8 gas lens cup is essential.
This setup provides consistent shielding and helps prevent oxidation during the welding process.
For stainless steel, consider using argon with a small percentage of hydrogen or nitrogen to enhance penetration and prevent alloy degradation through argon-hydrogen and argon-nitrogen blends.
Although choosing the right electrode and filler may seem straightforward, it demands careful attention to material compatibility and weld quality.
Use a 2% lanthanum tungsten electrode (blue tip) sized to match your stainless steel thickness, commonly 3/32 inch for general work.
Avoid pure tungsten electrodes as they lack stability.
For filler, select ER308L rods with a 1/16 inch diameter to guarantee optimal fusion and corrosion resistance.
Maintain an electrode taper no longer than 2.5 times its diameter to stabilize the arc.
Proper electrode and filler selection directly influence bead appearance, penetration, and weld integrity.
By adhering strictly to these parameters, you control heat input and prevent contamination.
This guarantees durable, aesthetically pleasing stainless steel welds that meet industry standards.
Also, selecting the appropriate shielding gas mixture is crucial to protect the chromium oxide layer and achieve superior arc stability during TIG welding.
Maintaining proper shielding gas flow plays a vital role in protecting the weld pool from atmospheric contamination and guaranteeing a clean stainless steel weld.
Set your argon flow rate to approximately 20 cubic feet per hour (cfh) to achieve peak coverage.
Too low a flow can allow oxygen and nitrogen intrusion, causing porosity and discoloration.
Conversely, excessive flow creates turbulence, pulling in air and compromising the weld quality.
Use a flowmeter to calibrate precisely, adjusting for environmental factors like wind or drafts.
When welding pipes, guarantee complete gas purging inside and out to prevent oxidation on the backside.
If you add helium to improve penetration, carefully monitor flow rates to avoid overheating.
Consistent, controlled argon flow guarantees a stable arc and superior weld integrity.
A stable arc supported by argon’s high ionization energy ensures smooth starts and consistent heat input throughout the weld.
Thoroughly clean all stainless steel surfaces to remove any contaminants, oils, or debris that could compromise weld integrity.
Ensure all stainless steel surfaces are meticulously cleaned to eliminate contaminants that may weaken weld quality.
Use a dedicated stainless steel wire brush or acetone to guarantee a pristine base. Inspect joints for fit-up, maintaining a consistent gap, typically 1/16 inch for Schedule 10 piping, to allow proper penetration and filler accommodation.
Align parts precisely to avoid distortion during welding. Position backing bars or aluminum chill bars firmly behind the joint; these absorb heat and prevent oxidation or sugaring on the backside.
Secure backing bars to eliminate movement during welding, which can disrupt shielding gas coverage. Confirm the joint edges are free of burrs or sharp angles that might cause arc instability.
This preparation assures peak fusion, shielding, and heat control, setting a solid foundation for high-quality TIG welds on stainless steel.
Proper surface preparation and cleaning are essential to avoid surface discontinuities such as cracks or porosity that can weaken the weld.
When you’re welding stainless steel pipes, it’s super important to purge the interior. This helps displace any oxygen and prevents oxidation, which is often referred to as sugaring.
The best way to do this is by using inert gas—argon is a popular choice. This creates an oxygen-free environment inside the pipe, which ensures that the backside of your weld is shielded consistently.
Also, don’t forget to use backing and chill bars! They’re really helpful because they absorb heat and help maintain the integrity of the weld. Plus, they work to minimize any discoloration that might occur during the welding process.
So, keep these tips in mind to achieve the best results when working with stainless steel pipes! Maintaining proper shielding gas flow rates is essential to prevent oxidation and ensure a clean weld.
Purging pipes with inert gas during stainless steel TIG welding prevents oxygen contamination that causes sugaring, a discolored, brittle oxide layer on the weld’s backside.
You need to seal pipe ends tightly and introduce argon at a controlled flow to displace ambient air completely.
Monitor the purge gas outlet to guarantee oxygen levels drop below 50 ppm before welding.
Maintain consistent gas flow throughout the process to avoid oxygen ingress.
Use proper backing materials, like aluminum, to support the purge and limit heat transfer.
Effective purging guarantees clean fusion, preserves corrosion resistance, and maintains weld integrity.
Neglecting this step leads to compromised mechanical properties and expensive rework.
Always verify purge effectiveness with oxygen analyzers or colorimetric indicators before initiating the arc.
Additionally, controlling heat input and using proper welding techniques can help reduce the risk of oxidation-related defects during the welding process.
To accomplish effective oxygen displacement during stainless steel TIG welding, you must create a sealed environment that prevents atmospheric air from contaminating the weld area. This eliminates oxygen exposure that causes oxidation and “sugaring” on the backside of the weld.
Proper purging displaces oxygen with inert gas, typically argon, inside pipes or enclosed sections. To guarantee effective purging, you should:
Additionally, integrating local exhaust ventilation can further reduce contamination risks by controlling fumes and protecting weld quality during the process.
In stainless steel TIG welding, backing and chill bars play a crucial role in controlling heat and preventing oxidation on the weld’s backside.
You use backing bars, often aluminum or copper, to support the molten weld pool and guarantee full penetration without burn-through.
Chill bars absorb excess heat, limiting distortion and discoloration, which prevents the dreaded “sugaring” effect caused by oxygen contamination.
When purging pipes, you block ends and inject inert argon gas to displace oxygen, but backing bars provide a physical barrier and heat sink that stabilize the weld’s rear face.
Proper placement and selection of these bars help maintain consistent temperature control, improve shielding effectiveness, and reduce post-weld cleanup.
Additionally, using backing bars made of copper enhances electrical conductivity and heat resistance, contributing to weld quality and protection.
Maintain a torch angle between 15 and 20 degrees from the base metal to guarantee peak visibility and consistent gas coverage during TIG welding.
This angle assures the shielding gas adequately protects the molten puddle while allowing you to monitor puddle formation clearly.
Use the pull technique by dragging the electrode opposite the direction of the weld deposit to promote deeper penetration and cleaner fusion.
Focus on these key points for optimal torch control:
Keep the tungsten centered in the gas lens cup to maintain uniform coverage.
Establish a stable puddle within 1-2 seconds to control heat input.
Move the torch steadily to avoid overheating and distortion.
Maintain a consistent travel speed, advancing roughly 1/8 inch between filler additions.
This approach yields precise, contaminant-free welds on stainless steel.
Although careful torch control sets the foundation, using the correct filler rods and employing a consistent weave pattern markedly enhance the strength and integrity of your stainless steel welds.
Select ER308L filler rods sized at 1/16 inch diameter for typical applications; this guarantees proper alloy matching and penetration.
When adding filler, dip the rod into the leading edge of the weld puddle steadily, maintaining a rate of about one addition per second.
Employ a Z-weave pattern to distribute heat evenly and fill the joint thoroughly.
Pause briefly on the weld toes during each weave to promote fusion without overheating.
This controlled weave avoids excessive buildup or underfill, yielding a uniform bead with peak mechanical properties.
Consistency in these steps is critical for durable, contamination-free weld joints.
Because stainless steel conducts heat poorly and accumulates it rapidly, you must carefully control amperage to prevent warping and discoloration. Use the minimum amperage necessary to establish a stable weld puddle, then move quickly to avoid excessive heat buildup.
Keep your welds cold and fast, completing each segment within three seconds to limit thermal expansion and distortion. Employ chill bars or aluminum backing to absorb heat and maintain dimensional stability.
To manage heat effectively:
This methodical approach reduces warping and preserves stainless steel’s corrosion resistance.
When you finish your weld, slow the arc reduction gradually to keep shielding gas coverage intact and avoid cracks or craters. Abruptly stopping the arc exposes the molten metal to oxygen, causing oxidation and weakening the joint.
Maintain gas flow for several seconds after arc termination to protect the weld pool as it solidifies. Keep your tungsten centered and steady during the final seconds to make certain uniform heat distribution and prevent crater formation.
A smooth, controlled taper in amperage prevents thermal shock and stress concentration, essential for crack-free welds. Avoid rapid torch withdrawal; instead, pull the torch back slowly while sustaining gas coverage.
This methodical finish preserves stainless steel’s corrosion resistance and mechanical properties, resulting in durable, visually consistent weld beads.
You need a welding helmet with an auto-darkening filter to protect your eyes from UV and infrared rays.
Wear flame-resistant gloves and a long-sleeve jacket to shield your skin from sparks and heat.
Use safety glasses under the helmet for added eye protection.
Respiratory protection is essential due to fumes; use a respirator or guarantee proper ventilation.
Finally, wear leather boots to protect your feet from hot metal and sharp objects.
Think of environmental conditions as invisible gatekeepers controlling your weld quality.
Wind disrupts argon shielding, causing oxidation and sugaring, so you’ll need windshields or enclosures.
Humidity can introduce moisture, leading to porosity and contamination.
Temperature extremes affect heat control; cold metal chills your puddle, requiring amperage adjustments.
Heat accelerates distortion.
Always monitor airflow, purge thoroughly, and use chill bars to maintain consistent, defect-free stainless steel TIG welds.
Yes, you can automate stainless steel TIG welding with robotic systems.
You’ll need precise control of amperage, torch angle, and shielding gas flow to maintain weld quality.
Programming the robot to follow consistent torch travel speeds and filler addition guarantees uniform penetration and bead appearance.
Additionally, integrating purge gas controls and chill bars helps prevent oxidation and distortion.
Automation improves repeatability, reduces operator fatigue, and enhances weld consistency in high-volume production.
Common causes of weld contamination in stainless steel include inadequate shielding gas coverage, allowing oxygen or nitrogen to react with the molten metal.
You might also introduce contaminants from dirty surfaces, oils, or grease.
Improper electrode selection or excessive heat can cause tungsten inclusions or oxidization.
Don’t assume tungsten inclusions are just from careless technique. They often stem from improper electrode setup.
To troubleshoot, first check your tungsten tip: grind it to a sharp point, avoiding contamination by using dedicated wheels.
Keep the electrode extension consistent and avoid dipping tungsten into the weld pool.
Maintain a stable arc and proper torch angle to guarantee the tungsten stays out of the molten puddle, preventing inclusion defects effectively.
By mastering the right tungsten electrode, torch angle, and filler rod techniques, you’ll weld stainless steel with precision and strength. Remember to control heat carefully to avoid warping or discoloration, much like a skilled blacksmith forging a blade in a medieval forge.
Proper surface prep, purging, and shielding gas setup guarantee clean, defect-free welds. Follow these methodical steps, and your TIG welds will stand the test of time with professional quality and durability.