Phone:
(701)814-6992
Physical address:
6296 Donnelly Plaza
Ratkeville, Bahamas.
Phone:
(701)814-6992
Physical address:
6296 Donnelly Plaza
Ratkeville, Bahamas.
To set up a TIG welder, start by gathering essential gear like the TIG machine, torch, shielding gas (argon), and matching filler metal.
Secure your workpiece and clamp the work clamp nearby.
Connect the torch with the adapter and attach the gas hose and regulator, ensuring leak-free fittings.
Adjust gas flow to about 10 CFH and set amperage based on material thickness.
Prepare and install a properly ground tungsten electrode for stable arc control.
Mastering these basics sets the foundation for precise, quality welding techniques.
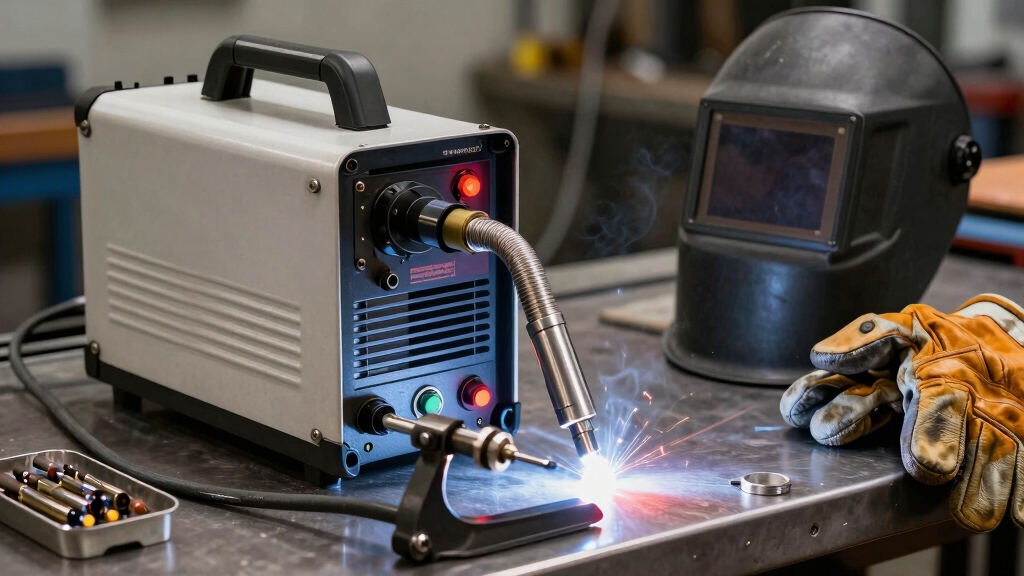
Start by assembling the essential TIG welding equipment necessary for a safe and effective setup.
You’ll need the TIG welding machine to generate the electric arc and control power output accurately.
Attach the TIG torch using the appropriate adapter, then connect the gas hose and regulator to maintain a consistent shielding gas flow, typically pure argon at about 10 PSI.
Choose filler metal that matches your base metal for proper joint filling.
Don’t forget personal protective equipment: welding gloves and a helmet with a darkened visor are mandatory.
Connect the work clamp securely to the machine and your workpiece or table to complete the electrical circuit.
Finally, plug in the foot pedal or fingertip control for amperage adjustments during welding.
This precise assembly guarantees efficiency and safety.
Ensure the tungsten electrode is kept clean and properly ground to maintain a stable arc and prevent contamination during welding with non-consumable electrodes.
Before you start welding, it’s really important to make sure your workpiece is securely clamped down. You can use angle irons, flat bars, or even hose clamps to hold everything in place. This helps prevent any movement while you’re working, which is crucial for a good weld.
Don’t forget to clean the surfaces thoroughly, too! Grinding off any mill scale and contaminants will ensure you get a strong, consistent weld. Properly securing and cleaning your workpiece sets you up for success, making it easier to achieve precise and defect-free TIG welding. So take those extra steps—they’ll make a big difference! Additionally, following the Welding Procedure Specification ensures proper preparation and welding parameters for optimal results.
When preparing your workpiece for TIG welding, securing it firmly is essential to guarantee stability and accurate alignment throughout the process.
Proper clamping prevents movement that can cause misalignment or weak joints. Use tools that provide consistent pressure without deforming the metal.
To clamp your workpiece effectively, consider these techniques:
Use angle irons or flat bars to support edges and maintain precise angles.
Apply hose clamps for uniform pressure on irregular shapes or thin materials.
Employ adjustable C-clamps or welding magnets to hold parts together securely.
Ensure your clamps don’t interfere with the torch or ground connections. Position the work clamp close to the weld area to maintain good electrical contact. This setup minimizes arc instability and promotes high-quality welds.
Additionally, inspecting and maintaining your torch components regularly supports consistent welding performance and precision, critical for flawless results and reliable operation of your TIG setup, such as the ceramic cup.
Once your workpiece is securely clamped and stable, focus shifts to removing any surface contaminants that could weaken the weld. Clean the metal by grinding off mill scale, rust, oil, and dirt.
Use a stainless steel wire brush dedicated to TIG welding to avoid contamination. For aluminum, remove the oxide layer with a chemical cleaner or mechanical abrasion. Proper cleaning guarantees strong, defect-free joints.
| Contaminant | Recommended Cleaning Method |
|---|---|
| Mill scale/rust | Angle grinder with flap disc |
| Oil/grease | Solvent wipe or degreaser |
| Aluminum oxide | Chemical cleaner or wire brush |
Prioritize thorough cleaning to maintain weld integrity and avoid porosity or inclusions.
Start by hooking up your TIG welder’s torch to the front panel using the provided adapter from the accessory package.
Next, attach the gas hose and regulator to both the machine and your shielding gas cylinder, guaranteeing a secure, leak-free connection.
Plug in your foot pedal or fingertip amperage control.
Then connect the work clamp to the machine and firmly clamp it to the workpiece or table.
Key connections include:
Double-check all fittings and connections for tightness before powering on your TIG welder to guarantee safe, reliable operation. Ensure you select the appropriate shielding gas based on the metal type and desired weld quality to optimize your results.
After securing all connections and verifying their tightness, focus on setting the shielding gas flow to protect the weld area from contamination.
Open the gas cylinder valve slowly, then adjust the regulator to deliver a consistent flow, typically around 10 cubic feet per hour (CFH) or 10 PSI for mild steel using pure argon.
Avoid excessive flow to prevent turbulence, which can introduce air and oxidize the weld.
Next, power on the TIG machine and select the correct current type: DC for steel, AC for aluminum.
Set the amperage based on material thickness; a good starting point is 125 amps for 1/8 inch steel.
Enable the high-frequency start to achieve a stable arc without contact.
Finally, configure ramp-up and ramp-down times for smooth current shifts during welding.
Maintaining a consistent arc length is essential to prevent tungsten contamination and ensure stable weld quality.
To get started, you’ll want to grind your tungsten electrode using a 200-grit wheel or finer. Aim to shape a point that’s about 2.5 times the diameter of the electrode in length. This step is crucial for ensuring a good arc when you’re welding.
Once you have that done, go ahead and loosen the back cap of the torch. After that, remove the nozzle and collet. This will allow you to clean everything and prepare the torch for the next steps.
Now, it’s time to insert the tungsten. Make sure it extends about 1/8 to 1/4 inch beyond the nozzle. You want it to fit securely, but be careful not to let it exceed the nozzle diameter. That way, you’ll be all set for a smooth welding experience!
Using a dedicated tungsten grinder helps maintain the correct tip shape and prevents contamination for better weld quality.
Grinding the tungsten electrode to a sharp point guarantees stable arc initiation and focused heat control during TIG welding. Use a dedicated 200-grit or finer grinding wheel designed for tungsten to avoid contamination.
Always grind longitudinally along the electrode’s length, not around its circumference, to maintain proper shape and performance. Aim for a pointed tip roughly 2.5 times the electrode diameter.
Keep these key points in mind:
Use light pressure to prevent overheating and tungsten degradation. Maintain a consistent grinding angle to achieve a uniform point. Avoid cross-contamination by dedicating one wheel solely for tungsten electrodes.
This technique safeguards peak arc stability and weld quality, preparing your electrode precisely before installation. Using a 300-grit wheel is recommended for general-purpose tungsten grinding to optimize tip quality and longevity.
Once you’ve shaped your tungsten electrode to the proper point, the next step is installing it into the torch. First, loosen the back cap and remove the nozzle and collet to clean any debris.
Insert the tungsten electrode into the collet, exposing about 1/8 to 1/4 inch beyond the collet body. Then, reassemble the collet, collet body, and nozzle, tightening securely to avoid movement during welding.
| Step | Action | Detail |
|---|---|---|
| 1 | Loosen back cap | Remove nozzle and collet |
| 2 | Insert tungsten electrode | Expose 1/8 to 1/4 inch |
| 3 | Reassemble collet components | Tighten firmly |
| 4 | Replace nozzle and back cap | Make certain secure fit |
This ensures proper arc stability and prevents contamination. Make sure to keep the tungsten electrode centered in the gas lens cup to maintain consistent arc initiation and avoid tungsten dipping into the weld pool.
Mastering TIG welding techniques and controls begins with maintaining consistent torch positioning and precise heat management.
Hold the torch at a 70-80 degree angle, keeping the tungsten 1/16 to 1/8 inch off the workpiece to avoid contamination.
Hold the torch at a 70-80° angle, maintaining a precise tungsten gap to prevent contamination.
Use the foot pedal or fingertip control to modulate amperage, guaranteeing a steady weld pool about 0.5 cm wide.
Feed the filler rod at a 15-degree angle with rapid, even dabs, never touching the tungsten.
Focus on these critical controls:
Maintain electrode distance around 0.5 cm from the joint without contact.
Control heat input via pedal to prevent overheating or undercutting.
Move the torch steadily to produce consistent bead width and fusion.
This precision guarantees strong, clean welds with minimal defects.
For most applications, using DCEN polarity helps concentrate heat on the workpiece for deeper penetration and longer tungsten life.
If your TIG welder won’t start, first check all connections: make certain the torch, gas hose, work clamp, and foot pedal are securely attached.
Verify the gas cylinder has pressure and the regulator is set correctly.
Inspect the tungsten electrode for proper installation and sharpness.
Confirm power supply is active and amperage settings match material thickness.
Finally, check for loose wires or blown fuses inside the machine.
Fix these to restore operation efficiently.
You need to regularly clean the torch, collet, and nozzle to prevent contamination and buildup.
Inspect and replace tungsten electrodes when worn or contaminated.
Check gas hoses and connections for leaks or damage.
Keep cooling fans and vents clear of dust to avoid overheating.
Verify foot pedal and control switches function smoothly.
Periodically calibrate amperage settings for accuracy.
Proper maintenance guarantees consistent weld quality and prolongs your TIG welder’s lifespan.
Yes, you can use TIG welding on stainless steel. Imagine the steady arc melting the base metal while you control the pure argon shielding gas flow to prevent oxidation.
You’ll want to grind a tungsten electrode to a sharp point and set your machine to DC current with high-frequency start.
Keep your amperage matched to material thickness, feed filler metal carefully, and maintain a clean workpiece. This precise control guarantees strong, clean stainless steel welds.
You choose tungsten electrode size based on your welding current and material thickness.
For light-duty work under 100 amps, use 1/16 inch tungsten. For medium currents up to 150 amps, 3/32 inch works well.
Heavy-duty, above 200 amps, needs 1/8 inch or larger. Also, consider your tungsten type: thoriated or ceriated for DC, pure or zirconiated for AC.
Match size to amperage for stable arc and less contamination.
Don’t just rely on PPE; always make sure proper ventilation to avoid inhaling harmful fumes and gases.
Keep your work area clean and free from flammable materials to prevent fire hazards.
Check your equipment for damage before use and secure cables and hoses to avoid tripping.
Never weld in damp or wet conditions and use a fire-resistant blanket or screen to protect surroundings.
These precautions keep you safe beyond your gloves and helmet.
Now that you’ve gathered your gear, secured your workpiece, and fine-tuned your TIG welder, you’re ready to weld with precision.
Remember, mastering electrode preparation and gas flow settings is key to clean, strong welds.
Practice steady hand control and proper technique to achieve professional results. So, are you ready to turn your setup into flawless welds that stand the test of time? With these steps, you absolutely can.