Phone:
(701)814-6992
Physical address:
6296 Donnelly Plaza
Ratkeville, Bahamas.
Phone:
(701)814-6992
Physical address:
6296 Donnelly Plaza
Ratkeville, Bahamas.
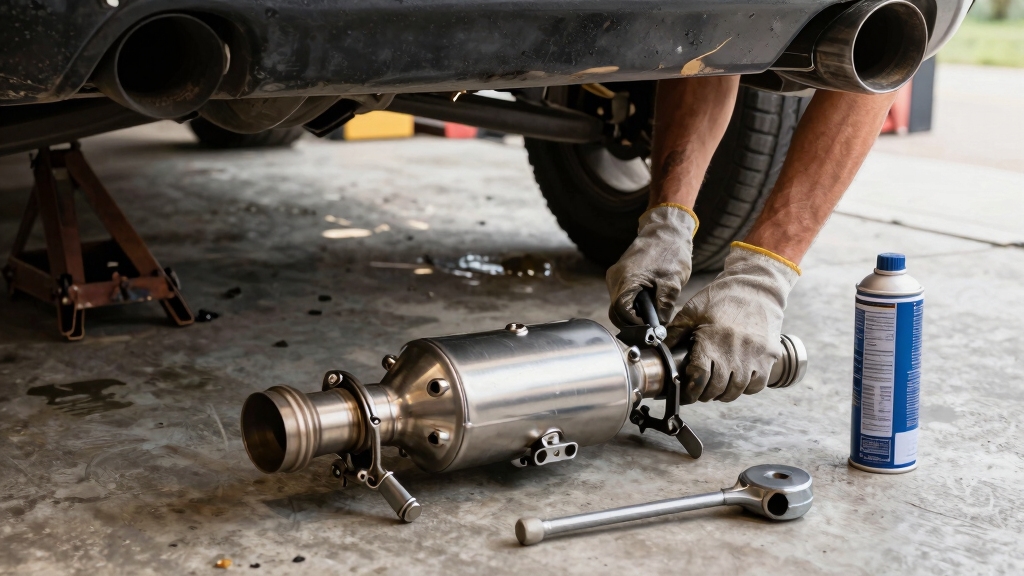
To replace your catalytic converter without welding, start by safely lifting the vehicle and using penetrating oil on flange bolts for easy removal.
Transfer oxygen sensors carefully with the right socket, avoiding thread damage.
Install the new converter using bolt-on clamps or mechanical couplings matched to pipe size and material.
Tighten bolts in a crisscross pattern for a secure fit. Use corrosion-resistant components to guarantee durability and check local regulations.
Explore the following steps to optimize your repair approach.
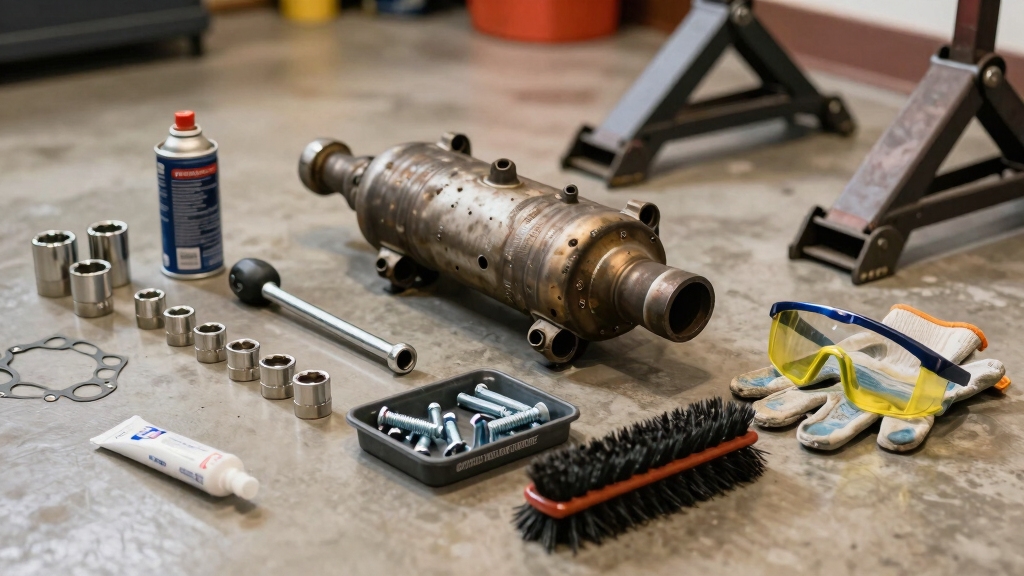
Gather the essential tools before starting your bolt-on catalytic converter replacement to guarantee a smooth process. You’ll need a flat blade and Phillips screwdriver, a metric socket set with ratchet, and socket extensions for hard-to-reach bolts.
Apply penetrating oil twice on all bolts beforehand, allowing sufficient soak time to loosen rusted fasteners. Use a floor jack and jack stands to safely elevate and secure the vehicle, and position wheel chocks to prevent movement.
Having these tools ready makes certain you can efficiently access and work on the converter flanges without interruptions. Avoid rushing, as proper preparation minimizes the risk of stripping bolts or damaging components.
Ensuring the use of proper tools and clamps helps secure the replacement parts firmly without the need for welding equipment.
Start by thoroughly applying penetrating oil to all bolts securing the catalytic converter’s flanges. Let it soak to loosen rust and corrosion.
Apply a second coat after 10–15 minutes for stubborn bolts. Use a floor jack and jack stands to safely elevate the vehicle.
Place wheel chocks to prevent movement. Document the converter’s orientation with clear photos to guarantee correct reinstallation.
Using a metric socket set with ratchet and extensions, carefully loosen and remove the flange bolts. Avoid forcing bolts to prevent stripping.
Once bolts are removed, gently wiggle the catalytic converter free from its position. Inspect and clean gasket surfaces thoroughly to prepare for the new unit.
Keep all hardware organized for reuse during installation. This procedure requires no welding tools.
Proper cleaning and preparation of surfaces are crucial to ensure a secure fit and avoid leaks during installation, similar to joint fitup techniques used in welding.
Carefully remove the oxygen sensors from the old catalytic converter using the appropriate socket to avoid damaging the sensor threads. Handle the sensors gently to maintain their functionality.
Before reinstalling, apply a thin layer of anti-seize compound on the sensor threads to guarantee easy future removal. This step is vital to prevent thread damage and costly replacements. Remember, each sensor costs about $100, so proper handling saves money.
Use an oxygen sensor socket for secure grip and thread protection. Disconnect the sensor wiring harness carefully to avoid electrical damage.
Clean sensor threads with a wire brush before applying anti-seize. Avoid contaminating the sensor tip with grease or dirt.
Store removed sensors safely to prevent impact damage during installation. Following these steps guarantees a reliable oxygen sensor transfer without welding.
Additionally, when welding near oxygen sensors or galvanized parts, it is crucial to have proper ventilation controls to minimize exposure to hazardous fumes and protect sensor functionality.
When installing the new bolt-on converter, it’s a good idea to choose clamps that are made from stainless steel or galvanized materials. This way, you can ensure they’re resistant to corrosion and will fit securely.
As you tighten the bolts, try using a crisscross pattern. This method helps evenly distribute pressure, which can prevent leaks down the line. And don’t forget to grab a torque wrench! It’s crucial to apply the manufacturer-specified torque values. This ensures a reliable seal without the risk of over-tightening.
For added durability and corrosion resistance, consider applying a galvanized steel primer to the clamps before installation.
Selecting the proper clamps is essential to securely fasten your new bolt-on catalytic converter without welding.
Choose clamps that match your exhaust pipe diameter and material to assure a tight, rust-resistant fit. Stainless steel or galvanized clamps resist corrosion, extending service life.
Consider clamp types based on your application: band clamps suit standard pipes, U-bolt clamps provide strong grip, and V-band clamps offer high durability for demanding conditions.
Proper clamp selection guarantees a leak-free, lasting installation without welding. To ensure optimal bonding and longevity, it is important to avoid surface contamination when assembling clamps and pipes.
Begin by tightening the bolts in a crisscross pattern to evenly distribute pressure across the catalytic converter flanges. This method prevents warping and assures a uniform seal.
Use a torque wrench set to the manufacturer’s specifications to avoid overtightening, which can damage the flanges or strip the threads.
When using band or U-bolt clamps, position the clamp evenly around the pipe. Then tighten bolts gradually and alternately, maintaining consistent pressure.
Check for any gaps or misalignment during the process. After all bolts are snug, perform a final torque pass in the same crisscross sequence.
Confirm the exhaust system has no contact with heat shields or other components. Proper bolt tightening assures a secure, leak-free installation without welding.
For enhanced durability, consider using clamps and bolts made from materials with high corrosion resistance to prevent rust and degradation over time.
When dealing with a stolen catalytic converter, clamp-based repair kits offer a practical and efficient solution that avoids welding.
Clamp-based repair kits provide a quick, practical alternative to welding for stolen catalytic converter repairs.
These kits enable you to quickly restore exhaust integrity using clamps designed for standard pipe sizes. This minimizes downtime and tool requirements.
To properly install a clamp-based kit, consider the following:
Select clamps made from stainless steel or galvanized materials to prevent rust.
Use band sleeves or slip-fit connections compatible with your exhaust pipe diameter.
Position clamps evenly and tighten them using a crisscross pattern for uniform pressure.
Make certain the mating surfaces are clean and free of debris to maximize seal effectiveness.
Verify that the clamp doesn’t contact heat shields or other components to avoid vibration noise.
Following these steps guarantees a durable, no-weld repair for stolen catalytic converters.
Always wear appropriate protective equipment during installation to ensure safety.
Although bolt-on catalytic converter replacements simplify installation, you must first verify local regulations to guarantee compliance with emissions and safety standards.
Laws vary by jurisdiction, and unauthorized replacements can result in fines or vehicle inspection failures.
Next, evaluate cost implications: DIY bolt-on replacements eliminate labor expenses charged by professionals, markedly reducing overall repair costs.
Consider aftermarket converters carefully; some integrate oxygen sensor bungs to streamline installation, while cheaper options may lack durability.
Opt for stainless steel or galvanized components to guarantee longevity and resist rust-induced failures.
Remember, clamp-based solutions can offer quick fixes but may not meet all regulatory criteria.
For durable, reusable connections that avoid welding, mechanical couplings can provide a practical alternative for temporary or emergency repairs.
You diagnose a failing catalytic converter by checking for reduced engine performance, rattling noises, and a sulfur smell from the exhaust.
Use an OBD-II scanner to detect trouble codes like P0420. Measure exhaust backpressure with a gauge; high readings indicate blockages.
Inspect oxygen sensor readings for irregularities.
Finally, perform a temperature test. Higher temperature at the outlet than the inlet suggests proper function, while the opposite signals failure.
Technically, traveling temporarily without a catalytic converter is possible but problematic.
You’ll likely trigger the check engine light, increase emissions, and face louder, harsher exhaust noise.
Driving this way can reduce engine efficiency and may violate local emissions laws, resulting in fines. If you must, limit your mileage and speed, and avoid long-term use.
Prioritize replacing or repairing the converter promptly to guarantee peak operation, legal compliance, and environmental responsibility.
Aftermarket catalytic converters reduce harmful emissions like carbon monoxide, hydrocarbons, and nitrogen oxides, helping you meet environmental standards.
However, their effectiveness varies by quality and design. Using a certified converter guarantees peak pollutant breakdown, minimizing environmental impact.
Poor-quality units may underperform, increasing emissions and contributing to air pollution. Always choose converters compliant with local regulations to balance cost, performance, and environmental responsibility effectively.
You should inspect your catalytic converter at least once every 30,000 miles or during routine exhaust system checks.
Pay attention to signs like decreased fuel efficiency, rattling noises, or warning lights.
Servicing is typically necessary if you detect clogging or damage, which can be addressed by cleaning or replacement.
Regular inspections prevent costly repairs and guarantee emissions compliance.
This maintains peak converter performance and prolongs its lifespan.
Replacing your catalytic converter without welding is easier than you think. It’s practically a walk in the park with the right tools and clamps.
By carefully removing the old unit, transferring oxygen sensors, and securely installing the new bolt-on converter, you’ll save time and avoid costly welding equipment.
Remember to check legal requirements and consider clamp kits for stolen converters. Follow these steps precisely, and your vehicle will run cleaner and smoother in no time.