Phone:
(701)814-6992
Physical address:
6296 Donnelly Plaza
Ratkeville, Bahamas.
Phone:
(701)814-6992
Physical address:
6296 Donnelly Plaza
Ratkeville, Bahamas.
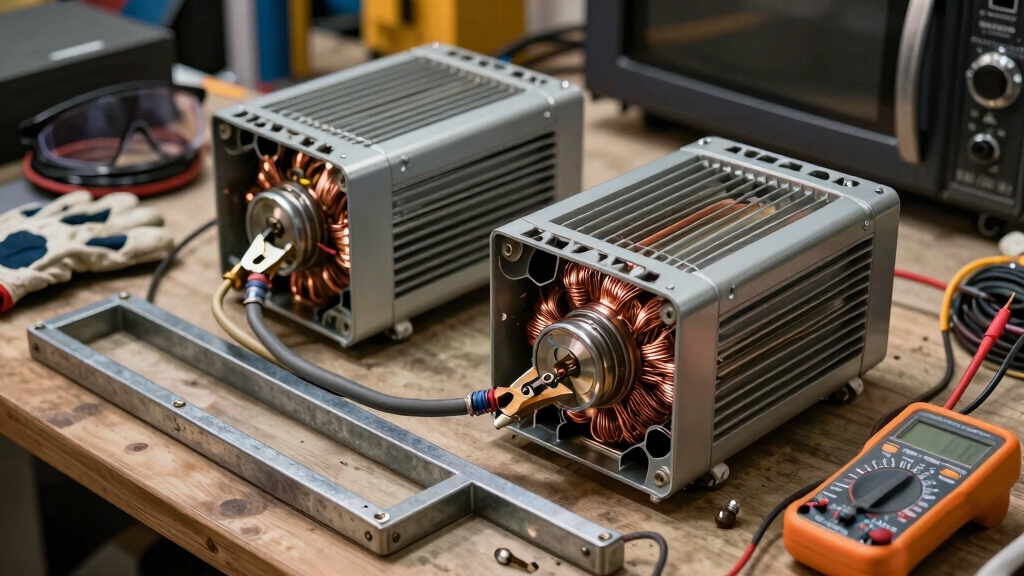
You can make a homemade welder by rewinding a microwave transformer’s secondary coil with about 20 turns of 10-gauge copper wire. Ensure the primary winding stays intact for safety.
Connect single or multiple transformers in series to boost voltage and maintain current. Use heavy-gauge wire and secure insulation.
Power it with a standard 120V supply or batteries for light tasks. Use homemade electrodes like spark plugs for precise arcs.
Proper gear and setup ensure safe operation. Explore more detailed steps and tips to optimize your DIY welding project.
To build a reliable homemade welder, you need to understand how microwave transformers function in welding applications. These transformers convert high-voltage, low-current input into low-voltage, high-current output, essential for creating the welding arc.
Understanding microwave transformers is key to converting voltage and current for effective welding arcs.
When repurposing, keep the primary winding intact to prevent shorts. Remove the secondary winding’s thin wire carefully, then rewind it with approximately 20 turns of durable 10-gauge wire. This provides sufficient current capacity.
This rewinding process directly influences the welder’s performance and safety. Using two transformers in series increases voltage for effective arc initiation. Recognizing these electrical transformations helps you prepare the core component correctly.
This ensures your homemade welder operates efficiently and safely. Mastering this step is critical before moving on to selecting or modifying transformers for specific welding tasks. Incorporating a high-frequency transformer can enhance the welder’s efficiency by reducing size and improving current control.
Having a solid grasp of microwave transformer rewinding lays the groundwork for selecting the right transformer for your welding project. You’ll want a transformer that can handle high current output safely and efficiently.
Focus on these key factors:
Confirm the transformer’s core size and weight; heavier cores often indicate higher power capacity. Make certain the primary winding remains intact and unmodified to prevent shorts.
Choose a transformer with a secondary coil you can easily remove and replace with thicker wire. Verify the transformer’s voltage rating suits your welding requirements, typically around 120V input.
Consider using two transformers in series if you need higher current output or longer weld times. Ensure your power supply can provide a stable 220–240 V supply to maintain arc stability and adequate penetration during welding.
Start by carefully removing the secondary winding from the microwave transformer without damaging the primary coil or the core.
Use a utility knife or wire cutters to strip away the thin secondary wire, guaranteeing the primary winding’s insulation remains intact.
Avoid nicking the copper or scratching the laminated steel core, as these could reduce efficiency or cause shorts.
Once stripped, clean the core surface and check for any debris.
Next, rewind the transformer with approximately 20 turns of 10-gauge copper wire, evenly distributing the coils to maintain magnetic flux uniformity.
Secure the winding with insulating tape or epoxy to prevent movement under load.
Proper rewinding guarantees the transformer delivers the low voltage, high current output necessary for effective arc welding performance.
When working with electrical components, always prioritize safety precautions such as wearing protective gloves and ensuring equipment is fully de-energized before handling.
If you want to boost your welder’s power, connecting multiple microwave transformers in series is the way to go. This method lets you add their voltages together, which really amps up the overall output—perfect for tackling those heavier welding tasks.
Just make sure to carefully align the secondary windings. It’s important for ensuring safe and efficient current flow while you’re working. You definitely want everything running smoothly!
When you need more welding power than a single microwave transformer can deliver, connecting multiple transformers in series is an effective approach. You wire the secondary windings end-to-end, ensuring the voltage adds up while current capacity stays consistent. This increases output voltage, ideal for thicker metals or longer arcs.
Keep these points in mind:
Also, maintaining the proper polarity is crucial to optimize the welding arc and ensure stable metal transfer when using increased power setups.
Building on the method of wiring microwave transformers in series, you can markedly boost your welder’s power output by combining multiple units.
Connect the secondary windings of each transformer in series to increase voltage while maintaining current capacity.
Make sure proper insulation and secure mounting to avoid shorts or overheating.
Balance the transformers’ specifications to prevent uneven load distribution.
| Transformers Connected | Voltage Output | Current Capacity |
|---|---|---|
| 1 | ~40V | 15-20A |
| 2 | ~80V | 15-20A |
| 3 | ~120V | 15-20A |
This setup enhances your arc’s intensity, enabling thicker metal welding and smoother operation without compromising safety or reliability.
Although extracting a transformer from an old microwave oven might seem intimidating, it provides a reliable core component for your spot welding machine.
Start by carefully removing the thin secondary windings without damaging the primary coil.
Then, rewind with about 20 turns of 10-gauge copper wire for high current conduction.
Use copper bars to hold welding electrodes firmly, enabling efficient current transfer.
Incorporate a timer circuit to control the welding duration precisely, preventing overheating or weak welds.
For safety, include a 20-amp fuse in the circuit to protect against electrical faults.
To ensure stable operation, it is important to verify the power supply compatibility before use.
Moving from transformer-based spot welders, you can create a battery-powered stick welder system using discarded industrial batteries connected in series to achieve around 50 volts.
Select batteries with at least 5000 mAh capacity to guarantee sufficient current delivery. Use 10-gauge copper stereo wire for all connections, securing terminals with standard wire connectors to maintain low resistance.
Attach dollar store metal spring clamps to hold the welding rod firmly in place, guaranteeing stable arc initiation. Connect the welding electrodes directly to the battery bank, taking care to insulate all exposed terminals to prevent shorts.
This setup provides enough voltage and current for basic SMAW welding tasks. Always verify polarity and test continuity before operation. Remember, this system suits light fabrication and emergency repairs rather than heavy industrial welding.
For improved safety and efficiency, consider integrating battery backup systems to provide emergency power during operation interruptions.
Utilizing 12-volt low-voltage power supplies offers a practical approach for small welding tasks where portability and simplicity are priorities.
Using 12-volt low-voltage power supplies is ideal for portable, simple welding on small projects.
You can use a standard 12V DC source, like a car battery or power adapter, to generate enough current for light welding jobs. This method suits basic metal joining, tacking, or repair work on thin materials.
Keep in mind the limited output current restricts weld thickness and penetration depth.
Key points to weigh:
Use thick, low-resistance cables (10-gauge recommended) to minimize voltage drop.
Employ pencil graphite or simple electrodes for efficient arc initiation.
Guarantee secure clamps for stable electrode contact.
Limit welding duration to prevent overheating the power source.
Work on clean, thin metals for best results with low voltage.
This setup is ideal for quick fixes, not heavy fabrication.
Because amperage controls penetration and deposition, matching current to material thickness is essential for effective welds using low-voltage sources with limited current capacity, such as 12V systems, to avoid burn-through risks.
If you want to enhance your welding setup beyond low-voltage pencil graphite electrodes, spark plugs offer a practical alternative for making welding electrodes.
Salvage automotive spark plugs, focusing on the central metal electrode and ceramic insulator. Remove the spark plug’s outer shell carefully to expose the inner core without damaging the ceramic.
The electrode gap concentrates the electrical arc, generating intense localized heat essential for metal fusion. Attach the spark plug electrode securely to your welding lead using a metal clamp or soldered connection to guarantee consistent current flow.
This setup produces higher arc temperatures compared to graphite, enabling stronger and cleaner welds. Using spark plugs reduces material costs and simplifies electrode fabrication for your homemade welder, improving performance for metal joining tasks.
However, be aware that welding galvanized steel can produce hazardous zinc oxide fumes, so proper ventilation and protective measures are essential when using homemade electrodes on coated metals.
When you’re diving into DIY welding, it’s super important to have the right safety gear. First off, make sure you grab a welding helmet that has the right shade. It’ll protect your eyes from those intense sparks and UV rays.
Next up, don’t forget about insulated gloves. They’re essential for keeping your hands safe from heat and sharp edges. And while you’re at it, wear flame-resistant clothing. Trust me, it’ll help shield you from all those pesky sparks flying around.
Also, always remember to practice safe welding habits. Work in a well-ventilated area; it makes a world of difference! Plus, ensure your equipment is properly grounded. Following these simple precautions not only minimizes the risk of injury but also helps you weld effectively and safely. Happy welding!
Wearing heat-resistant gloves is crucial to protect your hands from burns, electrical shocks, and sharp objects during welding.
Because welding generates intense light, heat, and sparks, wearing the right protective gear is critical to prevent injuries. You need to protect your eyes from ultraviolet and infrared radiation, your skin from burns, and your respiratory system from harmful fumes. Use equipment designed for welding environments to guarantee safety and comfort.
Essential protective equipment includes:
Always prioritize this gear before starting your DIY welding project to work safely and effectively. Make sure your welding helmet meets ANSI standards to ensure proper UV and IR protection and compliance with safety regulations.
Although welding can be rewarding as a DIY project, it demands strict adherence to safety practices to prevent serious injuries.
You must wear a welding helmet with a proper shade lens to protect your eyes from intense ultraviolet and infrared radiation.
Heavy-duty, flame-resistant gloves safeguard your hands from sparks and heat.
Use a long-sleeve, flame-retardant jacket to shield your skin.
Make certain proper ventilation to avoid inhaling toxic fumes generated by arc welding.
Always work on a fireproof surface and keep a fire extinguisher nearby.
Avoid synthetic clothing that can melt and cause burns.
Additionally, sturdy leather boots protect your feet from molten metal.
Following these precautions minimizes risks and ensures you stay safe while using your homemade welder.
When working with homemade welders, understanding their limitations is crucial to guarantee safety and achieve effective results. DIY welders are great for light fabrication and emergency fixes. However, they’re not suited for heavy-duty or precision welding. You should recognize what tasks they handle well and when to rely on professional equipment.
Suitable for motorcycle repairs, gate hinges, and bracket tacking. Can’t replace commercial welders for thick metals or structural work. Limited control over welding current and arc stability. Safety risks increase without proper protective gear and training. Ideal for spot welding and low-voltage, small-scale projects.
To test your homemade welder, first make sure all connections are secure and safety gear is on.
Power it up and check for a steady arc between the electrode and workpiece. Measure output voltage with a multimeter, confirming it matches expected levels.
Next, perform a short weld on scrap metal; look for consistent penetration and clean fusion without excessive spatter.
If the arc is unstable or weak, troubleshoot wiring, connections, or coil windings.
You can weld mild steel and low-carbon steel effectively with a DIY microwave transformer welder.
It’s true that these welders struggle with stainless steel or aluminum due to their higher melting points and conductivity differences.
Stick to thin steel sheets or rods for best results.
Keep in mind, your homemade welder works well for light fabrication and repair tasks.
However, it won’t handle heavy-duty metals or thick materials reliably.
Yes, you can use commercial welding rods with your homemade welder, but make certain they match your machine’s output voltage and current capacity.
Since DIY microwave transformer welders typically deliver lower and less stable power, choose rods designed for low-amperage use.
Look for mild steel electrodes with smaller diameters, such as 1/16 inch. Using incompatible rods risks poor arc stability, weak welds, or damaging your setup.
Always test on scrap metal first.
Like a knight pacing his joust, you need to manage your homemade welder’s heat carefully.
Prevent overheating by using intermittent welding bursts rather than continuous arcs.
Allow cooling periods between welds and monitor transformer temperature closely.
Incorporate a 20-amp fuse and guarantee your copper windings have proper insulation.
Adding a simple cooling fan or heat sink also helps dissipate heat effectively, extending your welder’s safe operating time during longer sessions.
Check your connections for tightness and corrosion. Loose terminals cause poor arcs.
Inspect the transformer windings for damage or shorts, especially if overheating occurs.
Verify wire gauge matches your design to prevent voltage drops. Test fuse integrity to guarantee circuit protection.
If the arc is unstable, adjust electrode gaps and confirm proper grounding.
Use a timer circuit to avoid overheating. Regular maintenance and protective gear guarantee safer, reliable operation.
You might think building a homemade welder is just a budget hack, but it’s a precise craft demanding technical skill and safety awareness.
While repurposing microwave transformers offers surprising power, it’s no substitute for professional equipment in heavy-duty tasks.
Balancing DIY ingenuity with practical limitations guarantees your projects succeed without risking harm.
So, gear up carefully, understand your tools, and weld smart. Your homemade welder can be both a clever solution and a responsible choice.