Phone:
(701)814-6992
Physical address:
6296 Donnelly Plaza
Ratkeville, Bahamas.
Phone:
(701)814-6992
Physical address:
6296 Donnelly Plaza
Ratkeville, Bahamas.
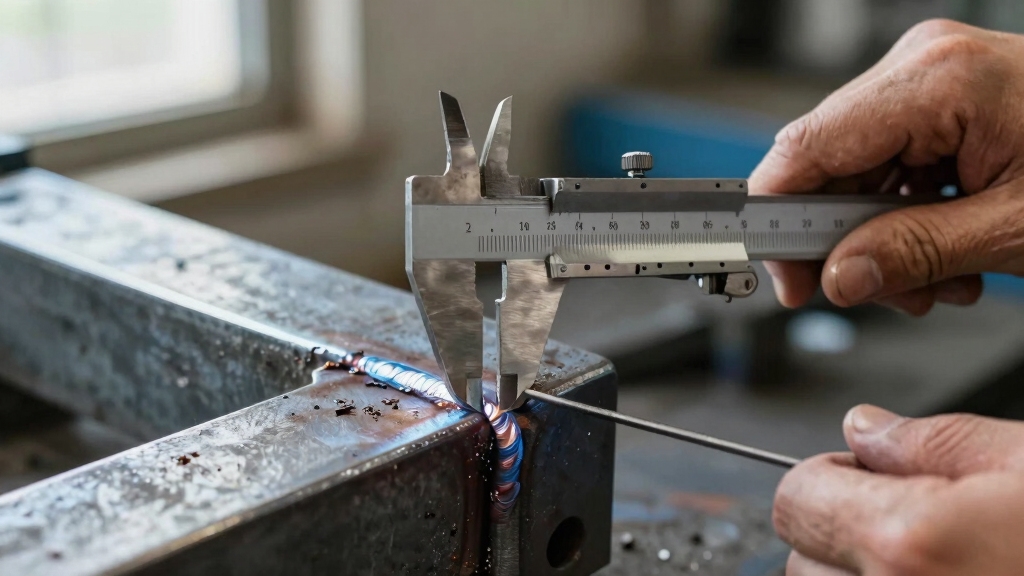
To check fillet weld size, select a fillet weld gauge matching the specified leg length and firmly place it at the weld toe, aligning its edges with the joined surfaces.
Measure both horizontal and vertical legs for accuracy.
Flip the gauge to the throat side to verify throat thickness, adjusting for weld convexity or concavity as needed.
For skewed or T-joints, use leg measurements from the obtuse side and apply angle factors per AWS D1.1.
Keep weld parameters consistent to assure reliable sizing. Understanding these steps assures compliance; detailed methods follow.
Although fillet weld size might seem straightforward, understanding its exact definition and specification is essential for ensuring joint strength and compliance with standards.
You measure fillet weld size by the leg length, which is the length of the largest right triangle inscribed in the weld’s cross-section. This leg contacts both joined surfaces, directly influencing weld strength.
The theoretical throat, pivotal for strength calculations, equals approximately 0.7 times the leg length for an isosceles right triangle.
When specifying size, you base it on material thickness and load demands, ensuring it meets design and code requirements.
AWS D1.1, for example, sets minimum leg lengths relative to base metal thickness. Precise definition and specification guarantee that the weld performs safely under expected stresses.
Accurate fillet weld sizing is often confirmed through visual weld inspection to ensure compliance with standards and detect surface defects.
When you work with fillet welds, understanding AWS D1.1 minimum size requirements is essential to guarantee structural integrity and code compliance.
AWS D1.1 Table 7.7 specifies minimum leg lengths based on base metal thickness; for example, 6 mm minimum leg size applies for material between 12.7 mm and 19.0 mm thickness.
AWS D1.1 Table 7.7 sets minimum fillet weld leg lengths per base metal thickness ranges.
You must make certain weld legs meet or exceed these values to prevent understrength joints. Note that undersized welds are unacceptable, while oversizing is permitted if mutually agreed upon.
The code also requires at least two passes when minimum sizes are specified. By adhering strictly to these minimum leg lengths, you maintain sufficient throat thickness and effective weld area.
This ensures the joint withstands design loads safely without violating AWS standards or risking structural failure.
Proper welding technique selection and parameter control are critical to ensure these minimum sizes are achieved without causing weld defects.
Meeting AWS minimum leg length requirements is only part of ensuring weld quality; verifying those dimensions accurately in the field requires the proper use of fillet weld gauges.
First, select the gauge size matching the specified leg length. Place the gauge’s end firmly on the weld toe, guaranteeing the scribed lines align precisely with the joined surfaces.
Check both the horizontal and vertical legs individually to confirm consistency. If the weld leg matches the gauge’s scribed lines without gaps or overlaps, the leg length meets specifications.
For skewed T-joints, measure the obtuse side leg similarly, using conventional gauges. Remember, undersized legs are unacceptable per AWS D1.1.
Practice proper positioning and steady hands to minimize measurement errors and ensure compliance with design requirements.
Accurate measurement and strict alignment during welding help prevent defects that could compromise the weld’s sealing and integrity.
To check the fillet weld throat dimension, you’ll want to start by measuring the theoretical throat. You can do this by taking 0.7 times the leg length. Just grab your fillet weld gauge and flip it to the throat side for this step.
Now, don’t forget to adjust your measurement based on the weld’s convexity or concavity. These factors can really impact the effective throat thickness.
Although measuring the fillet weld’s leg length is common, verifying the theoretical throat dimension is crucial for evaluating joint strength. The theoretical throat equals 0.7 times the leg length, representing the shortest distance from the root to the weld face.
To measure it, use a fillet weld gauge flipped to the throat side, aligning the gauge’s edge with the weld toe and root.
| Leg Length (S) | Throat Factor (cos 45°) | Theoretical Throat (0.7 × S) |
|---|---|---|
| 6 mm | 0.707 | 4.24 mm |
| 10 mm | 0.707 | 7.07 mm |
| 12 mm | 0.707 | 8.49 mm |
| 16 mm | 0.707 | 11.31 mm |
Accurate throat measurement guarantees the weld meets strength requirements per AWS D1.1. Using an inverter welding machine with precise heat input control enhances the consistency and quality of fillet welds, supporting reliable measurements and joint integrity.
When you measure the theoretical throat of a fillet weld, you must adjust for weld convexity to guarantee an accurate assessment of joint strength.
Convex welds increase throat thickness beyond the ideal 0.7 times leg length, impacting load-bearing capacity. To adjust correctly, follow these steps:
This method guarantees you account for weld profile variations, providing a reliable measurement of effective throat thickness and maintaining structural integrity. Understanding the deep penetration capability of welding processes ensures that weld size adjustments reflect actual joint strength.
When it comes to measuring fillet weld size on skewed and T-joints, it’s really important to get those leg lengths right.
You’ll want to use conventional gauges for this, and don’t forget to pay special attention to the obtuse side when you’re dealing with skewed joints.
Now, verifying the throat size is also key.
To do this, you’ll need to adjust your measurements based on the angles of the joints.
It might sound a bit complicated, but just remember to apply the right multiplication factors.
These careful adjustments will ensure that the weld size meets the necessary strength requirements, even with all the geometric challenges involved.
Additionally, maintaining precise heat input and proper welding parameters is crucial to prevent distortion and ensure the weld’s strength and integrity, as recommended in heat input management best practices.
Since skewed and T-joints present geometric challenges, you must adapt leg length measurement techniques to guarantee accuracy.
Start by identifying the obtuse and acute sides of the fillet weld, as each requires different attention. Use a fillet weld gauge aligned precisely at the weld toe for reliable readings.
Remember, the obtuse side’s leg length is easier to measure with conventional gauges, while the acute side demands more care.
Follow these steps:
This method secures precise leg length verification on complex joint geometries. Maintaining consistent electrode distance during welding helps ensure the fillet weld size matches measurement expectations.
Although measuring throat size on skewed and T-joints poses challenges due to their geometry, you can accurately verify weld strength by applying proper techniques.
Start by measuring the leg length on the accessible (usually obtuse) side using a fillet weld gauge. Then calculate the theoretical throat as 0.7 times the leg length for right-angle joints. For skewed joints, directly measuring the acute side throat is impractical, so focus on face width and leg length combined with known geometric factors.
| Parameter | Measurement Method |
|---|---|
| Leg length (obtuse) | Fillet gauge on weld toe |
| Theoretical throat | 0.7 × leg length |
| Face width (skewed) | Direct caliper measurement |
| Effective throat area | Throat × effective weld length |
This approach guarantees precise throat verification without ambiguity. Additionally, controlling welding parameters to minimize heat input is essential for preserving the weld integrity and preventing distortion during fillet weld formation.
Measuring fillet weld size on skewed and T-joints requires specific adjustments to account for their non-right-angle geometry.
You can’t simply apply standard leg length measurements; instead, consider these key steps:
These adjustments guarantee accurate sizing that reflects the actual weld strength.
This maintains compliance with standards and optimizes joint integrity.
Maintaining detailed continuity records is essential to demonstrate ongoing qualification when performing such welds under certified processes.
When fillet weld sizes fall short of specifications, you risk compromising joint strength and structural integrity.
Common problems include undersized legs, inconsistent throat thickness, excessive convexity, and misalignment.
Fix these by precise measurement with fillet weld gauges, adjusting welding parameters, and ensuring proper fit-up.
| Problem | Solution |
|---|---|
| Undersized leg | Use gauge to verify and increase weld pass thickness |
| Inconsistent throat | Flip gauge to check throat; re-weld if below minimum |
| Excessive convexity | Grind weld face to meet AWS D1.1 convexity limits |
| Misalignment | Adjust joint fit-up before welding; re-measure for accuracy |
Always ensure that welders use appropriate shade numbers for eye protection, as correct visibility is crucial during measurement and welding adjustments.
Weld convexity affects fillet weld strength by influencing the effective throat thickness, which determines load capacity.
Excessive convexity can reduce throat size, compromising joint strength and causing stress concentrations.
Conversely, slight convexity improves fatigue resistance by smoothing stress flow.
You must control convexity within specified limits, as outlined in AWS D1.1 Table 7.9, to guarantee proper weld size and strength.
This control helps avoid defects like underfill or stress risers.
You might think traditional fillet weld gauges struggle in tight spaces, but compact, thin-profile gauges excel there.
Use a small 7-piece or 8-piece gauge set with scribed lines to check leg length and throat dimensions precisely.
Their minimal bulk lets you position the gauge end on the weld toe even in constrained areas.
This assures accurate sizing per AWS standards, maintaining weld integrity without sacrificing measurement accuracy in limited access spots.
Yes, you can oversize fillet welds without compromising quality, provided it’s by mutual agreement and within design limits.
Oversizing often increases strength but may cause excessive heat input or distortion.
Make sure you follow AWS D1.1 guidelines and designer specifications.
Avoid underfilling or inconsistent weld profiles.
Confirm oversize dimensions with appropriate gauges and maintain proper convexity per standards to guarantee structural integrity and avoid weld defects.
Environmental factors like temperature, humidity, and lighting directly impact your fillet weld size measurement accuracy.
Cold or hot surfaces can cause gauge expansion or contraction, skewing leg length readings.
High humidity may fog gauges or surfaces, obscuring scribed lines.
Poor lighting reduces your ability to align gauges precisely with weld toes.
To minimize errors, control the environment when possible, use calibrated tools, and guarantee consistent measurement conditions during inspection.
You should undergo formal training covering AWS D1.1 standards, focusing on fillet weld size criteria, measurement techniques, and interpretation of welding symbols.
Practical sessions using fillet weld gauges are essential to develop accuracy in leg length and throat dimension checks.
Familiarize yourself with the effects of joint types and weld profiles on measurement.
Continuous practice and calibration exercises improve your proficiency in distinguishing acceptable weld sizes from underfills or oversizes per code requirements.
Now that you know how to measure fillet weld size accurately using gauges and throat dimension checks, are you ready to make certain every weld meets AWS standards?
Consistently verifying leg length and addressing skewed or T-joint challenges helps maintain structural integrity and avoid common weld issues.
By following these precise methods, you’ll confidently produce strong, reliable welds every time because quality control starts with knowing exactly how to check your fillet weld size.