Phone:
(701)814-6992
Physical address:
6296 Donnelly Plaza
Ratkeville, Bahamas.
Phone:
(701)814-6992
Physical address:
6296 Donnelly Plaza
Ratkeville, Bahamas.
To attach a muffler without welding, first securely elevate your vehicle and wear protective gear. Lubricate rubber hangers for smooth removal of the old muffler. Use exhaust clamp couplers to join pipe ends snugly, then tighten clamps evenly for stable, leak-proof connections.
Apply exhaust repair paste around joints to seal gaps and prevent leaks. Reattach hangers and verify alignment. Following these steps guarantees a durable fit; further guidance can help you perfect and maintain the installation.
When you need to attach a muffler without welding, start by securely elevating your vehicle using ramps or axle stands to gain safe access to the exhaust system.
Next, loosen existing clamps and carefully detach the old muffler, lubricating rubber hangers with soapy water to ease removal.
Prepare pipe ends by filing them smooth to guarantee a tight fit. Align the new muffler with the exhaust pipes, then slide clamp sleeve couplers over the joints.
Position exhaust clamps or jubilee clips around these connections and tighten them evenly to create a secure hold.
Apply exhaust repair paste and muffler sealer at the joints to prevent leaks. Finally, reattach rubber hangers and verify all fittings are stable before lowering the vehicle.
This method guarantees a durable, leak-resistant muffler installation without welding. To ensure maximum longevity, consider applying corrosion-resistant primers to metal parts exposed during installation.
When it comes to attaching a muffler without welding, there are a few specific tools you’ll want to have on hand.
First off, wheel ramps are super helpful for elevating your vehicle, making it easier to get under there and do the work. You’ll also want some metal snips and assorted spanners to help with any adjustments.
Now, let’s talk about materials. You’ll definitely need jubilee clips and exhaust clamps. These are essential for securing the muffler in place.
Oh, and don’t forget repair paste! It’s perfect for sealing up those connections to ensure everything is tight and leak-free.
Having all these tools and materials ready to go really makes the process smoother. It guarantees that your muffler installation isn’t only safe but also precise and effective.
Using mechanical fasteners like clamps and clips is a common alternative to welding for assembling metal components securely.
Securing a muffler without welding demands a specific set of tools and materials designed for effective, durable connections. You’ll need the right tools to elevate the vehicle, manipulate exhaust components, and assure precise adjustments.
Prioritize safety and efficiency by equipping yourself with these essentials:
These tools enable you to disassemble damaged sections, align pipes correctly, and secure joints tightly without welding. Using proper tools reduces the risk of damage and assures a solid fit, minimizing exhaust leaks and prolonging muffler life.
Prepare your workspace with these instruments to guarantee a professional-quality repair. Regular maintenance and proper tool use contribute to the longevity of mechanical components and ensure reliable performance over time.
Although attaching a muffler without welding requires specific skills, having the right materials is equally essential for a durable, leak-free connection.
You’ll need jubilee clips and exhaust clamps to securely join pipe sections and muffler inlets. Clamp sleeve couplers facilitate precise alignment and strong mechanical bonding between pipes.
Use exhaust repair paste and muffler sealer generously around joints to prevent leaks and corrosion. An empty tin can helps apply paste evenly.
Make sure pipe ends are cleaned and smoothed before fitting these components. Having these materials on hand, combined with proper preparation, guarantees your muffler installation withstands vibration and heat without welding.
Prioritize quality clamps and sealants to maintain exhaust system integrity and avoid costly rework. Additionally, proper surface cleaning with a mild detergent and thorough drying before assembly helps preserve metal coatings and prevent corrosion maintenance best practices.
Before starting your muffler installation, elevate the vehicle securely using wheel ramps or axle stands to provide stable access to the exhaust system. This guarantees you work safely and effectively underneath the car.
Always elevate your vehicle securely with ramps or stands before beginning muffler installation.
Next, equip yourself with eye protection to guard against debris and rust particles. Lubricate rubber hangers with soapy water to ease their removal without damage.
Clean pipe ends thoroughly with a file to create smooth, even joints for a secure fit.
Use sturdy ramps or stands for stable elevation. Always wear eye protection during the process. Lubricate rubber hangers for safe removal. File pipe ends to guarantee smooth connections.
Wearing proper gloves can protect your hands from heat and sharp edges while working on the muffler.
Following these steps minimizes risk and prepares your vehicle for a precise, leak-free muffler attachment.
After safely elevating your vehicle and preparing the exhaust system, you can begin removing the old muffler without resorting to cutting or welding.
Start by spraying soapy water on the rubber hangers connecting the muffler; this lubricates and softens them for easier removal.
Use pliers or a flat-head screwdriver to carefully slide the rubber hangers off the metal hooks.
Next, employ sockets and extensions to loosen the exhaust clamps securing the muffler to the pipes. Once loosened, gently twist and pull the muffler away from the pipe ends.
If the muffler resists, apply penetrating oil and allow it to sit before retrying. Avoid forcing harsh movements to prevent damage.
Following these steps guarantees you detach the muffler intact and ready for replacement without cutting or welding.
For stubborn coatings or corrosion, consider combining mechanical removal techniques such as wire brushing with chemical treatments to ease separation and protect the metal surface.
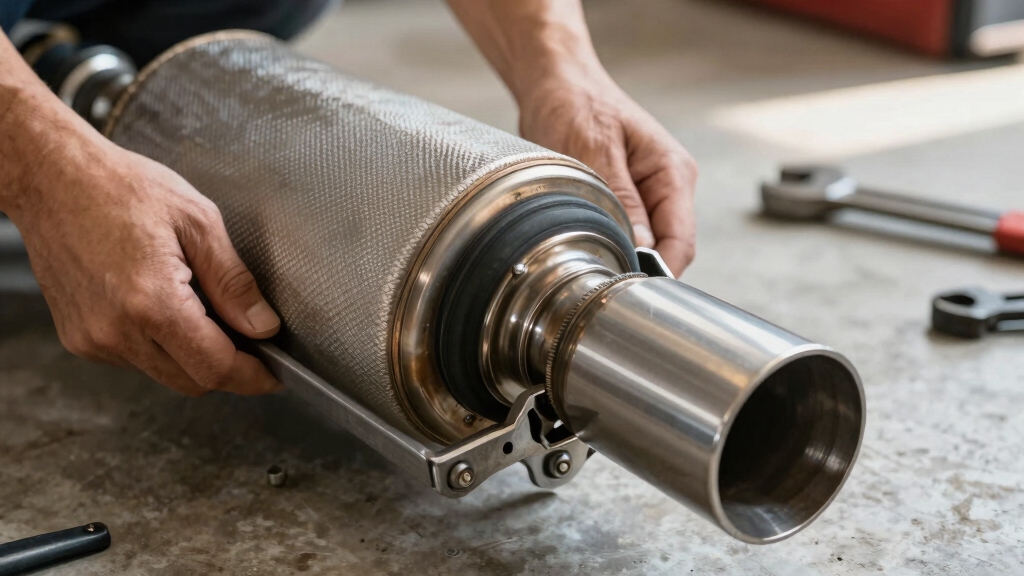
To join and secure muffler pipes without welding, start by aligning the pipe ends carefully and sliding them into clamp sleeve couplers designed for exhaust connections.
Begin by carefully aligning muffler pipe ends and sliding them into exhaust clamp sleeve couplers.
Make sure both pipes fit snugly inside the coupler to prevent movement. Next, position exhaust clamps over the joint and tighten them evenly to maintain uniform pressure.
Using two clamps adds extra stability at critical joints. Remember to thread one jubilee clip through another if you need additional tension.
This method provides a secure, leak-resistant joint without heat or welding, preserving pipe integrity and allowing easier future disassembly.
For enhanced durability and corrosion resistance, select clamps made with laser-welded bonding technology designed for high temperature and vibration environments.
When you’ve securely joined the muffler pipes, applying exhaust sealants is essential to stop leaks and guarantee airtight joints.
First, clean the joint surfaces thoroughly to remove dirt and oils. Next, apply a generous layer of exhaust repair paste or muffler sealer evenly around the joint circumference. Make sure the sealant penetrates gaps for a complete seal.
Once applied, tighten the clamps uniformly to maintain pressure and prevent sealant displacement. Allow the sealant to cure as per the manufacturer’s instructions before testing.
Proper ventilation and respiratory protection are important when working with exhaust fumes to ensure safety from hazardous metal fume exposure.
| Step | Action |
|---|---|
| Clean Joint | Remove dirt and grease |
| Apply Sealant | Spread evenly on pipe joints |
| Tighten Clamps | Ensure uniform pressure |
| Cure Sealant | Wait for recommended drying time |
Hey there! It’s super important to keep an eye on your muffler attachment. Regular visual inspections can really help you catch any signs of corrosion, cracks, or loose parts before they become bigger issues.
Make sure you check the tightness of all those clamps and jubilee clips too. You want them to maintain uniform pressure, but be careful not to overtighten.
Finding that sweet spot with clamp tension is key, and if you notice any wear, addressing it right away will definitely help extend the life of your non-welded muffler connection.
Happy inspecting! Wearing proper gloves during inspection can protect your hands from sharp edges and potential burns.
Regularly inspecting your muffler attachment helps catch early signs of wear, corrosion, or loose fittings that could compromise the exhaust system’s integrity.
You should visually check all connection points, clamps, and hangers for rust or damage. Look for any gaps or misalignments where exhaust gases might escape.
Also, monitor the condition of rubber hangers for brittleness or cracking. Don’t forget to examine weld-free joints for any movement or separation.
Key inspection points include:
Consistent inspections enable prompt maintenance, prolonging muffler life and ensuring safe operation.
Additionally, when welding is necessary, proper fume control is critical to protect health and maintain system integrity.
Always make certain your muffler clamps maintain peak tightness to prevent exhaust leaks and component shifting.
Begin by visually inspecting each clamp for signs of corrosion, deformation, or looseness.
Use a torque wrench to check clamp torque against manufacturer specifications, ensuring uniform pressure around pipe joints.
If clamps show slack, tighten them incrementally to avoid over-compression, which can damage pipes. Pay special attention to joints under stress or vibration.
Regularly remove debris or rust buildup that could compromise clamp integrity. After tightening, apply muffler and tailpipe sealer to reinforce airtight connections.
Finally, recheck clamps after a short drive to accommodate thermal expansion and settling. Consistent clamp maintenance extends muffler longevity and maintains exhaust system efficiency.
You can attach a muffler without welding on most vehicle models by using clamp sleeve couplers, jubilee clips, and exhaust clamps designed for your exhaust size.
Make certain pipes align properly, clean pipe ends, and apply exhaust repair paste for sealing.
However, some custom or performance exhausts may require welding for durability.
Always verify compatibility with your vehicle’s exhaust system to maintain a secure and leak-free connection.
A clamp-only muffler attachment typically lasts between 1 to 3 years, depending on driving conditions and quality of materials used.
You should regularly inspect clamps and seals for corrosion or loosening. Using high-quality jubilee clips and exhaust clamps, along with proper sealing paste, extends durability.
Keep in mind that vibration and heat cycles can weaken joints over time, so maintenance is vital to prevent leaks and guarantee a secure fit.
Using exhaust sealants generally won’t cause your vehicle to fail emission tests if applied correctly and the exhaust system remains airtight.
Sealants prevent leaks that could skew sensor readings or increase emissions. However, if sealants degrade or cause blockages, they might affect emissions negatively.
Always use high-quality, heat-resistant sealants and make certain proper sealing to maintain emission compliance during inspections.
Regular checks help catch any potential issues early.
You can reuse old clamps and couplers if they’re in good condition, free from rust, cracks, or deformation.
Inspect them carefully; worn or damaged parts won’t secure the muffler properly, risking leaks or detachment.
For reliable sealing and safety, replace any suspect components.
Using new clamps and couplers guarantees a tight fit, prevents exhaust leaks, and prolongs the muffler’s lifespan without welding. Always prioritize quality over convenience.
Did you know 70% of muffler failures stem from faulty attachments?
You’ll notice rattling noises, exhaust leaks, or visible rust around joints.
These are clear signs your muffler needs immediate repair.
If you detect increased exhaust fumes or reduced fuel efficiency, check clamps and seals promptly.
Don’t ignore loose hangers or misaligned pipes either.
They compromise your system’s integrity and safety.
Act fast to avoid costly damage or hazardous emissions.
Attaching a muffler without welding is not only practical but increasingly popular. Studies show that over 40% of DIY muffler replacements use clamps or couplers instead of welding.
By choosing these methods, you avoid complex tools and reduce installation time while maintaining a secure fit. Remember to use quality clamps and exhaust sealants to prevent leaks and guarantee durability.
Regular inspections will help keep your system running smoothly without costly repairs down the line.