Phone:
(701)814-6992
Physical address:
6296 Donnelly Plaza
Ratkeville, Bahamas.
Phone:
(701)814-6992
Physical address:
6296 Donnelly Plaza
Ratkeville, Bahamas.
To assemble a TIG welding torch, first gather and inspect torch body, collet body, collet, back cap, ceramic cup, and tungsten electrode.
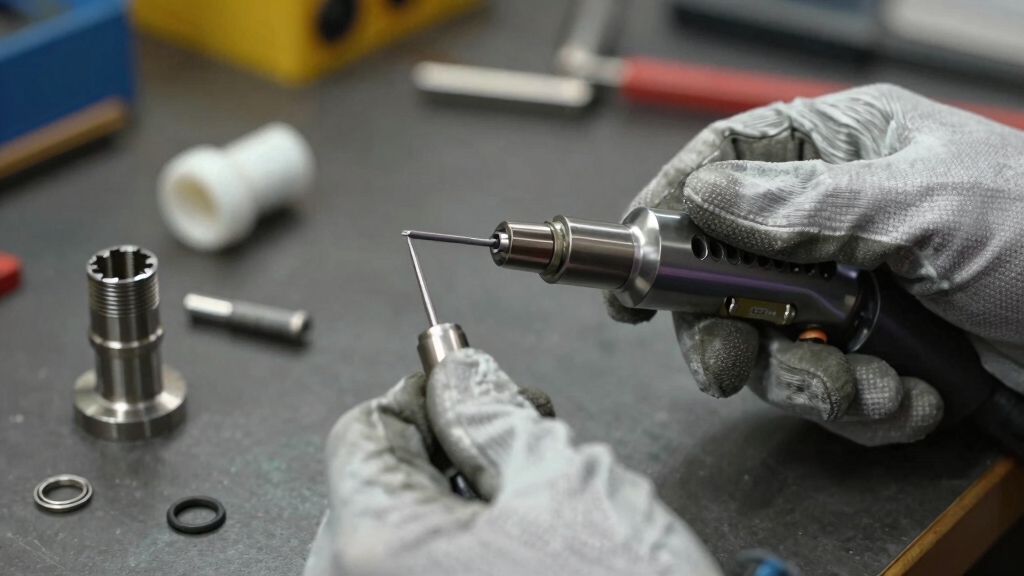
Grind the electrode longitudinally using a dedicated grinder, then insert it fully into the collet.
Screw the collet body into the torch head, slide in the collet, and tighten the back cap snugly.
Attach the ceramic cup and optionally install a gas lens for better shielding.
Finally, connect the torch to argon gas and power source, ensuring secure fittings and proper gas flow.
Learn how each step enhances your weld quality.
Start by collecting all essential TIG torch components, including the torch body, collet body, collet, back cap, ceramic cup, and the tungsten electrode.
The torch body serves as the main structural assembly, housing all internal parts. The collet body screws into the torch head’s front, accepting the collet that clamps the tungsten electrode securely.
The back cap threads onto the rear, pressing the collet upward to guarantee proper sealing. The ceramic cup fits over the collet body, providing gas shielding.
Before assembly, inspect each component for damage or contamination. Make sure the tungsten electrode is clean and free from oxidation.
Proper preparation of these components guarantees peak torch performance and arc stability, laying the foundation for precise and reliable TIG welding operations.
Using a non-consumable tungsten electrode ensures the arc remains stable and the welds are clean and precise.
Grind the tungsten electrode to the desired taper or shape using a dedicated grinder, guaranteeing the tip is sharp and free of contamination.
Sharpen the tungsten electrode with a dedicated grinder to ensure a clean, precise tip for optimal welding.
Correct grinding ensures prime arc stability and consistent weld quality.
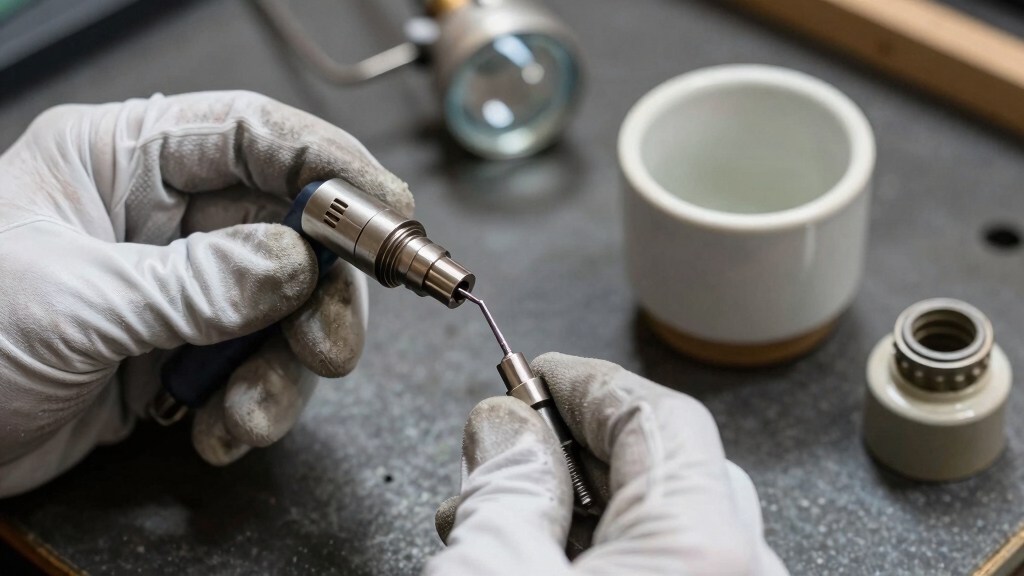
Once ground, insert the electrode properly by sliding it through the collet body and into the split collet. Keep these key points in mind:
Following these steps precisely guarantees a secure, stable electrode setup, critical for high-quality TIG welds.
Using a dedicated tungsten grinder with a diamond wheel helps minimize contamination and extend electrode life.
Secure the collet body by screwing it firmly into the front of the torch head before inserting the collet. Make sure it seats flush to prevent gas leaks and maintain structural integrity.
Next, slide the collet into the rear of the collet body, aligning it precisely to accept the tungsten electrode. The collet must fit snugly without excessive force, guaranteeing firm clamping during welding.
Avoid cross-threading during installation to prevent damage to the torch head or collet body. Once positioned, leave the back cap loose initially to allow electrode adjustment.
This setup makes certain the collet can clamp the electrode securely when you tighten the back cap later. Proper installation here is critical for consistent arc stability and electrode retention during TIG welding operations.
Using the correct polarity during welding ensures optimal electrode performance and arc stability, which complements proper torch assembly.
Once you’ve positioned the electrode and tightened the back cap, slide the ceramic cup over the collet body. Ensure it fits snugly without overtightening to avoid damaging components.
The ceramic cup acts as a heat shield and directs shielding gas effectively around the weld zone. If you opt for a gas lens kit, install it by replacing the standard collet body to enhance gas flow stability and coverage.
Keep these points in mind: gas lens kits improve arc protection and reduce turbulence. The gas lens screws onto the collet body after standard assembly. Use number N style gas lens cups for compatible stubby kits.
Avoid forcing the ceramic cup or gas lens to prevent thread damage. This careful installation guarantees peak shielding and torch performance.
Additionally, maintaining the correct gas flow rates between 10 to 35 CFH ensures optimal shielding and prevents contamination during welding.
Before you begin welding, connect the TIG torch to the shielding gas supply and power source to guarantee proper operation. Attach the torch’s gas hose to the argon regulator securely, ensuring no leaks.
Connect the weld cable to the negative (-) terminal of your power source. Adjust the argon regulator to approximately 20 CFH for peak shielding gas flow. Open the torch valve to confirm steady gas flow before striking the arc.
Using argon’s inert atmosphere helps prevent contamination and defects during welding by shielding the molten metal from oxygen and nitrogen.
Verify all connections are tight to maintain consistent performance and safety.
| Component | Connection Detail |
|---|---|
| Gas Hose | Connect to argon regulator |
| Regulator Setting | Adjust to 20 CFH |
| Weld Cable | Attach to power source negative |
| Torch Valve | Open after regulator adjustment |
You maintain your TIG torch by regularly inspecting and cleaning all components, especially the collet, collet body, and ceramic cup.
Replace worn or damaged parts promptly to guarantee proper gas flow and electrode stability.
Keep the tungsten electrode sharp and clean by grinding it before use.
Check gas connections and regulator settings often to prevent leaks.
Tighten the back cap carefully to avoid collet deformation, preserving electrode grip for consistent welding performance.
You should always wear insulated gloves and safety glasses to protect against sharp components and accidental sparks.
Make sure the torch is disconnected from power and gas supply before assembly to prevent electric shock or gas leaks.
Work in a well-ventilated area to avoid inhaling fumes.
Tighten connections carefully to avoid damaging parts or causing leaks.
Follow manufacturer guidelines precisely and inspect components for damage before use to maintain safe operation.
Yes, you can use different tungsten electrode sizes with the same torch, but you need to match the collet and collet body to the electrode diameter for proper fit and secure clamping.
Using the correct collet size prevents electrode movement and guarantees stable arc performance.
Always verify the torch’s manufacturer specifications and use compatible components to maintain safety and welding quality.
Adjust the back cap accordingly to avoid deforming the collet.
Imagine a gentle breeze failing to reach your flame. That’s a gas flow issue.
First, check your regulator and make certain it’s set to about 20 CFH. Inspect all connections for leaks or blockages, especially the torch’s gas line and back cap seal.
Replace damaged components like the gas lens or ceramic cup if needed. Thoroughly verify that valves fully open and that the shielding gas flows uninterrupted for peak arc protection.
You’ll notice a worn or damaged collet if your tungsten electrode slips or shifts during welding, causing an unstable arc.
Look for visible signs like deformation, cracks, or corrosion on the collet’s surface.
Poor gas sealing and inconsistent shielding gas flow around the electrode tip also indicate collet wear.
If tightening the back cap doesn’t secure the electrode firmly, it’s time to replace the collet to maintain proper weld quality.
Now that you’ve firmly placed each component—the tungsten like the heart, the collet body as its guardian, and the ceramic cup as its shield—you’ve crafted more than a torch; you’ve forged a beacon of precision.
Connecting gas and power breathes life into this tool, ready to ignite your craft. With every assembly step, you build a reliable path for flawless welds, ensuring your TIG torch stands as a symbol of control, strength, and expert performance.