Phone:
(701)814-6992
Physical address:
6296 Donnelly Plaza
Ratkeville, Bahamas.
Phone:
(701)814-6992
Physical address:
6296 Donnelly Plaza
Ratkeville, Bahamas.
To use JB Weld, first clean and roughen the surface, removing any grease or debris for strong adhesion.
Mix equal parts of resin and hardener thoroughly until you get a uniform gray color.
Then apply it evenly to fill cracks or gaps.
Press parts together and let the weld cure for 15 to 24 hours, avoiding moisture and excess handling.
Proper preparation and curing guarantee a durable, heat-resistant bond.
Keep going to uncover tips for perfect application and finishing.
When preparing surfaces for JB Weld, start by thoroughly cleaning the area to remove dirt, grease, oil, paint, or any loose debris. Use a detergent or degreaser to guarantee all contaminants are eliminated.
Next, roughen the surface with a file or 60-grit sandpaper to create a textured profile that enhances adhesion. Avoid smooth surfaces as they reduce bonding strength.
Roughen surfaces with 60-grit sandpaper to boost adhesion; smooth areas weaken the bond strength.
After sanding, wipe the area with a fresh paper towel soaked in acetone to remove fine dust and oils. Remove all loose particles from edges to guarantee a clean bonding perimeter.
This scuffing and cleaning process is critical; it creates the necessary “tooth” for the epoxy to grip, improving mechanical interlocking and guaranteeing a durable, long-lasting repair.
For the best results, ensure the surface is completely dry before applying JB Weld, as moisture can interfere with adhesion and compromise the bonding strength.
Begin by squeezing equal portions of the steel resin and hardener onto a disposable surface such as an old plate.
Use a stick or teaspoon to mix them thoroughly until the color is uniform, typically a consistent gray.
Work quickly because the chemical reaction starts immediately, generating heat.
Adjust the hardener ratio if necessary: reduce it in hot weather or for large batches, increase it in cold conditions.
Prepare enough mixture to complete your task without interruption, as partially cured epoxy can’t be reused.
Avoid mixing on non-disposable surfaces to prevent contamination.
Proper mixing guarantees peak bonding strength and curing performance.
Once mixed correctly, you’re ready to proceed with application before the epoxy begins to set.
Wearing protective gloves during mixing and application is important to prevent skin irritation and chemical exposure.
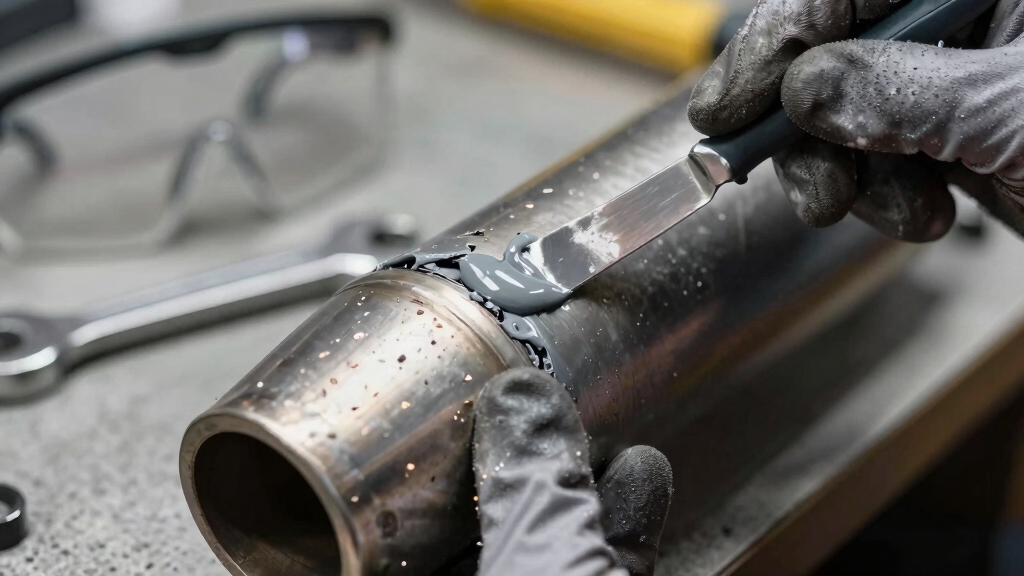
Apply the mixed JB Weld evenly to the repair area using a suitable tool, such as a putty knife or syringe, to guarantee precise placement.
Spread the epoxy in a consistent layer, ensuring full coverage over the damaged surface. If needed, build up the material slightly to fill gaps or cracks.
Press the bonded pieces together firmly and clamp or hold them in place to maintain alignment during the initial setting phase. For cracks, apply light pressure with a heat gun to enhance penetration.
Avoid excess movement to prevent weakening the bond. Wipe away any surplus JB Weld immediately before it sets, using a solvent if necessary.
Proper application secures optimum adhesion strength and a durable, lasting repair. For enhanced durability and flexibility, consider the benefits of conditioning agents to maintain material integrity after repair.
Although JB Weld sets quickly, typically within 4 to 6 hours, you should allow a full cure time of 15 to 24 hours for maximum strength and durability.
During this period, the epoxy undergoes a chemical reaction that achieves its full tensile strength of approximately 5020 PSI.
Handling the repair before this window compromises adhesion and integrity.
Temperature affects curing: below 40°F, expect extended cure times, while warmer conditions accelerate the process.
After mixing equal parts resin and hardener, apply and clamp the pieces promptly to secure proper bonding.
Avoid disturbing the joint during the initial set phase.
Waiting the full cure time guarantees the repair withstands stress, heat (up to 550°F), and environmental exposure, assuring a lasting, reliable fix.
For repairs involving coated metals, proper surface preparation including removal of oils and contaminants is essential to ensure strong adhesion and reduce defects related to surface contamination.
Frequently, the final steps after curing JB Weld involve sanding, drilling, or painting the repair to achieve a smooth, functional finish.
Sand the area with fine-grit sandpaper to remove excess material and create an even surface. If needed, drill holes or shape the repair to fit precisely.
Painting not only improves aesthetics but also adds a protective layer against moisture and corrosion.
| Step | Benefit |
|---|---|
| Sanding | Smooths rough edges |
| Drilling | Enables precise fitting |
| Painting | Enhances durability |
| Inspection | Guarantees repair quality |
Take care during these finishing steps to maintain the structural integrity of the bond. Use appropriate tools and gentle pressure to avoid compromising the repair.
Proper finishing enhances both function and appearance. Ensuring the surface is thoroughly dried before painting or sealing will help maximize adhesion and prevent moisture-related damage.
You shouldn’t use JB Weld underwater or on wet surfaces because it requires a clean, dry, and roughened surface for proper adhesion.
Moisture interferes with its chemical bond, reducing strength and curing effectiveness.
For wet conditions, dry and prep the area thoroughly before applying.
If you must work in damp environments, consider alternative waterproof adhesives designed for underwater use to assure a reliable, long-lasting repair.
Think of JB Weld like a tough shield, but not one you’d want touching your food directly.
It’s not food-safe or FDA-approved for surfaces that contact food.
You shouldn’t use it on cutting boards, utensils, or containers meant for eating or drinking.
Instead, reserve it for structural repairs away from edible items.
If you need a fix on food-contact surfaces, look for FDA-compliant epoxies designed explicitly for that purpose.
JB Weld offers strong resistance to many chemicals and solvents, including water, oils, gasoline, and mild acids or bases.
However, it’s not impervious to all harsh chemicals.
Strong acids, alkalis, or concentrated solvents may degrade it over time.
For best results, prepare surfaces properly and allow full curing.
If you work with aggressive chemicals regularly, consider testing a small area first to verify the bond holds under your specific conditions.
Yes, you can paint or coat JB Weld after curing.
First, sand the cured surface to create a rough texture for better paint adhesion.
Then, clean off debris thoroughly before applying your paint or coating.
This process guarantees durability, enhances appearance, and protects the repair.
By preparing, sanding, and cleaning, you maximize bonding and finish quality.
This allows JB Weld repairs to blend seamlessly with your project’s aesthetics and functional requirements.
You can expect unopened JB Weld tubes to have a shelf life of about two years when stored properly.
Keep them in a cool, dry place away from direct sunlight and extreme temperatures to maintain effectiveness.
Avoid exposure to air by sealing caps tightly.
After two years, the chemical components may degrade, reducing bonding strength and curing performance.
Always check consistency before use if stored near expiration.
Now that you’ve mastered the art of using JB Weld, think of it as your trusty armor, sealing cracks and binding parts with precision.
By prepping, mixing, and applying it carefully, you create a bond as strong and reliable as forged steel.
Give it time to cure fully, then finish smoothly to restore durability and appearance. With these steps, your repairs won’t just stick; they’ll stand the test of time like a well-crafted tool.