Phone:
(701)814-6992
Physical address:
6296 Donnelly Plaza
Ratkeville, Bahamas.
Phone:
(701)814-6992
Physical address:
6296 Donnelly Plaza
Ratkeville, Bahamas.
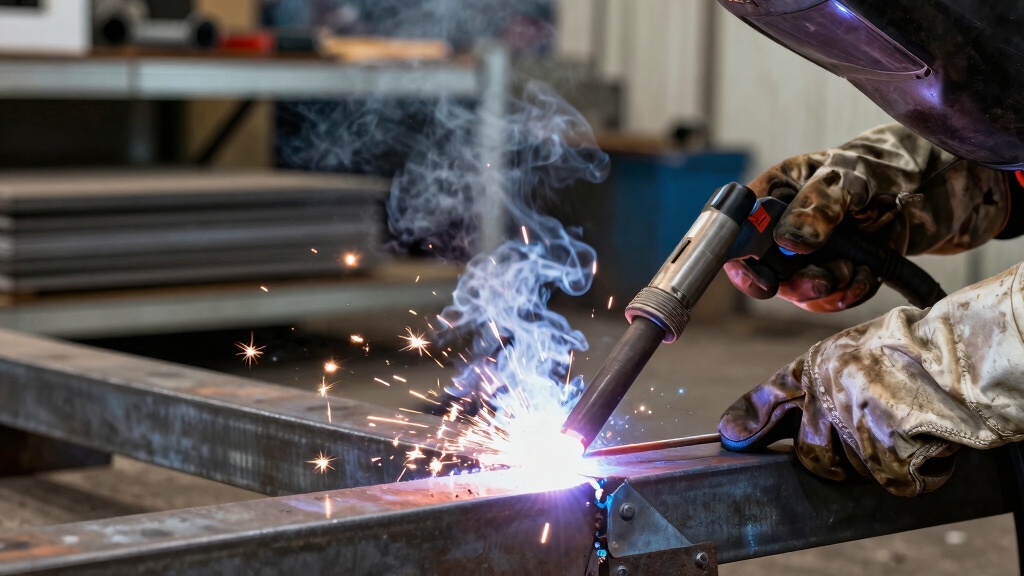
You push a MIG welder when you want a flatter bead, better gas shielding, and cleaner welds. This technique is ideal for aluminum and thin materials.
Pulling provides deeper penetration and stronger fusion, making it suitable for thicker metals and structural joints. Your choice depends on material thickness, position, and whether visual finish or strength is your priority.
Mastering torch angle, travel speed, and gas coverage for each method boosts weld quality. Exploring these techniques further helps you optimize every weld.
When you decide whether to push or pull a MIG welder, understanding the fundamental differences in torch positioning and weld bead characteristics is essential.
With the push technique, you angle the torch 5-15 degrees ahead of the weld puddle. This produces a flatter bead and better ties the weld into base metal edges. Although some regions consider pushing the only correct way, in the United States, both push and pull methods are accepted and produce successful welds under controlled conditions. This positioning guarantees superior shielding gas coverage, especially important on aluminum, and suits applications demanding clean aesthetics like furniture welding. Proper nozzle positioning ensures optimal shielding gas coverage to maintain weld quality.
Angle the torch 5-15 degrees ahead with the push technique for a flatter bead and strong edge fusion.
Conversely, the pull technique involves dragging the torch 5-15 degrees behind the puddle. This creates a more rounded bead with deeper penetration due to increased heat input. Studies show that pulling often results in slightly more penetration and heat compared to pushing. Pulling offers better visibility of the weld puddle and is preferred for fusing thick sections or narrow gaps.
Selecting between push and pull depends on material thickness, desired penetration, and shielding requirements.
When you’re deciding between push and pull techniques, it’s important to realize just how much they impact your weld. For instance, if you go with the push technique, you’re likely to see flatter beads that have a cleaner tie-in.
On the other hand, if you opt for the pull method, you’ll achieve those rounded beads with deeper penetration. Additionally, the pull technique allows for better control of the weld puddle and typically results in lower spatter. Choosing the correct technique also influences arc stability, which is crucial for consistent weld quality.
And it’s not just about the bead shape—there are also differences in how effectively shielding gas is used. With the push technique, you get better coverage, which is especially crucial when working with aluminum. This means you’re not only enhancing the visual appeal of your weld but also ensuring its overall integrity. So, the technique you choose really does make a difference!
Both push and pull welding techniques distinctly influence the bead profile and gas coverage, impacting weld quality and appearance.
When you pull the torch, you get a rounded bead with deeper penetration and a trailing weld pool, ideal for stringer beads and gaps like 1/8 inch in I-beams. This method offers enhanced control and better puddle visibility due to the arc edge facing forward at 5-15 degrees. The pull technique is often chosen when deeper penetration is a priority for the weld. Proper heat input management is essential in pulling to avoid burn-through or weak fusion on thin materials.
Conversely, pushing produces a flatter, wider bead that ties in better to base metal edges, improving aesthetics and reducing spatter in spray transfer mode. The electrode leads the weld pool, with gas coverage benefiting from a neutral angle up to 5 degrees, favorable for vertical welding. Maintaining shielding gas management during pushing is critical to prevent porosity and arc instability.
Your choice affects both bead strength and cleanup requirements.
Although push and pull welding techniques each influence shielding gas coverage differently, understanding their effects is essential for optimizing weld appearance and integrity.
When you push the MIG welder, the gas flows ahead of the arc, efficiently protecting the molten pool and reducing oxidation. This method also offers better visibility of the joint ahead, allowing more precise control during welding. The stable arc conditions created by pushing enhance uniform heat distribution, improving weld bead quality.
Pull welding directs gas behind the arc, cooling the weld but offering less uniform coverage.
Consider these key points:
Choose your technique based on material, position, and desired gas efficiency.
Understanding how push and pull techniques influence shielding gas coverage naturally leads to examining their direct impact on weld appearance.
When you push the MIG welder, gas flows ahead of the weld pool, enhancing protection and producing flatter, more uniform beads with superior edge tie-in. This results in a cleaner, aesthetically pleasing weld, ideal for visible applications like furniture. This technique helps maintain better shielding gas coverage, reducing oxidation and spatter.
Conversely, pulling the welder causes gas to trail behind the pool, offering less effective coverage and a rounded bead profile with deeper penetration. While pull welding provides stronger welds and better puddle visibility, it sacrifices some visual appeal and risks increased porosity. For thicker materials, achieving optimal penetration with pull welding often requires adjustments such as higher voltage and faster wire feed.
Your choice depends on whether you prioritize weld strength and penetration or surface finish quality.
Push welding is favored for cleaner, spatter-reduced results, while pull welding is suited for robust structural joints.
When you use the pull technique in MIG welding, positioning the gun ahead of the weld puddle allows the arc to preheat and melt the base metal before depositing filler wire. This results in deeper penetration.
This method enhances arc focus, creating a concentrated heat input that produces a narrower, more rounded bead with superior fusion depth. You’ll notice the filler wire dips into the preheated molten pool, enabling better root penetration and structural integrity. It requires higher skill due to the need for controlled weaving and arc stability, which helps maintain weld quality.
Pulling the MIG gun preheats the base metal, enabling deeper weld penetration and stronger fusion.
Key factors include:
Using pull delivers a weld profile that’s deeper and more convex. This is ideal for heavy-duty, thicker materials requiring robust fusion. Proper selection of filler metal compatible with both base metals also ensures joint strength and corrosion resistance.
Since different materials and welding positions demand specific heat input and bead characteristics, choosing between push and pull MIG welding techniques depends heavily on these factors.
For steel, push suits mild steel and flat positions, offering flatter beads and better edge tie-in. Pull excels on I-beams and vertical joints, delivering deeper penetration. Many welders find that using a larger welder around 130+ amps improves control and weld quality in these applications. Understanding how heat distribution affects penetration can further optimize weld results.
Aluminum favors push due to superior gas shielding and less spatter in spray transfer, with neutral angles ideal. Flat and horizontal positions benefit from push for aesthetics and reduced spatter.
However, pull suits horizontal fillets and vertical welds needing penetration. Vertical welding primarily requires pull to leverage gravity for deeper, cleaner joints. Managing cooling rates is critical in vertical welds to avoid defects and distortion.
Avoid extreme gun angles (10-20 degrees) in horizontal and aluminum to maintain weld quality. Your choice must align with material type and weld orientation for best results.
When it comes to choosing between push or pull techniques for your welding project, it’s really important to think about what you want to achieve. Start by considering how the appearance of the weld will fit with your project’s needs.
For instance, if you’re working on a visible joint, pushing might be the way to go. It tends to create wider, flatter beads that look great. This is because the pushing technique offers better visibility of the weld pool, making it easier to control and avoid defects. Additionally, pushing generally results in less penetration, which can be beneficial when working with thinner materials to prevent burn-through.
On the other hand, if you need something that has strong structural integrity, pulling is your best bet. It provides deeper penetration, which is crucial for strength. This deeper penetration is especially important when welding high-strength materials like chromoly steel, where controlling heat input and weld quality directly affects durability.
Welders often face a critical choice between push and pull techniques based on their desired weld appearance and functional outcomes.
When prioritizing aesthetics, you’ll want to take into account these factors:
Choosing push or pull depends on whether your goal is a cleaner, visually pleasing weld or a structurally robust joint with deeper penetration.
Although both push and pull techniques have their merits, selecting the appropriate method hinges largely on the material thickness and welding position you’re working with.
For thicker plates requiring deep fusion, you should use the pull method, as it guarantees stronger weld profiles and deeper penetration. Some welders note that the drag method often results in deeper penetration compared to pushing. Proper control of heat input is essential to achieve consistent fusion and avoid defects.
Conversely, push suits thinner materials, preventing burn-through by controlling heat input and promoting better edge tie-in.
Welding position also influences your choice: pull works best in flat positions for deeper access, while push excels in vertical or overhead positions, maintaining bead control with a neutral 0-5 degree angle.
Additionally, right-to-left travel favors push for arc stability in right-handers.
Align your technique with these factors to optimize weld strength, penetration, and bead quality based on your specific project requirements.
Mastering both push and pull MIG welding techniques requires understanding how each method influences weld bead shape, penetration, and spatter levels.
To excel, consider these tips:
Yes, push and pull techniques directly influence wire feed speed settings.
When you push, you generally need lower wire speeds to maintain a stable, less spitty arc, especially with high inductance setups.
Pulling allows higher wire feed speeds, promoting deeper penetration without excessive heat.
Adjusting wire feed speed balances amperage; too low causes a harsh arc, while too high leads to popping.
Consequently, your technique dictates precise wire feed control for ideal weld quality.
Imagine welding galvanized steel with the finesse of a Renaissance artisan.
You’ll find that push welding reduces spatter markedly, protecting the zinc coating from excessive burn-off.
It offers better control over heat input, minimizing distortion and zinc vaporization.
Pull welding, while easier to control visually, can increase spatter and zinc fume.
You’ll want to use the push technique when welding thin sheet metal. It provides better control over heat input, reducing the risk of burn-through and warping.
Pushing also improves gas shielding ahead of the weld pool, resulting in cleaner, more consistent welds on delicate material. While pull may cause deeper penetration, it’s less suitable for thin sheets due to higher heat concentration and increased chances of distortion.
Imagine balancing a tray of hot soup. Push welding is like carrying it steadily behind you, needing heat-resistant gloves since the bead’s hot under your hand.
Pull welding’s like pulling the tray forward, requiring sharper control to avoid spills. This means you must focus on PPE due to increased spatter risk.
Push offers better gas shielding, so you watch for burn-through. Pull demands steadier motion to prevent porosity and arc instability.
Yes, your electrode angle changes with push versus pull techniques.
When you push, you angle the gun forward 10-15 degrees away from the weld pool. This improves gas coverage and produces a flatter bead.
Pulling involves angling the torch back 10-15 degrees toward the weld pool, which increases penetration and visibility.
Adjusting your angle based on material thickness, joint design, and transfer mode optimizes weld quality and control effectively.
When deciding whether to push or pull your MIG welder, remember that the right tool makes the job easier.
Pushing offers better gas coverage and a smoother bead, ideal for thin materials and out-of-position welds.
Pulling provides deeper penetration, perfect for thicker metals.
Analyze your material and welding goals carefully to choose the best technique.
Mastering both methods enhances your versatility and weld quality, ensuring precision in every project.