Phone:
(701)814-6992
Physical address:
6296 Donnelly Plaza
Ratkeville, Bahamas.
Phone:
(701)814-6992
Physical address:
6296 Donnelly Plaza
Ratkeville, Bahamas.
To plastic weld your bumper, first identify its plastic type by checking the underside for material codes like PP or TPO. Test a small scrap with welding rods.
Clean and sand the repair area, then cut a V-groove along the crack. Tack weld using a hot air tool at 300–450°C with matching rods. Fill the groove evenly on both sides if possible.
Let it cool naturally, finish by sanding, and flex to test strength. Following these steps guarantees a durable repair. Further details will help you refine your technique.

How do you make certain a strong, lasting weld on your bumper? First, identify the plastic type precisely.
Locate the material code on the bumper’s underside, such as PP for polypropylene, TPO for thermoplastic olefin, or ABS for acrylonitrile butadiene styrene. Use the welding kit’s identification chart to confirm.
Next, test compatibility by melting a small sample; your welding rod must match the bumper’s plastic exactly. Using an incorrect rod leads to weak bonds and failure.
Common bumper plastics include TPO, PP, and polycarbonate blends, each requiring specific welding rods. Verify this before proceeding.
Accurate identification guarantees proper melt behavior and bonding strength. Skipping this step risks poor adhesion and compromised weld integrity, so perform it methodically to set the foundation for a durable repair.
Proper surface preparation and cleaning are essential before welding to ensure optimal adhesion and avoid contamination that weakens the weld.
Before you start welding, thoroughly prepare the surface by cleaning the area with isopropyl alcohol to remove dirt, grease, and wax that could interfere with adhesion.
Begin welding by cleaning the surface with isopropyl alcohol to eliminate contaminants for better adhesion.
Once dry, sand the repair zone using 80-120 grit sandpaper to create a rough texture that promotes bonding. Remove all loose material and bevel the edges at a 45-degree angle to facilitate proper weld penetration.
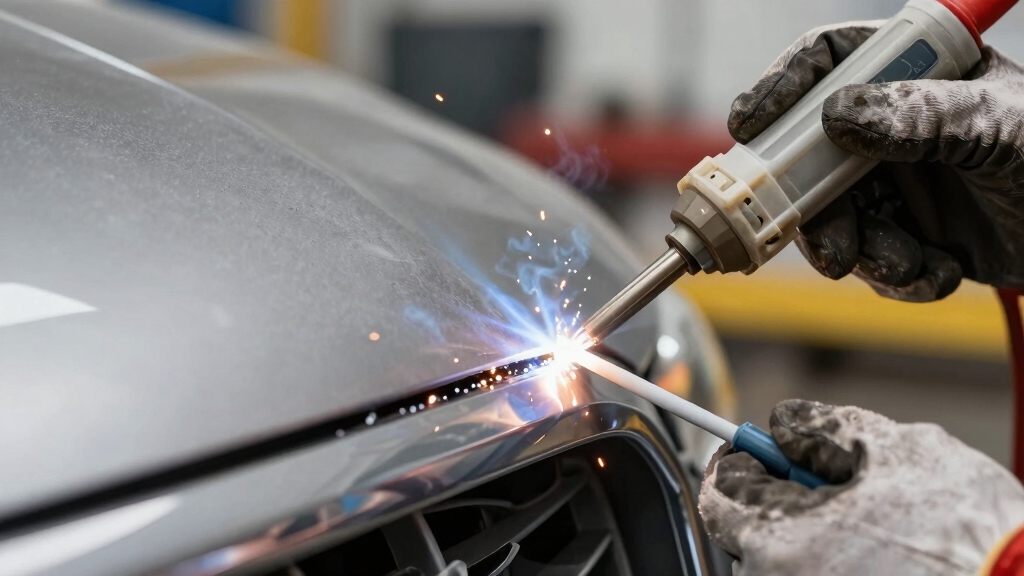
Next, identify and prepare your welding tools: select a hot air welder or soldering iron set between 300-450°C, matching the plastic type you previously identified. Attach an appropriate nozzle, such as a standard or pendulum tip, for best access.
Test the temperature on scrap material to verify a smooth melt without burning. Wear protective gear and work in a ventilated space to maintain safety throughout the process.
Ensure proper ventilation during welding to avoid inhaling harmful fumes and maintain a safe working environment, as recommended for chemical safety.
Once you’ve prepared the surface and set up your tools, cut a V-groove along the crack using a rotary burr or grinding tip, ensuring the groove depth is 1.5 to 2 times the thickness of the bumper material.
This groove shapes the crack for optimal weld penetration. Maintain a clean, consistent bevel to promote adhesion.
Next, select a matching plastic welding rod for tacking. Tack weld at intervals of 1 to 2 inches along the groove to hold alignment firmly.
Use your hot air welder or soldering iron set to the correct temperature, applying short, controlled melts of both rod and parent material. Allow each tack to cool fully before proceeding to avoid distortion.
These steps stabilize the repair, setting the foundation for a strong, uniform weld. Using short, controlled weld passes helps to prevent localized overheating and distortion during the repair process.
Though the tacking process secures the crack, you’ll need to apply consistent plastic welding techniques to guarantee a durable, uniform bond.
Use a pendulum motion to evenly heat both the base plastic and welding rod, ensuring full fusion.
Maintain a steady speed to create a slight wash at the rod edges, fully filling the V-groove without overheating.
Weld both sides if possible, and incorporate mesh reinforcements for large cracks by melting parent material, rod, and mesh together.
Proper control of heat input is essential to avoid material degradation and ensure a strong joint with minimal defects, similar to managing heat input in metal welding.
| Technique | Key Point |
|---|---|
| Pendulum Motion | Even heat application |
| Continuous Run | Uniform weld bead |
| Groove Filling | Complete without overheating |
Precision and control during welding prevent bubbles and weak spots for a strong repair.
After completing the weld, let the plastic cool naturally to room temperature to guarantee maximum bond strength. Avoid forced cooling methods, which can induce stress and weaken the repair.
Allow the plastic to cool naturally to ensure a strong, lasting weld without stress or damage.
Once cooled, trim any excess weld bead carefully using a rotary tool or file for a flush surface. Sand progressively with grits from 220 to 400 to prepare for finishing.
Finally, test the weld’s durability by flexing the bumper gently. The joint should hold without cracking or separation.
Trim excess weld bead smoothly for uniformity. Sand with progressively finer grits to prepare for painting. Flex test the repaired area to confirm bond integrity.
Following these steps secures a professional, durable repair ready for primer and paint. Using the correct welding mode, such as Synergic MIG mode, can simplify setup and improve overall weld quality in compatible processes.
No, you can’t plastic weld painted bumpers without removing the paint first. The paint creates a barrier that prevents proper melting and fusion of the plastic materials, resulting in a weak bond.
You need to strip the paint around the weld area, clean the surface thoroughly with isopropyl alcohol, and roughen it with sandpaper. This guarantees the welding rod bonds directly to the base plastic for a strong, durable weld.
A properly executed plastic bumper weld can last several years, often matching the lifespan of the bumper itself.
You’ll guarantee durability by correctly identifying the plastic, preparing the surface meticulously, and using matching welding rods with appropriate temperature control.
Cooling fully before trimming and finishing also affects longevity.
However, exposure to harsh environmental conditions or mechanical stress may reduce the weld’s lifespan. Regular inspection is advisable to maintain structural integrity.
Oh, sure, you can totally ignore ventilation and enjoy inhaling toxic fumes while plastic welding if you want a lung full of trouble.
Seriously, though, you must work in a well-ventilated area or use local exhaust ventilation.
Plastic welding releases harmful vapors, so keep fans running or open windows.
Always wear a respirator if ventilation’s inadequate.
Protect your health methodically by controlling airborne contaminants during the entire welding process.
You can repair bumper dents with plastic welding, but the technique differs from fixing cracks.
For dents, you’ll need to heat the area carefully to soften the plastic, then reshape it using tools or pressure before it cools.
Welding’s primary strength is in fusing cracks or splits.
So, while welding can assist dent repair, it’s mostly for structural fixes.
Reshaping relies on controlled heating and manipulation rather than just welding.
You should be aware of burns from hot tools and molten plastic. Always wear heat-resistant gloves and goggles.
Fumes released during welding can be toxic. Work in a well-ventilated area or use a fume extractor.
Avoid inhaling dust during sanding by wearing a dust mask.
Electrical hazards exist if your equipment isn’t properly maintained.
Keep your workspace organized to prevent trips or accidental contact with hot surfaces.
Now that you’ve mastered plastic welding, remember: a strong bumper repair isn’t just about fixing cracks. It’s about restoring safety and integrity.
Like a surgeon stitching a wound, your precise technique guarantees durability and resilience. By identifying the plastic, preparing meticulously, and welding with care, you turn damage into strength.
Keep your tools sharp and your process methodical. Every weld you make is a small victory against wear and tear on your vehicle.