Phone:
(701)814-6992
Physical address:
6296 Donnelly Plaza
Ratkeville, Bahamas.
Phone:
(701)814-6992
Physical address:
6296 Donnelly Plaza
Ratkeville, Bahamas.
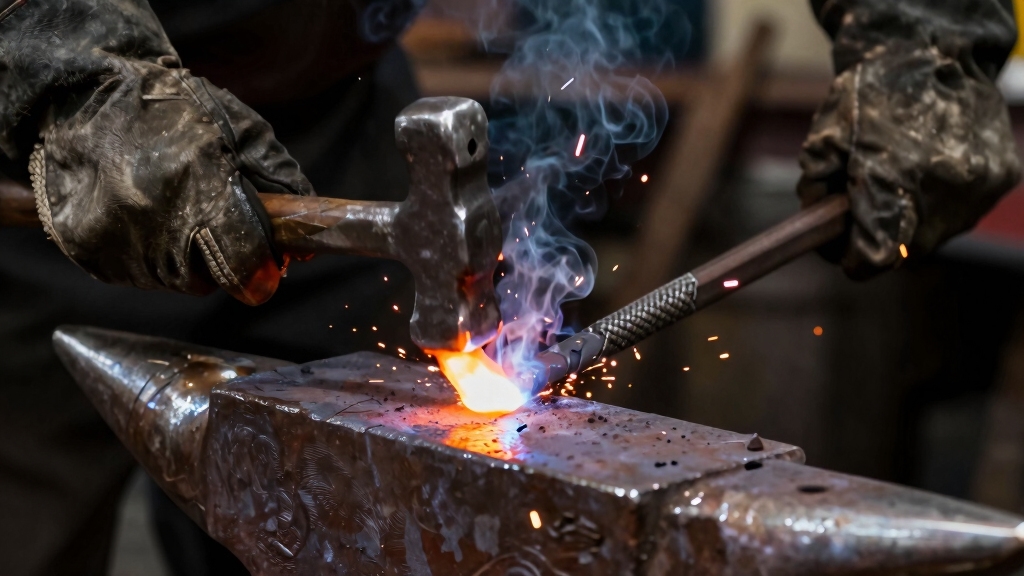
To forge weld, first prepare clean, scarfed metal surfaces and remove all scale. Heat the pieces evenly in a solid-fuel forge until they reach a bright orange to yellow-white glow.
Apply flux to prevent oxidation and improve bonding. Quickly transfer the heated parts and hammer firmly with controlled blows, rotating to apply uniform pressure.
Reheat as needed, avoiding overheating or cold spots, until weld lines vanish and dimensions restore. You’ll find detailed steps on flux choice, heating control, and finishing in the following sections.
Although forge welding has ancient origins, it remains a critical technique for joining metals without melting them into a liquid state.
Forge welding joins metal pieces in a solid-state by heating them to 50–90% of their melting points and applying precise pressure.
Forge welding bonds metals solidly by heating to near melting and applying exact pressure for a strong join.
You heat both surfaces evenly until the flux melts, preventing oxidation and lowering the melting temperature of surface oxides.
Then, you strike or press the metals together to create a seamless bond.
This method retains the metal’s structural integrity and avoids the weaknesses associated with liquid-phase welding.
Whether using manual hammering or mechanical presses, forge welding offers a reliable, enduring joint essential for blacksmithing and metalworking.
Controlled heat and pressure produce high-quality welds.
Proper control of heat input and pressure is essential to achieve a strong, consistent weld without damaging the metal’s structure.
Properly preparing metal surfaces is essential for achieving a strong forge weld.
Begin by scarfing or beveling the ends to create a clean overlap, ensuring proper alignment on the welding plane.
Next, remove all surface scale and contaminants using a wire brush. Any remaining oxide layer will inhibit bonding.
Upset the bar ends slightly to counteract thinning caused by heat and oxidation.
Position your stock horizontally in the forge, rotating it evenly to reach a consistent bright orange temperature.
Maintain a minimal gap between the pieces initially to allow flux to flow freely during heating.
These meticulous steps establish ideal contact and cleanliness, which are critical for the flux to function effectively and for the metals to fuse under pressure without defects.
Controlling heat input and cleanliness during preparation helps prevent common weld defects that can compromise joint integrity.
Once your metal surfaces are prepared and aligned with flux applied, focus on achieving the correct welding temperature.
Heat the metal evenly to a yellow-white glow, indicating a temperature near 50-90% of the metal’s melting point. This temperature range guarantees the metal reaches a plastic state without melting.
Use a solid-fuel forge, such as coal, coke, or gas, to maintain a clean fire and minimize contamination.
Rotate the workpiece to ensure uniform heat distribution, preventing cold spots that weaken the weld.
Avoid overheating into a semi-molten state, which compromises weld integrity.
The flux will liquefy at welding temperature, creating a slippery, fluid surface that signals readiness.
Remove the metal promptly to prevent excessive scale buildup and proceed immediately to the forging stage for peak weld quality.
Maintaining stable arc control during the process is crucial for consistent weld quality and minimal defects.
When you’re picking flux for forge welding, it’s really important to consider its composition. You want to make sure it can effectively liquefy any oxides and prevent contamination. That way, you’re setting yourself up for success right from the start.
Once you’ve got your flux, remember to apply it evenly after your initial heating. This creates a protective barrier that actually lowers the welding temperature. Pretty neat, right?
Also, don’t overlook the role of flux in sealing the joint. It helps facilitate clean metal contact, which is key for achieving a strong, reliable weld. So, keep all this in mind, and you’ll be well on your way to a great weld!
Effective flux selection and application can also help manage thermal gradients during the welding process, reducing the risk of cracking.
Although selecting the right flux might seem straightforward, it plays a critical role in achieving a strong and clean forge weld. You need a flux blend that melts at welding temperatures, seals the joint, and dissolves oxides effectively.
Typical compositions include borax, silica sand, and iron filings. Borax lowers the melting point and fluidizes the flux, while silica sand aids in combining with scale to form a glassy slag. Iron filings enhance flux activity by reacting with impurities.
The flux must flow smoothly at the weld temperature to prevent oxidation and sulfur or phosphorus migration. Avoid fluxes with high melting points or excessive viscosity, as they hinder oxide removal and joint cleanliness.
A well-chosen flux guarantees reliable bonding and minimizes weld defects. Proper heat management during welding is essential to prevent contamination and ensure the flux performs its protective role effectively, especially when working with reactive metals.
Properly applying flux is essential for successful forge welding, as it directly influences oxide removal and joint cleanliness.
After heating your metal to bright orange, sprinkle flux evenly over the mating surfaces.
Choose a flux formulated for your specific metal type; common blends include borax-based compounds with silica sand and iron filings to liquefy scale and carry away impurities.
Avoid excess flux; too much can cause inclusions, while too little fails to prevent oxidation.
Apply flux when the metal is hot enough to melt it quickly, ensuring it flows thoroughly into the joint.
Maintain a small gap initially to allow flux distribution before striking.
During hammering, the flux should remain fluid enough to seal and protect the weld area without burning off prematurely.
Consistent, precise flux application optimizes weld quality and repeatability.
In forge welding copper to steel, careful surface preparation is critical to prevent oxidation and ensure a strong metallurgical bond between the dissimilar metals.
Since flux directly influences oxide removal and weld integrity, selecting the right type for your forge welding project is critical. You’ll want a flux that liquefies oxides efficiently at welding temperatures, commonly borax-based, to seal the joint and prevent further oxidation.
The flux must flow easily between mating surfaces, carrying impurities away and lowering the welding temperature. Avoid fluxes that leave excessive residues or burn too quickly, as these can compromise weld strength.
Apply flux after initial heating; it melts to form a protective barrier, ensuring clean metal contact during hammering. Proper flux choice supports consistent weld quality by maintaining a fluid interface, reducing scale formation, and facilitating pressure bonding without introducing contaminants. Consider that controlling oxidation during welding is essential for preserving material integrity and achieving strong, clean joints.
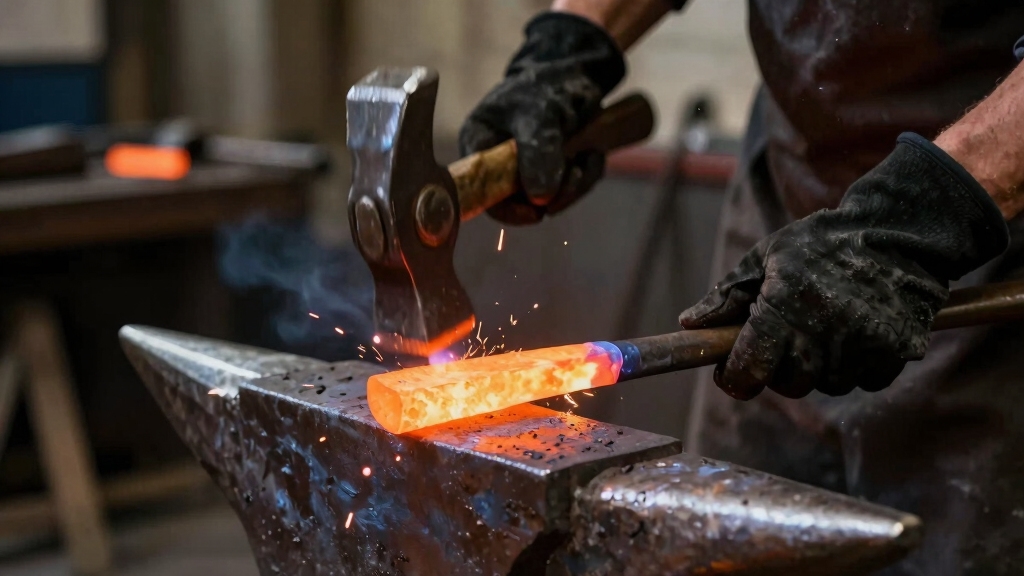
Begin by preparing your metal pieces through careful cleaning and scarfing to guarantee a proper weld surface.
Heat the metals evenly in your forge until they reach a yellow-white glow, indicating the welding temperature.
Apply flux to prevent oxidation and promote bonding.
Quickly transfer the pieces to your anvil, positioning them for hammering.
Overlap scarfed ends with a small initial gap for flux flow.
Strike firmly at the thickest area, rotating the workpiece for uniform pressure.
Use controlled, outward hammer blows to expel flux and forge the joint.
Continue hammering until weld lines disappear and the bar regains original dimensions.
Reheat as needed to maintain welding temperature without overheating.
This methodical approach guarantees a solid, clean forge weld using manual hammering techniques.
For joining thicker plates, consider the importance of multi-pass welding to ensure full penetration and minimize distortion.
When you want to increase efficiency and consistency in forge welding, mechanical and roll welding methods offer effective alternatives to manual hammering.
Mechanical hammers, powered by water, air, electricity, or steam, apply controlled, repetitive blows to heated metal positioned between hammer and anvil. This ensures uniform pressure and reduces operator fatigue.
Mechanical hammers deliver precise, consistent blows to heated metal, ensuring uniform pressure and minimizing operator fatigue.
This precision facilitates stronger welds with less variability.
Roll welding involves overlapping heated metal pieces and passing them through high-pressure rollers. The rollers exert continuous compressive force, consolidating the joint and producing a clean, consistent weld over longer lengths.
Both methods require proper surface preparation, precise temperature control, and flux application to prevent oxidation and promote metallurgical bonding.
Integrating these methods into a fabrication workflow enhances joint integrity and overall structural strength.
Once your forge weld has cooled down, it’s time to reheat it. Just be careful as you bring it back up to a workable temperature for shaping. You want to make sure you’re using controlled hammer strikes during this process. It’s all about refining the weld, so keep consistent pressure. This helps eliminate any irregularities without compromising the joint.
As you go through this finishing process, you’ll notice that it not only restores the bar to its original dimensions but also strengthens the bond. It’s a crucial step, so take your time and focus on getting it just right! Proper heat control during reheating is essential to prevent burn-through and maintain weld integrity.
Although the initial weld secures the joint, you’ll need to reheat the workpiece carefully to refine its shape and restore uniformity.
Controlled reheating prevents cracking, relieves internal stresses, and guarantees consistent grain structure across the weld.
Follow these steps for effective post-weld reheating:
Heat evenly to a bright orange to avoid thermal gradients.
Avoid overheating to prevent grain coarsening or partial melting.
Use a solid-fuel forge for a clean, controllable flame.
Rotate the workpiece continuously to maintain uniform temperature.
Monitor the workpiece closely, reheating only as necessary to maintain forge weld integrity.
Shaping and refining your forge welds requires deliberate hammering and careful control of temperature to restore the workpiece’s original dimensions and assure structural integrity.
After initial welding, reheat the piece just enough to regain plasticity without overheating. Use steady, controlled hammer blows to remove welding lines and homogenize the joint.
Focus on uniform thickness and correct any distortion.
| Step | Purpose |
|---|---|
| Reheat moderately | Maintain workability |
| Light hammering | Remove weld seams |
| Rotate workpiece | Assure even shaping |
| Check dimensions | Restore original size |
| Final quench | Lock in shape, relieve stress |
Consistent temperature and measured hammering prevent defects, assuring a robust, clean weld.
Different metals affect your forge welding success mainly through their melting points, oxide formation, and thermal conductivity.
Steels with similar carbon content weld best, as mismatched alloys cause weak joints or excessive oxidation.
High alloy or stainless steels need careful flux choice and temperature control to prevent scale.
Soft metals like copper or aluminum are challenging due to low melting points and rapid oxidation.
These require precise heat management and specialized fluxes for reliable welds.
Picture sparks flying like tiny fireflies as you work. You need heat-resistant gloves to protect your hands from burns and a leather apron to shield your torso from sparks and hot metal.
Wear safety goggles or a face shield to guard your eyes from flying debris and intense light. Don’t forget sturdy boots and long sleeves to prevent burns.
Proper ventilation and a respirator are essential to avoid inhaling harmful fumes.
Yes, you can forge weld thin metal sheets, but it requires precise control of heat and pressure.
Thin metals heat quickly, so you must carefully monitor temperature to avoid overheating or burning through.
Use a steady hand to apply even pressure and avoid warping.
Scarfing edges and using flux are critical to guarantee clean welds.
Thin sheets demand quicker, lighter hammer blows and faster work to maintain weld integrity.
Weather affects forge welding quality by influencing temperature control and oxidation rates.
If it’s cold, your metal cools faster, requiring higher heat or quicker hammering to maintain welding temperature.
High humidity or rain increases oxidation, making flux less effective and raising contamination risk.
Wind can cool the forge unevenly, causing inconsistent heating.
You need to adjust fire intensity, protect your workspace, and monitor metal temperature closely to ensure a clean, strong weld.
You rely on a balance between chaos and control, which is why tools like pyrometers, thermocouples, and infrared thermometers help maintain consistent forge temperature.
Unlike guessing by color alone, these devices offer precise readings, ensuring you hit the critical range between bright orange and yellow-white heat.
Additionally, adjustable gas regulators and air dampers stabilize fuel flow, giving you steady heat. Together, they let you sustain ideal welding conditions efficiently and predictably.
Forge welding demands precision, patience, and proper technique, but mastering it reveals powerful metalworking possibilities.
By preparing surfaces meticulously, heating to the right temperature, and selecting appropriate flux, you guarantee strong, lasting bonds. Whether you choose manual or mechanical methods, remember: “Well begun is half done.”
Careful preparation and methodical execution will lead you to successful, high-quality welds every time. Keep honing your skills to achieve flawless results.