Phone:
(701)814-6992
Physical address:
6296 Donnelly Plaza
Ratkeville, Bahamas.
Phone:
(701)814-6992
Physical address:
6296 Donnelly Plaza
Ratkeville, Bahamas.
You start by thoroughly cleaning and sanding compatible metal surfaces like aluminum or steel to remove oils, rust, and debris.
Cut the needed amount of JB Weld Steel Stick, then knead equal parts until it turns an even gray and warms slightly.
Apply and press the putty firmly into place within 3–5 minutes for peak bonding. Let it cure at temperatures above 60°F for at least an hour before finishing.
Following these steps guarantees a strong, lasting repair. More detailed guidance covers preparation, application, and curing nuances.
When working with JB Weld Steel Stick, you’ll find it compatible with a range of metals including aluminum, brass, bronze, copper, iron, and stainless steel. This versatility allows you to address various repair scenarios efficiently.
You can use it for patching holes, filling gaps, and rebuilding metal surfaces subjected to wear or corrosion. Its industrial-strength polymer compound cures to a dark grey, steel-like hardness rated at 4000 PSI, ensuring durability under mechanical stress.
Steel Stick withstands temperatures up to 350°F, making it suitable for automotive exhaust systems, plumbing repairs, and structural metal maintenance. Its non-rusting formulation guarantees long-term stability in diverse environments. Proper surface preparation and thorough mixing are essential to achieve the maximum strength of the bond.
Successfully repairing metals with JB Weld Steel Stick depends heavily on how well you prepare the surfaces involved.
Begin by thoroughly cleaning the area to remove all dirt, grease, oil, and rust. Any contaminants can compromise adhesion.
Thoroughly clean to remove dirt, grease, oil, and rust for optimal adhesion and a strong repair bond.
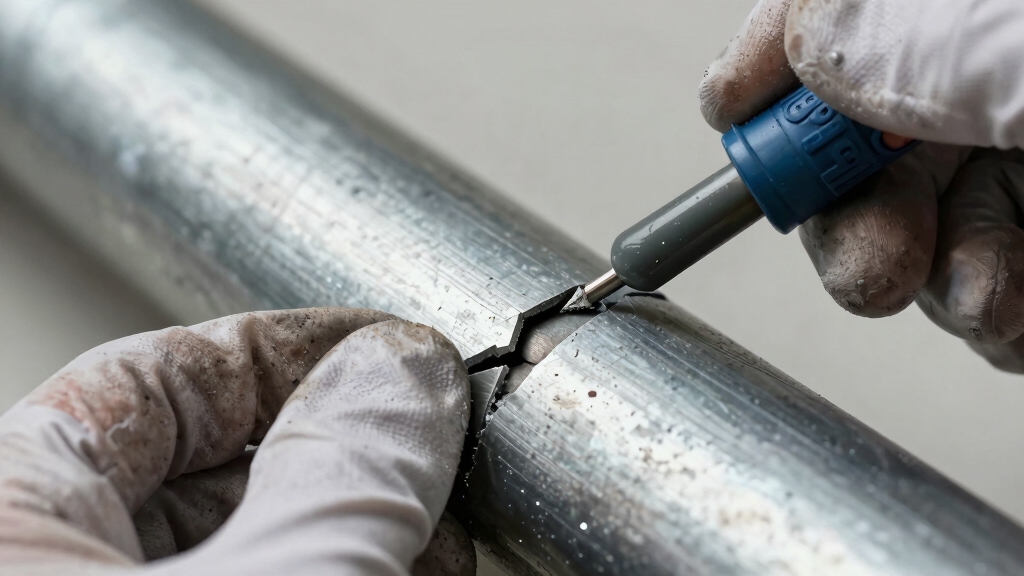
Next, mechanically roughen the surface using sandpaper, a file, or a Dremel tool to create micro-abrasions that increase bonding strength.
Smooth or polished surfaces markedly reduce the epoxy’s grip. Focus on the repair zone, ensuring you expose fresh metal.
After roughening, wipe the surface with a clean cloth to eliminate dust and debris. Properly prepared surfaces optimize the chemical and mechanical bond of the steel-reinforced epoxy putty.
This enhances the structural integrity and durability of your repair. This meticulous preparation is critical for achieving the product’s rated 4000 PSI bond strength.
Avoid applying the epoxy on surfaces below 40°F to ensure optimal curing and bonding performance with temperature considerations.
To get the best results with JB Weld Steel Stick, start by cutting off just the amount of putty you need.
Then, knead it really well until you notice the color changing from that bluish gray and black to a nice, uniform gray. This shift in color is a good sign—it means the putty is fully activated.
It’s super important to pay attention to that consistent color and tacky texture. If you don’t mix it enough, you might end up with a bond that’s weaker than you’d like.
Also, just a heads up: this putty can be a bit of a skin irritant, so make sure to wash your hands right away after you’re done handling it.
Keep in mind that JB Weld acts primarily as an electrical insulator and is best used for mechanical repairs rather than conductive applications.
Knead the JB Weld Steel Stick thoroughly with your fingers until the color is uniform and the putty reaches a tacky consistency.
This activates the epoxy’s chemical components, generating heat and ensuring a strong bond. Proper mixing is critical; incomplete blending reduces strength and curing reliability.
Cut only the required amount since the putty sets in 3-5 minutes.
Ensure you handle the putty with care and maintain proper hygiene by washing your hands after use to avoid skin irritation.
| Step | Details |
|---|---|
| Cut | Use a knife or scissors |
| Knead | 2-3 minutes until warm |
| Consistency | Tacky, pliable, not sticky |
| Safety | Wash hands; avoid skin contact |
Although mixing JB Weld Steel Stick may seem straightforward, achieving a uniform color requires careful, consistent kneading to fully activate the epoxy components.
You’ll notice the compound shifts from bluish gray and black to an even gray as the epoxy reacts and generates heat.
This uniform color signals readiness for application and guarantees peak bonding strength.
To achieve this:
Precision in mixing directly affects the durability and performance of your repair. For best results, combine proper mixing with controlled application techniques to ensure optimal adhesion and longevity.
Always wear protective gloves when handling JB Weld Steel Stick to prevent skin irritation from direct contact with the epoxy components. The putty contains reactive chemicals that can cause dermatitis if absorbed through the skin.
Avoid touching your face or eyes during mixing. Work in a well-ventilated area to minimize inhalation of any fumes. Use a clean surface or disposable mixing board to prevent contamination, which can compromise the curing process.
After kneading the putty to a uniform color, promptly apply it, as the set time is 3-5 minutes. Wash your hands thoroughly with soap and water after use, even if gloves were worn.
Store unused portions in airtight containers to prevent premature curing and maintain effectiveness for subsequent applications.
Wearing gloves also provides chemical barrier protection, reducing the risk of skin irritation and chemical exposure during handling.
To apply JB Weld Steel Stick effectively, you really want to kick things off with some solid surface preparation. Start by roughening up and cleaning the metal—this step is crucial for achieving that peak adhesion you’re after.
Once your surfaces are prepped, mix the putty until it’s nice and uniform, reaching that tacky consistency. This is key to activating the epoxy fully.
Now, here’s where it gets hands-on: press and shape the material quickly before it sets. You don’t want to dawdle!
After you’ve got it in place, just let it cure properly. This waiting time is essential for reaching maximum strength.
To ensure long-lasting results, it’s important to store and handle welding materials properly to avoid moisture absorption that can compromise bonding.
Before applying JB Weld Steel Stick, you must thoroughly prepare the surface to guarantee a strong, lasting bond. Proper surface prep enhances adhesion and ensures the epoxy putty forms a durable, industrial-strength repair.
Follow these essential steps:
Completing these steps precisely maximizes the JB Weld Steel Stick’s 4000 PSI bond strength and heat resistance up to 350°F. Additionally, using proper ventilation during preparation helps avoid inhaling harmful dust or fumes.
Once the surface is meticulously prepared, the next step involves properly mixing the JB Weld Steel Stick to activate its bonding properties. Cut off the required amount and knead it thoroughly with your fingers.
Make certain you blend the bluish-gray base and black hardener evenly until the compound achieves a uniform gray color. During mixing, the putty will warm slightly, indicating the chemical reaction has begun.
Achieving a tacky, consistent texture is vital for peak adhesion and strength. Avoid incomplete mixing, as uneven color or texture reduces bonding effectiveness and curing reliability.
Work efficiently since the set time starts as soon as the components combine. After mixing, promptly apply the putty to maintain its activated state and guarantee maximum structural integrity. Proper surface preparation and bonding techniques are as crucial as using insulating tape or epoxy to secure components in DIY welding projects.
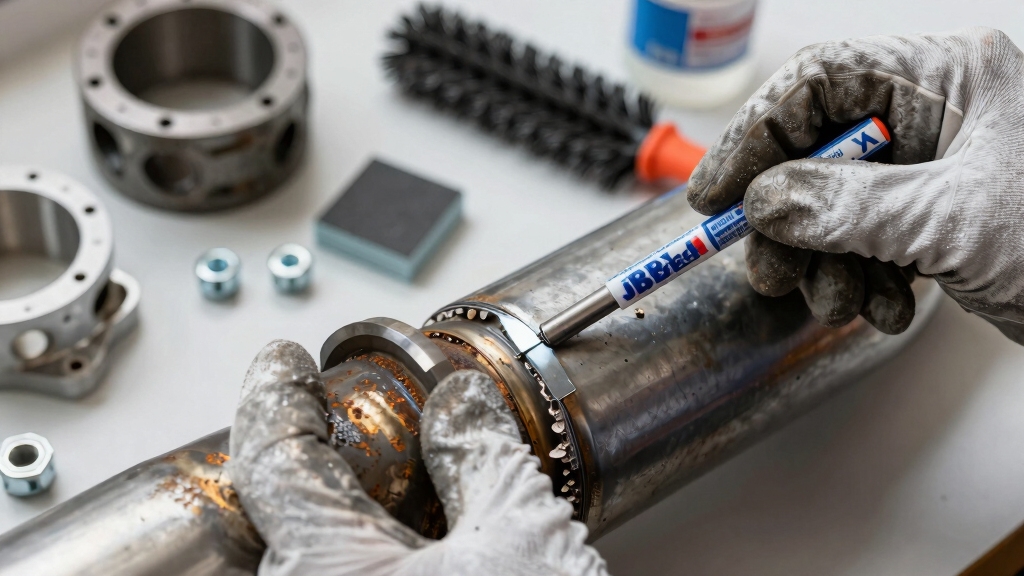
Press the thoroughly mixed JB Weld Steel Stick firmly onto the prepared surface, guaranteeing full contact and working it into crevices or gaps like a malleable putty.
Apply quickly since it sets within 3-5 minutes and mold it precisely to build up or fill holes.
The putty holds overhead without sagging, allowing efficient vertical or inverted repairs.
Once applied, allow the material to cure to achieve optimal strength and durability.
Key application and curing points to remember:
For enhanced safety during application, consider using heat-resistant gloves to protect your hands from hot surfaces or sparks.
During the curing process, JB Weld Steel Stick rapidly hardens to a rigid state within 3 to 5 minutes. You can drill, tap, machine, grind, file, or paint the repair after just one hour.
For best results, ensure surface preparation is adequate and ambient temperature is moderate. Full strength develops over 24 hours.
| Step | Timeframe | Action |
|---|---|---|
| Initial Set | 3-5 minutes | Achieves rigid state |
| Light Finishing | 60 minutes | Drill, tap, machine, paint |
| Full Cure | 24 hours | Maximum strength, heavy use |
| Ambient Conditions | Variable | Slower cure in cold temperatures |
Following these guidelines guarantees a durable, steel-like finish ready for demanding applications.
Although JB Weld Steel Stick offers reliable performance, you may occasionally encounter issues such as poor adhesion, incomplete curing, or surface cracks. Address these problems methodically to ensure peak results.
Following these steps will help you troubleshoot and correct common application challenges efficiently.
Yes, you can paint over JB Weld Steel Stick after it’s fully cured. Once it sets rigid in 3-5 minutes and cures for at least 1 hour, the surface becomes hard and stable enough to accept paint.
For best results, wait the recommended full curing time of 24 hours to guarantee maximum strength and adhesion. Lightly sanding the surface before painting improves paint bonding and finish quality.
You shouldn’t use JB Weld Steel Stick on drinking water pipes. It’s not certified for potable water systems and may leach chemicals into the water.
The epoxy contains compounds that aren’t tested or approved for safe, long-term contact with drinking water. For plumbing repairs involving potable water, opt for NSF-approved or FDA-compliant products specifically designed to guarantee water safety and regulatory compliance.
Prioritize safety and adhere to local plumbing codes.
You should use JB Weld Steel Stick immediately after mixing because its chemical reaction starts right away. This gives you a working time of about 3 to 5 minutes before it begins to set.
Storing mixed putty isn’t practical as it hardens quickly and loses adhesion properties. For best results, only mix the amount you can apply within this short window to guarantee maximum bonding strength and proper curing.
No, JB Weld Steel Stick doesn’t conduct electricity after curing.
Once fully hardened, it forms a steel-reinforced polymer compound with insulating properties.
While it has metal particles for strength, these are embedded in a non-conductive epoxy matrix, preventing electrical flow.
You shouldn’t rely on it for electrical conductivity.
Instead, use it for structural repairs on metals where electrical insulation is required or where conductivity isn’t critical.
Imagine JB Weld Steel Stick as a seasoned diver, capable but cautious. It can handle wet conditions and even brief underwater exposure once fully cured, thanks to its non-rusting, water-resistant polymer.
However, you’ll want to apply it on dry, prepped surfaces for a strong bond. Moisture during curing can weaken adhesion, so make certain surfaces are clean and dry before use.
After curing, it performs reliably in damp environments and underwater repairs.
Using JB Weld Steel Stick is like wielding a precision tool in your repair arsenal. Once you master surface prep, mixing, and application, you forge bonds as strong as steel itself.
Think of it as engineering resilience where every step, from curing to finishing, sharpens your fix. When issues arise, troubleshooting is your blueprint for success.
By following these exact techniques, you transform weak points into impenetrable joints. This ensures lasting durability in your repairs.